|
|
Post by StellarElite on Aug 19, 2018 14:48:32 GMT -5
This is a weird question but is it possible that an update can change the way uv maps display? I had spent a lot of time getting my brass end table to have the perfect reflectivity going in and out of game and adjusting the rgb channels in tiny increments. It was exactly how I wanted it. Now I went to finish the slots and get it done and the specular looks completely wrong and different than before. I've tried remapping it a bunch of times but I can't seem to get the same diagonal slanted shine I had and now it's just like these big ugly square patches of shine that look so dumb.lol Does anyone have any idea how to change orientation/direction of shine or what could have happened to my poor specular? I've spent so long on this set and every time I think I make a step forward it's like 100 steps back. This is how it should/used to look:  And this is what it looks like after latest patch:  I tried stretching the uv map, rotating it nothing seems to change it's like it's stuck like this. It's probably not the update but I just don't know/understand much so I just grasp at anything to blame lol. Any insights would be appreciated thanks. |
|
|
|
Post by inabadromance on Aug 19, 2018 18:28:10 GMT -5
Hi! I really can't tell without seeing it. Can you share the blend and package file? Is your issue related to the shiny parts that are reflecting or the intensity?
|
|
|
|
Post by StellarElite on Aug 19, 2018 22:15:19 GMT -5
Hi inabadromance thanks for responding. I feel like I'm in here whining every other day lately lol I should also get in the habit of just including files right off I'll remember to do that in the future. Here are links to the larger images so you can see I just don't like to post giant pictures in here so I reduce the size: Before: s19.postimg.cc/aeedyrm3n/red100-green50-blue75.jpg // s19.postimg.cc/ulrtr2bv7/red90-green25-blue50.jpgAfter: s19.postimg.cc/rf3ci62jn/TS4_x64_2018-08-18_16-25-26.pngPackageBlend FileI'm not sure there's really a solution and I know I'm being freakishly fussy but I figured it can't hurt to try. Basically if you look at the pictures it's kind of the orientation/shape of the shine on the object. Before it had a realistic slant and now it's like these rectangular shapes if that makes sense? Let me know if you see it in the pics and understand what I mean. I could upload larger images if need be. Thanks again for responding!! Oh also I should add that I'm using the exact same specular as before though I've tried like a hundred other different variations by now to see if I could get the same look as before. |
|
|
|
Post by inabadromance on Aug 20, 2018 0:28:23 GMT -5
If you're still using the same specular, then maybe they changed something in the game after the update. Have you tried looking to other metallic surfaces in your game and seeing how the specular is reacting?
|
|
|
|
Post by StellarElite on Aug 20, 2018 5:32:44 GMT -5
|
|
|
|
Post by menaceman44 on Aug 20, 2018 7:45:56 GMT -5
This texture is the CubeEnvMap and is basically the light reflection that you would get if you placed an object into a square room with a window in the middle of each wall. It's the game's way of faking real light reflections on metallic and glass surfaces (or anything with a high specular setting).
If you go into edit the material definition of your LODs you can see the CubeEnvMap listed and the Instance of the texture it is using. If you can locate that file (as it won't be pulled into the package) then you could possibly edit it to be slanted how you would like it to be and then import it into your package and update the CubeEnvMap entries to point to your new texture. Might be worth a shot.
|
|
|
|
Post by StellarElite on Aug 20, 2018 13:21:02 GMT -5
Hi again menaceman44 . That is interesting info thank you very much! This is why I wanted to muck about with the specular I'm not sure why but I just want to mess with it to see what happens lol. I started digging into the warehouse which I don't spend a ton of time in except to import bump/specular so I'm a bit lost. I just want to make sure I've found the right spot before I change things and eff it up. Here's the step I took to find the CubeEnvMap entries... 1. In Warehouse I clicked on Model LOD 2. Next to Meshes I clicked Edit Itims 3. Then there's a window with options on the left and info on the right. Two Dropshadows, one Phong, and one PhongAlpha. I clicked Phong 4. Then on the right under Materials section I went to Entries and clicked Edit Items 5. Then there's tons of options down the right and another Materials -> Items -> Edit Items 6. And then finally on the left here I can see CubeEnvMap. 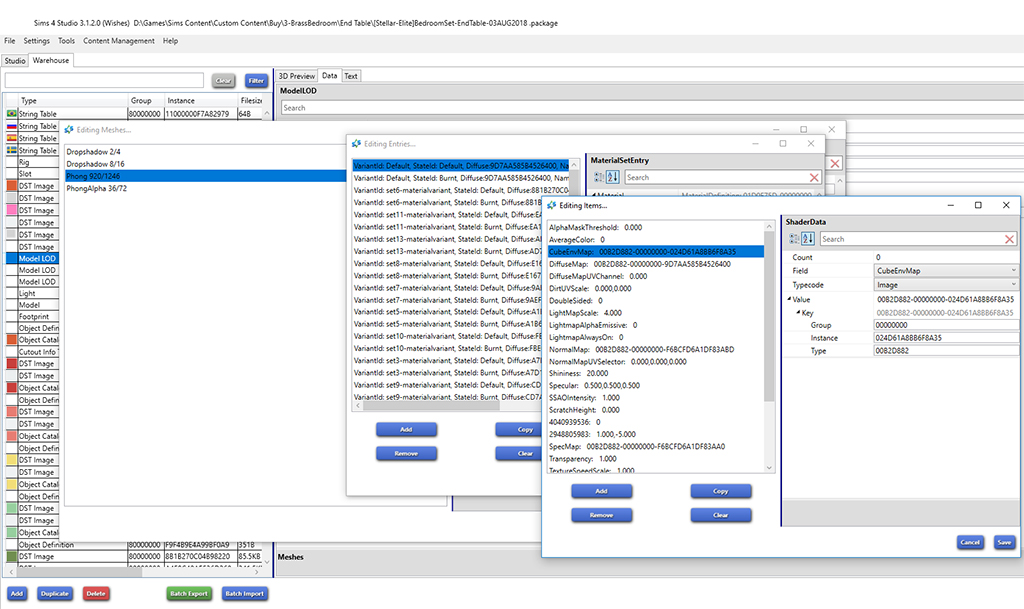 Is this the correct path to edit material definition? I tried to google it too but I'm just not sure what I'm doing. |
|
|
|
Post by menaceman44 on Aug 20, 2018 13:45:45 GMT -5
You've found it wonderfully!
What you want to take from this is the Instance number and Type of the CubeEnvMap and try to locate it within the game files. I honestly don't know the best method to go about this. Then you can extract it and make your own. When you import it to your package you will have to make sure to give it a new Instance so that it doesn't override the original one the game uses for other objects. Then you need to go and change the details in the window you have in your screenshot to point to your new image file.
One your step 5, that "ton of options" represent each different swatch for your object and any other states they have such as burnt or dirty, etc.
It's really time consuming to do after you have added all your swatches but any changes you make will have to be done for all of those entries. Unless there are some you don't want to alter in which case it is perfectly fine to leave them be.
The Dropshadow entries refer to the ground shadows for your object so they can be ignored as well as the PhongAlpha entry which will be for your glass parts.
You will also need to repeat these steps for the Model resource listed in the left on the very first Warehouse window. This affects the lower level LODs whereas the Model LOD does the highest LOD.
It's not a very complicated task but there is a LOT of clicking and text pasting involved.
Alternatively, you could delete all of your swatches except for the first one, make your changes and then add the other swatches back as they will copy the details of the first swatch.
|
|
|
|
Post by StellarElite on Aug 20, 2018 15:03:20 GMT -5
Hmm I actually just tried changing CubeEnvMap to something else from the drop-down menu with interesting results. So that was obviously not the way to go how silly of me to think it would be that easy! I even scrolled through the whole list and chose ones that seemed like they'd be normal like Specular, light direction etc. I have no idea how to find that in the files either. I just opened all the .ini files i could from the Game/Bin folder but no luck. I mean that's the only way I can think to search game files is to open every one and search lol I don't know if it would be in the .dll files but I looked into those and would need a decompiler and I dunno way too much fuss. It seems I've hit a road block so I'll probably just drop the metallic portion of the set. I just hate how it looks and cannot settle for that. I do have a set of colour swatches but they will not be as shiny so won't have to worry about that. This has all been very informative though so thanks very much for all your help on my threads I really appreciate it! Think I chose something too ambitious for my skill level  |
|
|
|
Post by menaceman44 on Aug 20, 2018 17:11:15 GMT -5
I figured out how to find it but I'm not sure about how exactly to edit it.
If you open Studio you can use the cheat console, opened the same way as in game with Ctrl-Shift-C, to view objects without actually having to clone them. Open the console and type in "object-preview" without the quotes. A new window should pop up if it worked. Now just find an object with high reflectivity, probably something with glass, and then go to the Texture tab. The CubeEnvMap texture is shown here as the first texture at the top and it can be extracted with the button at the bottom.
The thing that has me confused now is that it looks like a single square texture in Studio but if you open it in an image editor then it is actually a long rectangular image with six versions of the cube, all slightly different colours. Maybe something to play about with some time? This is new territory for me too.
|
|
|
|
Post by peacemaker on Aug 21, 2018 0:13:30 GMT -5
I know this is closed, but I see the issue and you don't need to go to the extent of editing the cube map. It is your normals on the mesh. Basically, you are making your mesh with flat normals, and this is not representative of what you are going to see in game. Always set a mesh to Smooth normals to see how it looks in blender otherwise you are going to get a rude surprise ingame when you test it. So what is happening, each end you have on the horizontal and vertical bars are being seen as smooth corners and altering how the game is 'bending' the light on it. On flat surfaces, you get 1 cube map spread over it, but once you start adding curves and corners, it starts adding them. You are seeing 2 cube maps over the horizontal bars because you effectively have 2 corners instead of making them hard edges. to fix take all the end flat peices that aren't bevelled and highlight them with the face tool. Then under the edge tool select "mark sharp" which will highlight those edges aqua. Under the modifiers menu on the right, add a new modifier called "spilt edges". Untick "edge angle" so only "sharp edges" remain. Save and import. You should end up with something like what I got here: www.dropbox.com/s/agwu8hnekn7q793/Screenshot%202018-08-21%2013.07.24.png?dl=0Now, its not exactly what you had intially, but it looks far more metallic to me then you other version, hopefully saving you from scrapping the metallic finish. |
|
|
|
Post by StellarElite on Aug 21, 2018 7:44:22 GMT -5
menaceman44 What is this magic?  The cheat console is so cool!!! I would have loved to know about this from the get go I have so many "test" packages lying around where i just wanted to steal a texture here or a mesh there but this makes things much quicker. Brilliant! Also I see what you mean with the cube map very interesting I've not seen one like this before. I've noticed when you save as DDS and then re-open it the files seem to show like every size down from what you initially set going horizontally like a weird infinity shot lol but I've never seen one like this with multiple colours in a long line up. Very weird and I'll definitely play around with this in the future. Thank you for bringing this up! peacemaker this is awesome and totally did the trick. You're right it's not like how I managed the first pass but it still does exactly what I want which is the shine animates across the object when you move rather than the painted on look that most in game objects have. I was so excited I took a quick video lol Thank you very much for this tidbit as it gives me more to think about when modelling in the future. I honestly thought it was a mapping issue so I tried multiple ways of mapping the horizontal bars. I've watched some of Blender Guru's videos and did some of a Udemy course but to be honest I go super intense trying to learn and then burn out and then come back later having forgotten a bunch of stuff. So now I'm just diving in with what knowledge I have and googling my way through the rest while banging my head against the wall. This was a big help and I can finally call this object in the set DONE and move on to the next. Thank youuuu!!! 
|
|
|
|
Post by blackgryffin on Aug 21, 2018 7:51:58 GMT -5
hello everyone  Thanks a lot for this very interesting thread. Since Seasons, there is the same "cube map" problem with some of the floor paints such as grass. Result, in game, grass colors are much more bright and hard colored than the texture used. New territory for me too. If we have to play with the CubeEnvMap values, how to know what value scale to use to get something less flashy ? |
|
|
|
Post by StellarElite on Aug 21, 2018 8:11:09 GMT -5
blackgryffin I'm really not sure but I would maybe start with lowering the Alpha? It looks like it's full white when I look at the file see below:   Like maybe do a selection on the white portion and in the alpha channel fill with 50% grey as as start and see what that does? Playing with the channel mixer on the normal layer would be my next thought but I really don't know what each section represents since there's more than three. However changing the shape of it might be interesting if you don't want a cube? 
|
|
|
|
Post by blackgryffin on Aug 21, 2018 9:02:00 GMT -5
Already did that  but it was not enough at all. Thanks a lot for your answer. Right now, I slim the informations AND the call to the specular and the bump files since the 44 Floorpaints Mod intends to replace the Maxis ones. The problem appears only since Seasons. I was asking to level directly the CubeEnvMap values in order to avoid a wrong call or call nothing which could give an error in game. Will come back to tell you if it works or not (xx) |
|


 but it was not enough at all. Thanks a lot for your answer.