


Tutorial: Converting an accessory's look in to glass
May 10, 2015 6:56:00 GMT -5
orangemittens, fufu508, and 3 more like this
Post by untraditionalnerd on May 10, 2015 6:56:00 GMT -5
In this short tutorial you’ll learn how to convert a part of an accessory to give it a solid transparent appearance; duplicating the look and material quality of glass. We’ll be using earrings as our example for this tutorial; however you my use any accessory.
Programs Required:
Sims 4 Studio
any 2D editor with a DDS plugin and
Blender 2.70
Tutorial Instructions:
1_ Open S4S > Create a new mesh
2_ The editor (S4S) will give us a variety of clothing, shoes, hair, and accessory options. Using the organization/search tabs we will select Female, Adult, and Accessory to find our earrings we wish to work on (these options can be changed depending on your personal goals while using this tutorial).
3_ Select the Diamond Accessory (earring); highlighting the item’s image. Upon selecting various colors from the same type/style, they too will be highlighted. This corresponds to the package’s color swatches options and textures.
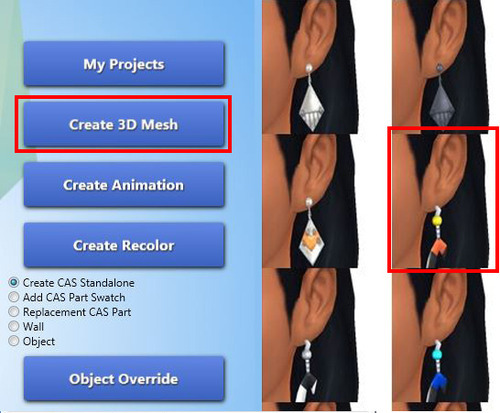
Select Next to confirm and save into a package format.
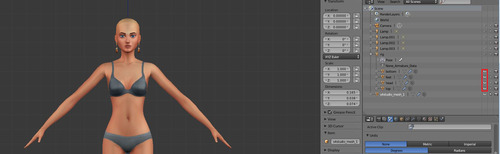
4_ The 3D model will then be loaded, along with our color Swatches, Textures, and Meshes.
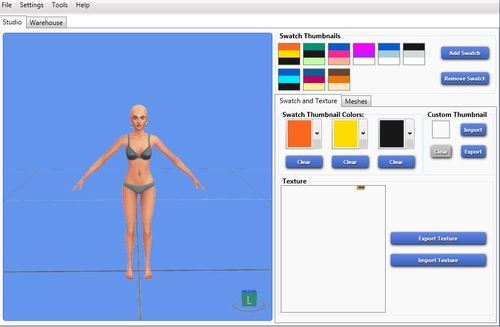
Export the textures of the accessory colors that you wish to use and save each into a DDS format. In my case I have acquired all of the colors available for my earrings because I wanted to convert each color. (You many use a custom texture which can be treated as a stand-alone texture for the earring/accessory).
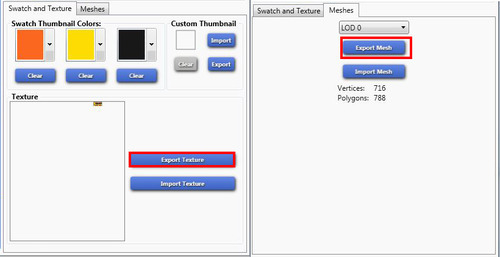
Next step is to export one mesh of the earrings by using the mesh tab. By default it will set on LOD0 so there is no need to change. Exporting and saving will create a .blend format for this mesh.
5_ At this point we are done with this package, texture and mesh for our earrings. We now need a new base package with 2 geometries for each LOD. The best one to use is the package of the Sunglasses.
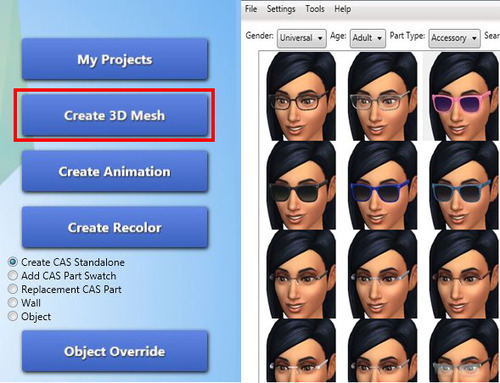
Repeating steps 2-4 for the Sunglasses, we then acquire and save the LOD0 mesh into .blend format. By now you will have 2 .blend files (earrings and sunglasses) and at least 1 texture of the earrings.
6_ Using Blender, open the earrings mesh and hide all the body parts of the mannequin.
Right click on the earrings, press DOT on the num pad to zoom closer and press tab to switch to edit mode or change to edit mode by clicking on object mode and selecting edit mode.

7_ Next select all the elements to be converted into glass. Now that you’re in edit mode the tool bar under your model with change in to this:

Hold shift and start selecting the elements. To make the selection easier you could switch from vertex selection to face selection (which is the square with a yellow face). Press “B” to enter in rectangular selection mode to speed up the process. Once you’re done selecting, it should look something like this:

8_ Once the selection is complete press “P”. By pressing “P” a window will open and the option highlighted should be “Selection”. Press enter and the mesh will split into two different objects. At your right a new object called s4studio_mesh_1_001 will appear. Press tab again to switch to object mode and right click on the pendant that we just split. Save
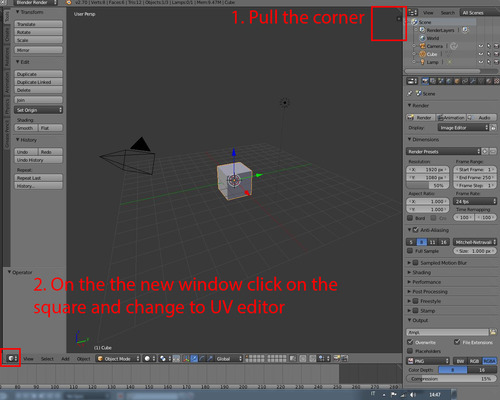
(Optional) At this point have the option to extract the UV map layer to use as a guide for re-coloring. To do so, highlight the pendant and press TAB again to enter edit mode. On your left you should have the UV map editor (if not click on the corner of the 3D window and open a new window and switch to UV map).
Something like this will appear:
Switch the UV map picture to the diffuse map. With the cursor over the 3D model press “A” till everything is highlighted. Now go on the bottom bar of the UV editor window, click on UVs and on the top of the list you will see Export UVs layout. Save the file.
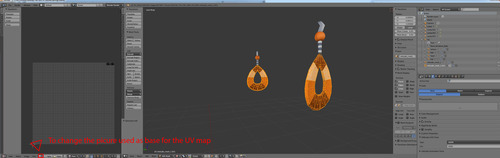
9_ Now open the sunglasses’ blender file. Hide all the body parts of the mannequin. Press shift+F1 (or file, then append) and select the earrings blender file. Once there, select the folder “objects” and double click s4studio_mesh_1. Repeat step 9 for s4studio_mesh_1_001 as well.
You should have something like this:
10_ Select the lens by right clicking on them and press TAB to switch the mode into edit mode. Press “A” to select all and then press “G” to move them far from the earrings. Once done press TAB to exit edit mode. Right click on the sunglasses’ structure and repeat what you did for the lens. This step is not really required in this case but it’s useful in case multiple objects intersect making the deleting process difficult.
Time to merge!
11_ s4studio_mesh_1 is the lens and s4studio_mesh_2 is the structure. That means we have to merge the object that will be glass with s4studio_mesh_1 and the matt part with s4studio_mesh_2. If you followed my order the pendant should be s4studio_mesh_1_002 and the hook should be s4studio_mesh_1_0001. Once you make sure what is what in Object mode hold shift and click on the hook and then on the sunglasses’ structure. Now press Ctrl+J to merge the 2 objects together. Repeat with pendant to lens. Remember that the selection order is really important because the last object to be selected will be the one to retain the name and all its information.

12_ Once everything is merged it’s time to delete the sunglasses. Enter edit mode for each object and delete the lens and the structure. Save this. Congratulations the mesh part is done
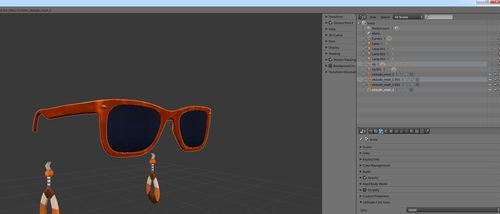
13_Back to S4S and import the blender file that you just saved. It should look something like this:

About LOD 1-2-3: I usually import the same blender file for LOD 1. To do so click on LOD 0 switch to LOD 1 and import the blender file.
For the remaining LODs there are two options. There is a group of packages that have 2 geometries for each LOD and some that have 2 geometries for LOD0-1 and only 1 for LOD2-3.
A) In the first case you could use the blender file that you worked on with 2 geometries. You could also use a blender tool called Decimate to remove some faces from the objects and use that file for LOD2-3.
B) In case the package you picked has LOD2-3 with only 1 geometry you could either use the original LOD2-3 from the original earring package or simply use the original blender file of the earrings with only 1 object.
14_ Before working on the texture switch to warehouse (left top corner).
As you can see I used the Glasses with 2 geometries each LOD:
To recognize what is what just remember the order in your blender file. lens>pendant
structure>hook.
This means first geometry is the lens object and second is the structure and so on. (Even if I’m almost sure in this particular case is always like that). You should always check the geometries before modifying their related info.
Select the lens geometry and switch to data tab and scroll down till you see the information related the material. What we need to make sure is that the “Shader” for the lens is set as Simglass. Since we used the geometry that used to be the lens it should be correct but it never hurts to check :3.
In the warehouse list you will see a file listed called CAS Part. That’s the file that tells the game what your item is. Here you can set who’s going to use it and what body part that item is related to.
We need to change from glasses to earrings. You will have to edit each CAS part file in the list since there is 1 for each color swatch.
Last thing to do is to edit the RLES file. The RLES file is the specular image. Since it’s not easy to edit the best way yo go is to replace it with a blank file which can be found here with a related tutorial written by Orangemittens
15_Texture time!
We need to open the earring’s DDS that we exported earlier. We could use it as is but we would not have the result we are looking for. Remember the PNG you exported earlier with the UV on it? It’s time to open it and paste it in the DDS as layer. Next step is to set the UV map layer active and select outside the grid with the magic wand. Invert the selection and swap from RGB channels to Alpha channel.

Now with the brush or the bucket tool fill the area using a scale of grey. Remember: You should pick the grey according to this “White is mat and black is transparent”.
It should look something like this:
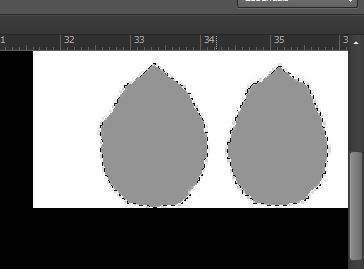
16_Once done, save and remember to hide/delete the UV map layer in case you used it. Go back to S4S and import the DDS we just finished editing. In case you are converting an accessory with multiple color swatches you can paste the texture in to the DDS you just finished to work on and save.
Congratulations you've just finished converting the earring and it’s time to test it in game
For an example go here
For any question or issue replay to this post
UN
Programs Required:
Sims 4 Studio
any 2D editor with a DDS plugin and
Blender 2.70
Tutorial Instructions:
1_ Open S4S > Create a new mesh
2_ The editor (S4S) will give us a variety of clothing, shoes, hair, and accessory options. Using the organization/search tabs we will select Female, Adult, and Accessory to find our earrings we wish to work on (these options can be changed depending on your personal goals while using this tutorial).
3_ Select the Diamond Accessory (earring); highlighting the item’s image. Upon selecting various colors from the same type/style, they too will be highlighted. This corresponds to the package’s color swatches options and textures.
Select Next to confirm and save into a package format.
4_ The 3D model will then be loaded, along with our color Swatches, Textures, and Meshes.
Export the textures of the accessory colors that you wish to use and save each into a DDS format. In my case I have acquired all of the colors available for my earrings because I wanted to convert each color. (You many use a custom texture which can be treated as a stand-alone texture for the earring/accessory).
Next step is to export one mesh of the earrings by using the mesh tab. By default it will set on LOD0 so there is no need to change. Exporting and saving will create a .blend format for this mesh.
5_ At this point we are done with this package, texture and mesh for our earrings. We now need a new base package with 2 geometries for each LOD. The best one to use is the package of the Sunglasses.
Repeating steps 2-4 for the Sunglasses, we then acquire and save the LOD0 mesh into .blend format. By now you will have 2 .blend files (earrings and sunglasses) and at least 1 texture of the earrings.
6_ Using Blender, open the earrings mesh and hide all the body parts of the mannequin.
Right click on the earrings, press DOT on the num pad to zoom closer and press tab to switch to edit mode or change to edit mode by clicking on object mode and selecting edit mode.
7_ Next select all the elements to be converted into glass. Now that you’re in edit mode the tool bar under your model with change in to this:
Hold shift and start selecting the elements. To make the selection easier you could switch from vertex selection to face selection (which is the square with a yellow face). Press “B” to enter in rectangular selection mode to speed up the process. Once you’re done selecting, it should look something like this:
8_ Once the selection is complete press “P”. By pressing “P” a window will open and the option highlighted should be “Selection”. Press enter and the mesh will split into two different objects. At your right a new object called s4studio_mesh_1_001 will appear. Press tab again to switch to object mode and right click on the pendant that we just split. Save

(Optional) At this point have the option to extract the UV map layer to use as a guide for re-coloring. To do so, highlight the pendant and press TAB again to enter edit mode. On your left you should have the UV map editor (if not click on the corner of the 3D window and open a new window and switch to UV map).
Something like this will appear:
Switch the UV map picture to the diffuse map. With the cursor over the 3D model press “A” till everything is highlighted. Now go on the bottom bar of the UV editor window, click on UVs and on the top of the list you will see Export UVs layout. Save the file.
9_ Now open the sunglasses’ blender file. Hide all the body parts of the mannequin. Press shift+F1 (or file, then append) and select the earrings blender file. Once there, select the folder “objects” and double click s4studio_mesh_1. Repeat step 9 for s4studio_mesh_1_001 as well.
You should have something like this:
10_ Select the lens by right clicking on them and press TAB to switch the mode into edit mode. Press “A” to select all and then press “G” to move them far from the earrings. Once done press TAB to exit edit mode. Right click on the sunglasses’ structure and repeat what you did for the lens. This step is not really required in this case but it’s useful in case multiple objects intersect making the deleting process difficult.
Time to merge!
11_ s4studio_mesh_1 is the lens and s4studio_mesh_2 is the structure. That means we have to merge the object that will be glass with s4studio_mesh_1 and the matt part with s4studio_mesh_2. If you followed my order the pendant should be s4studio_mesh_1_002 and the hook should be s4studio_mesh_1_0001. Once you make sure what is what in Object mode hold shift and click on the hook and then on the sunglasses’ structure. Now press Ctrl+J to merge the 2 objects together. Repeat with pendant to lens. Remember that the selection order is really important because the last object to be selected will be the one to retain the name and all its information.
12_ Once everything is merged it’s time to delete the sunglasses. Enter edit mode for each object and delete the lens and the structure. Save this. Congratulations the mesh part is done
13_Back to S4S and import the blender file that you just saved. It should look something like this:
About LOD 1-2-3: I usually import the same blender file for LOD 1. To do so click on LOD 0 switch to LOD 1 and import the blender file.
For the remaining LODs there are two options. There is a group of packages that have 2 geometries for each LOD and some that have 2 geometries for LOD0-1 and only 1 for LOD2-3.
A) In the first case you could use the blender file that you worked on with 2 geometries. You could also use a blender tool called Decimate to remove some faces from the objects and use that file for LOD2-3.
B) In case the package you picked has LOD2-3 with only 1 geometry you could either use the original LOD2-3 from the original earring package or simply use the original blender file of the earrings with only 1 object.
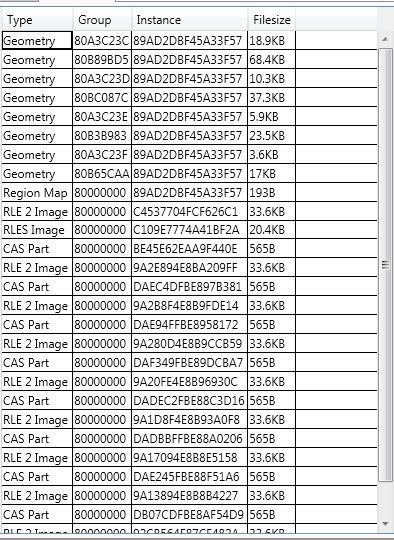
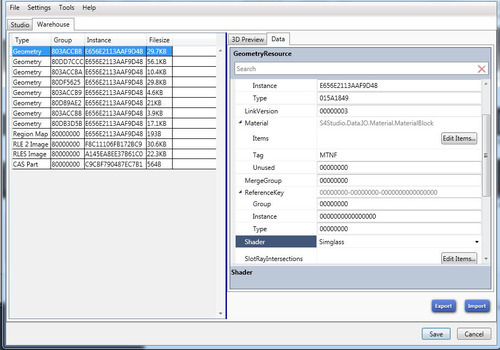
14_ Before working on the texture switch to warehouse (left top corner).
As you can see I used the Glasses with 2 geometries each LOD:
To recognize what is what just remember the order in your blender file. lens>pendant
structure>hook.
This means first geometry is the lens object and second is the structure and so on. (Even if I’m almost sure in this particular case is always like that). You should always check the geometries before modifying their related info.
Select the lens geometry and switch to data tab and scroll down till you see the information related the material. What we need to make sure is that the “Shader” for the lens is set as Simglass. Since we used the geometry that used to be the lens it should be correct but it never hurts to check :3.
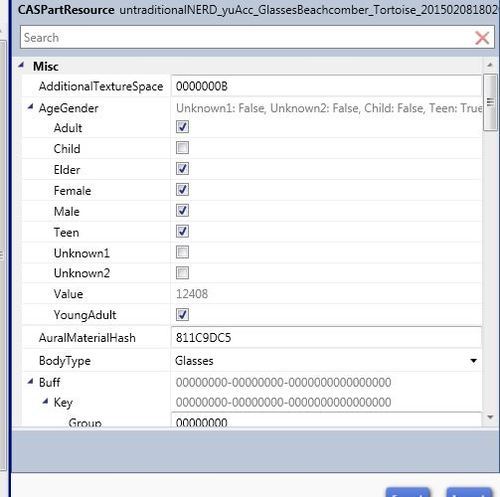
In the warehouse list you will see a file listed called CAS Part. That’s the file that tells the game what your item is. Here you can set who’s going to use it and what body part that item is related to.
We need to change from glasses to earrings. You will have to edit each CAS part file in the list since there is 1 for each color swatch.
Last thing to do is to edit the RLES file. The RLES file is the specular image. Since it’s not easy to edit the best way yo go is to replace it with a blank file which can be found here with a related tutorial written by Orangemittens
15_Texture time!
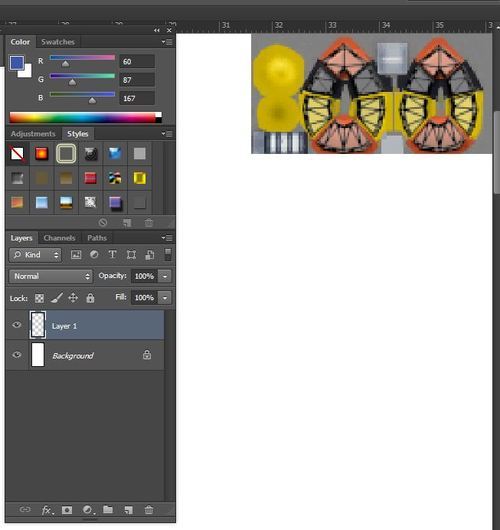
We need to open the earring’s DDS that we exported earlier. We could use it as is but we would not have the result we are looking for. Remember the PNG you exported earlier with the UV on it? It’s time to open it and paste it in the DDS as layer. Next step is to set the UV map layer active and select outside the grid with the magic wand. Invert the selection and swap from RGB channels to Alpha channel.
Now with the brush or the bucket tool fill the area using a scale of grey. Remember: You should pick the grey according to this “White is mat and black is transparent”.
It should look something like this:
16_Once done, save and remember to hide/delete the UV map layer in case you used it. Go back to S4S and import the DDS we just finished editing. In case you are converting an accessory with multiple color swatches you can paste the texture in to the DDS you just finished to work on and save.
Congratulations you've just finished converting the earring and it’s time to test it in game
For an example go here
For any question or issue replay to this post
UN


