|
|
Post by firfurcio on Feb 13, 2019 13:33:41 GMT -5
I'm trying to make a chonmage (a traditional samurai hairstyle) for my samurai Sim, but I'm having issues with it, and I've tried pretty much everything I can think of (not that I can think of that many things to begin with, since I'm kind of a newbie when it comes to Blender, and even more of a newbie to making Sims 4 hair... this is my first try). I made the mesh by editing the base game's receding hairstyle, but I must have broken something along the way, because when I load the mesh into Sims4Studio it looks like this:
(I made a basic diffuse map in blue and red to test out some things; the black parts shouldn't be there)
---
Also, when I load the mod into Sims 4, the "ponytail" part of my mesh floats above the Sim's head for some reason. :(
I'm pretty desperate at this point, so... any charitable souls out there who can fix this for me, or at least tell me what I'm doing wrong?
|
|
|
|
Post by inabadromance on Feb 13, 2019 15:15:04 GMT -5
Hi! There's some things you need to fix in your mesh. When you move parts around usually this is the way to go, since weights and other things change depending on where the mesh is placed on the body. Select the first s4studio_mesh_1 group. You'll fix this and then you'll clone the other groups after you've done and tested this one. - Weight transfer: Go into edit mode and delete all vertex groups. Select the first bone from the list and click the - button next to it. Keep clicking the minus button until all bones are deleted. 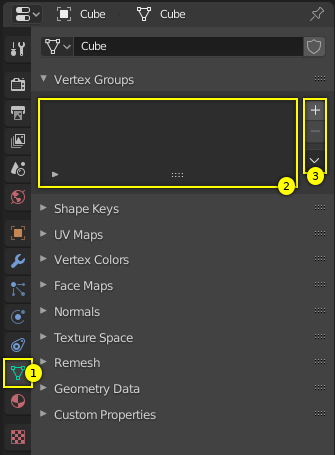 Follow the WEIGHT TRANSFER tutorial. - UV_1: Just as what happened with weights, you'll need to re do the uv_1 that controls morphs. Not only that but there's an extra uv in the list that shouldn't be there:  Select uv_1 and delete it. Do the same with uv_2. Now follow this UV_1 VIDEO TUTORIAL (form 2:32) using the same reference mesh as you used for weights. |
|
|
|
Post by firfurcio on Feb 14, 2019 8:47:03 GMT -5
Thank you SO MUCH for the advice, Ms. Inabadromance! It worked like a charm! Now that I got that fixed, I have a couple more questions, if it's not too much of a bother.  1) I'm going to make the chopped/hat versions of the hair now, and even though I read two tutorials about it, they both gave contradicting instructions. In which order do I have to place the meshes in Blender and/or what names should I give to each mesh for Sims4Studio to identify them correctly? 2) In order to make the different LOD meshes, I read somewhere that the quickest way is to use the command "Decimate". Where can I find that command? I've been looking around in the Blender options, but I couldn't find it. Thank you very much again! :D |
|
|
|
Post by inabadromance on Feb 14, 2019 11:05:44 GMT -5
yay! glad to heart things are moving nicely . 1- The basic premise on how to import anything (applies to build/buy too) is to have your blend composed as CLOSELY as the original. having said that, I suggest you export or open the original hair you cloned and compare it to yours. check the first hat chop, its meshgroup name (s4_mesh_x , renaming your mesh group isn't mandatory but it helps you to organize your blend) and its cut number. that's what your own hat chop should have. same with the next mesh group's hat chop. remember that your blend should only have 3 mesh groups, off you have any other that's visible or hidden remember to delete it prior import. - 2: here's a guide that will help you out: sims4studio.com/thread/1031/reduce-mesh-poly-count. don't hesitate to ask if you don't understand something . |
|
|
|
Post by sammoyke on Dec 23, 2021 20:47:57 GMT -5
Did you ever finish this? I really need this style and after an hour of looking this is literally the only attempt of this style i have found and would really be interested in acquiring it.
|
|


