|
|
Post by Cosmic Epiphany on Apr 4, 2019 19:01:50 GMT -5
Hi all, just joined the forum and I'm dipping my feet into modding hair for the first time. I've made some color swatches for hair, added new swatches to posters, etc. But I've never actually modified a mesh before. I'm trying to create a friend's character in-game and one of Kijiko's hairstyles is pretty much what I need, except the bangs are a bit too long and I need to shorten the back a bit. Kijiko's policy on modifying their work is that it is okay if you do not intend to share it with anyone else, which I do not intend to do so, as my friend does not play the Sims. This would be for my own personal use. I've been following this tutorial, but when I get to the part where you actually shorten the hair, Blender does not behave correctly for me at all. Instead of bringing the hair upward (following the instructions in the comments to select the section you want to move and pressing S), it moves sideways or bulges forward, not moving cleanly upward as shown in the video, even though I am making sure to move it on a single axis as well. I'm wondering what I am doing wrong and if someone could shed any light on it. Or if perhaps there is an easier way for me to accomplish what I want to do. I can provide the package file for the hair in question if you'd like me to. :3  This is how I want the hair to look when I shorten it.   This is how the hair looks when I try to shorten the bangs. They stretch and don't actually move upward cleanly like in the video. |
|
|
|
Post by mauvemorn on Apr 5, 2019 3:04:06 GMT -5
Hi. Let's start by getting our hotkeys right. S to scale, G to move, R to rotate. Following the first two with X (while in 3D window) will constrain modifications to horizontal axis, with Z to vertical, with Y to, um, perpendicular to them(depth). In UV editor X is for horizontal and Y is for vertical. Following R with a number will rotate the mesh by that number.
SO what you need to do here is, first, press S Z and move it to the side to scale it down. Then you press G Z to move it up.
|
|
|
|
Post by Cosmic Epiphany on Apr 5, 2019 14:18:13 GMT -5
Hi. Let's start by getting our hotkeys right. S to scale, G to move, R to rotate. Following the first two with X (while in 3D window) will constrain modifications to horizontal axis, with Z to vertical, with Y to, um, perpendicular to them(depth). In UV editor X is for horizontal and Y is for vertical. Following R with a number will rotate the mesh by that number. SO what you need to do here is, first, press S Z and move it to the side to scale it down. Then you press G Z to move it up. Hi mauvemorn , thank you for replying! I took your advice and followed your instructions, but for some reason the hair still remains where it was even when I move it upward. It seems like a copy of it is being made rather than the actual mesh being moved?  For reference, I am doing all of this in Edit Mode. |
|
|
|
Post by mauvemorn on Apr 5, 2019 15:27:59 GMT -5
Hair blends have 3 meshes, two of which are meant to interact with hats. So what you're seeing are the other two meshes. You didn't join them, right( it looks like you did)? If you don't plan on using this hair with hats, hide the other two and edit only the one that has cut number 0002. If not, you can use multiedit addon to edit all 3 simultaneously. blenderartists.org/t/multiedit-version-1-0-multiple-objects-editing/612538Anyway, please share the link for this hair if you need more details |
|
|
|
Post by Cosmic Epiphany on Apr 5, 2019 15:54:28 GMT -5
Hi mauvemorn. I'm only editing cut number 002; I have also had both of the hat cuts hidden from the beginning. I still can't seem to move the entire mesh in one clean motion, though. It's quite puzzling. I've been fiddling with the mesh in Blender for a few hours and can't seem to get the same result as the video. I even tried deleting the hat cuts to see if they were interfering with it, but no dice. If you'd like, you can take a look at it yourself; I have it on my Google Drive. Maybe you can give me some insight. c: |
|
|
|
Post by simadream on Apr 6, 2019 7:57:58 GMT -5
it looks like you're not really selecting all of the mesh, so since some vertices are still connected to vertices that you didn't select, they stretch to still be connected to the ones that stayed in place. Try selecting whole pieces of hair by holding down L and hovering over the hair you want to shorten. Move around the mesh and use zoom after hitting num 5 on the keyboard to see through the mesh and make sure everything that you want to affect is selected. You might need to unselect this button (limit selection to visible) to get all the hair you want, though you want to be careful so that you don't select hair pieces you don't want, since it 'sees' through the mesh. 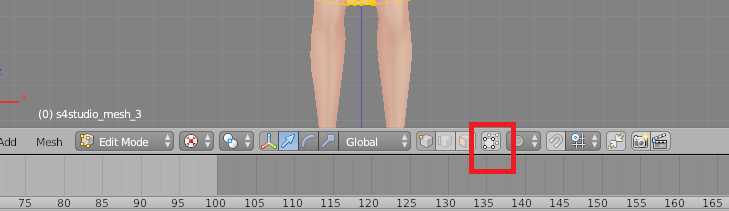 |
|
|
|
Post by Cosmic Epiphany on Apr 7, 2019 14:32:11 GMT -5
it looks like you're not really selecting all of the mesh, so since some vertices are still connected to vertices that you didn't select, they stretch to still be connected to the ones that stayed in place. Try selecting whole pieces of hair by holding down L and hovering over the hair you want to shorten. Move around the mesh and use zoom after hitting num 5 on the keyboard to see through the mesh and make sure everything that you want to affect is selected. You might need to unselect this button (limit selection to visible) to get all the hair you want, though you want to be careful so that you don't select hair pieces you don't want, since it 'sees' through the mesh. Hmmm, I think you are correct. I'll have to try this! I'll report back later with my results. |
|


