|
|
Post by sindel910 on Aug 3, 2019 22:14:21 GMT -5
I have looked at literally every tutorial out there to try and append this pair of scissors to my sims hand. I have the pair of scissors all ready. They are the right color and they fit perfectly in my sims hand, but every time I try to bring it into the game something goes wrong. Not to mention I haven't even started trying to fix the texture problem as when I append the object in, it creates its own texture separate from the size its supposed to be and it's getting infuriating! Can someone help me, better yet, someone who is good at blender, do me the hugest favor and do this for me? I'm trying to get to work on a machinima   |
|
|
|
Post by sindel910 on Aug 3, 2019 22:17:43 GMT -5
|
|
|
|
Post by mauvemorn on Aug 4, 2019 15:28:54 GMT -5
Hi. Check this tutorialThey do not mention how to make a uv_0 and uv_1 map though Just put uvs in a uv_0 map in the right placeInstead of doing a uv_1, just vertex paint the mesh with black to disable the ability to be affected by sliders |
|
|
|
Post by sindel910 on Aug 4, 2019 17:56:11 GMT -5
Hi. Check this tutorialThey do not mention how to make a uv_0 and uv_1 map though Just put uvs in a uv_0 map in the right placeInstead of doing a uv_1, just vertex paint the mesh with black to disable the ability to be affected by sliders Hi~ Thanks for the help. I followed the tutorials word for word but when I tried it in game, it acted the same way the other tutorials I followed resulted it into acting. It follows the sims hand, but its like a little far from where its supposed to be so its floating. It even squishes, may become flat on how the sim's hand moves. Its makes it seem so bendable, which is weird because I did the vertex paint part correctly. I haven't even started on the texture yet. :(      |
|
|
|
Post by mauvemorn on Aug 5, 2019 8:56:25 GMT -5
Ok, say, you start a package from a right hand bracelet. You export the blend and look at its vertex groups. Then you DELETE ALL meshgroup's vertex groups in the blend for scissors REGARDLESS OF THEIR NAMES and create new ones, same number of vertex groups and same names as the bracelet
|
|
|
|
Post by sindel910 on Aug 5, 2019 20:42:50 GMT -5
Ok, say, you start a package from a right hand bracelet. You export the blend and look at its vertex groups. Then you DELETE ALL meshgroup's vertex groups in the blend for scissors REGARDLESS OF THEIR NAMES and create new ones, same number of vertex groups and same names as the bracelet Yay!~ It works now! Thank you! The mesh looks a little wonky but I think it's the fact that I still don't have the texture. I still can't figure out how to get it to fit in the ring spot.  |
|
|
|
Post by mauvemorn on Aug 7, 2019 2:53:57 GMT -5
S to scale, G to move, R to rotate. Following the first two with X or Y constrains modification to horizontal or vertical axes.
Select all uvs with A, set the background image, press S Y .5 to shrink it. Press S and shrink it to the right size. Press move and put it where you need it
|
|
|
|
Post by sindel910 on Aug 8, 2019 1:47:03 GMT -5
S to scale, G to move, R to rotate. Following the first two with X or Y constrains modification to horizontal or vertical axes. Select all uvs with A, set the background image, press S Y .5 to shrink it. Press S and shrink it to the right size. Press move and put it where you need it Omg! It worked! I have the texture! Finally, its just the mesh thats messed up. It's strange. It doesnt look like this in studio. And it looks as though it changes with the sims size which is weird cuz ther vertex paint is on.    |
|
|
|
Post by mauvemorn on Aug 8, 2019 2:03:55 GMT -5
The pics do not work.
The mesh must be assigned to one bone (hand) only. To do this, switch to Edit mode, select your whole mesh with A, find a vertex group called something like Hand_R, click assign. Then switch to Weight paint and use Clean set to All groups
|
|
|
|
Post by sindel910 on Aug 8, 2019 12:40:53 GMT -5
The pics do not work. The mesh must be assigned to one bone (hand) only. To do this, switch to Edit mode, select your whole mesh with A, find a vertex group called something like Hand_R, click assign. Then switch to Weight paint and use Clean set to All groups Ugh the way to upload photos is complicated. I do have it assigned to one bone. But Clean set to all groups? I'll have to look for that.    |
|
|
|
Post by sindel910 on Aug 8, 2019 12:59:23 GMT -5
The pics do not work. The mesh must be assigned to one bone (hand) only. To do this, switch to Edit mode, select your whole mesh with A, find a vertex group called something like Hand_R, click assign. Then switch to Weight paint and use Clean set to All groups Update, the mesh is fine when the sim is extremely skinny now but when they get bigger, the mesh messes up.   |
|
|
|
Post by Feyona on Aug 8, 2019 16:52:48 GMT -5
Share your new .blend and .package.
|
|
|
|
Post by sindel910 on Aug 9, 2019 2:11:30 GMT -5
|
|
|
|
Post by Feyona on Aug 9, 2019 2:46:11 GMT -5
You have uv_1 where uv map is placed in the middle. That's why you get distortion. You need to select entire uv map on uv_1, scaled it down to one dot (S and press 0) then open N-tab and enter 0 in X and Y coordinates, dot will be moved to the left corner in the bottom and this way it won't be affected by sliders. 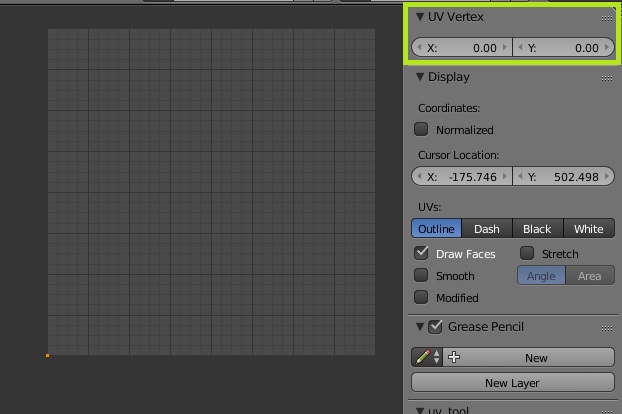 |
|
|
|
Post by mauvemorn on Aug 9, 2019 11:00:23 GMT -5
Instead of doing a uv_1, just vertex paint the mesh with black to disable the ability to be affected by sliders You skipped this step which is the reason the mesh was being affected by deformation maps |
|


