b0re
Member
 How hilarious / You just set off my trap card / Your death approaches
Posts: 11
|
Post by b0re on Aug 13, 2019 21:42:14 GMT -5
Hi, there! Sorry to bother you guys. I am working on converting a hair from Sims 3 into Sims 4. This is only the SECOND time I've done it--the first one was successful, following all the helpful tutorials here. (Thank you so much for your efforts!) This particular one, however, is not. When I open S4S and import the mesh, somehow, it's not showing up / it's not importing at all. I know it's not importing because the polycount information in S4S does not change, it's still showing the old polycount of the EA base that I'm importing over. I apologize if that doesn't make sense... And I checked the cut numbers. I checked the index here and tried looking up any sort of tutorial related to cut numbers, I was pretty sure I did most of those correctly. Or so I hope. *sniff* This is the hair:  I'll list the things that I've tried: 1- I tried changing the cut numbers to match the cut numbers of the EA hair that I was importing it over. Please see images:    outcome: did not work. 2- I tried changing the cut numbers in ascending order instead. so it went like: s4studio_mesh_1 => 0000 s4studio_mesh_2 => 0001 s4studio_mesh_3 => 0002 outcome: did not work. 3- I tried changing the base hair that I'm importing it over in S4S, maybe the one I had was borked... outcome: did not work. Other information: POLYS: The hair is only 3049 polys, so I'm sure the polys aren't an issue. VERTEX GROUPS: It's only assigned to one bone / weight / group, in this case, the "Head" since I figured this was a really short hair... VERTEX PAINT: Colored 007F00, I looked at a recently released hair by another creator and checked the HEX code of it and copied it from there. Again, this is my second one, the first one worked out fine so... I'm not sure why it's not importing this time around. I didn't do anything to deviate and the difficulty level is the same, both this hair and my first one were not complex meshes... I'm stumped, and I would truly appreciate any help! Hope you all have a great day. I apologize if this problem has already been posted, please feel free to just link me to it and I'll go ahead and read up on it! |
|
|
|
Post by squari on Aug 13, 2019 22:39:13 GMT -5
Can you upload your .blend file? You checked a lot of good stuff but it'd help pinpoint the problem.
|
|
b0re
Member
How hilarious / You just set off my trap card / Your death approaches
Posts: 11
|
Post by b0re on Aug 13, 2019 22:58:13 GMT -5
Can you upload your .blend file? You checked a lot of good stuff but it'd help pinpoint the problem. Sure thing! one second-- Here you go  please let me know if the link doesn't work or what ^_^ |
|
|
|
Post by squari on Aug 13, 2019 23:28:42 GMT -5
Okay, so the first thing I noticed when I looked at your picture was that there are strange spots all over the hair in different shades of grey. Usually when there's weird stuff going on with geometry and lighting and stuff I kind of assume it's a normal problem. If you don't know (and if you do, ignore me), normals are basically the direction that a face of a mesh is facing. So if the normal is facing outwards then you will have a solid box and the inside of the box will be transparent. If your normals are facing every direction then it looks like that picture, apparently! For some reason that I'm not aware of, your file is not displaying normals correctly (it's probably just a checkbox somewhere, not a big deal). If I look at the backside of a piece of hair, it looks the same as the front side. I just cloned a new hair and copied your mesh into that file and deleted the hat chop that I wanted to replace and changed the GEOM number to match the replaced hat chop. Then I fixed the normals. 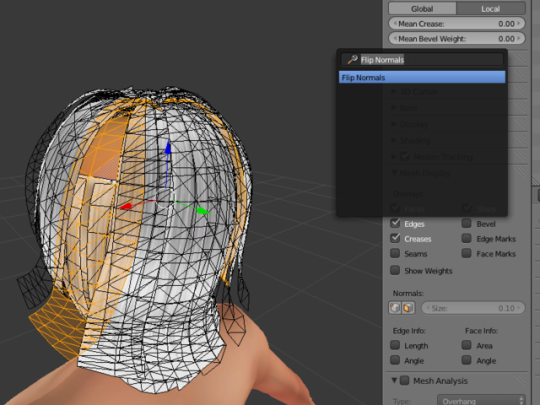 You can select the whole mesh in edit mode, press space, and type "make normals consistent" and then select individual pieces of hair that are not facing the correct direction to flip them outside with "flip normals". 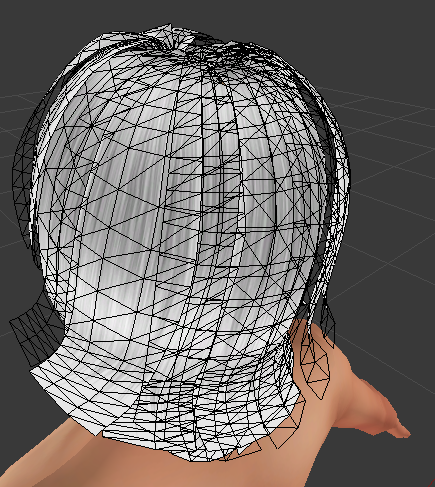 Even if you don't flip them, you should be able to see the hair in S4S after you bring it over to a fresh file. Sorry I have no idea what actually happened! 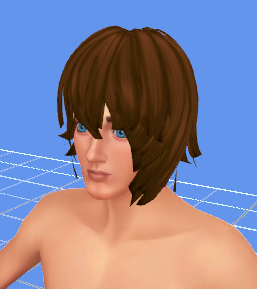 |
|
b0re
Member
How hilarious / You just set off my trap card / Your death approaches
Posts: 11
|
Post by b0re on Aug 14, 2019 0:03:59 GMT -5
Okay, so the first thing I noticed when I looked at your picture was that there are strange spots all over the hair in different shades of grey. Usually when there's weird stuff going on with geometry and lighting and stuff I kind of assume it's a normal problem. If you don't know (and if you do, ignore me), normals are basically the direction that a face of a mesh is facing. So if the normal is facing outwards then you will have a solid box and the inside of the box will be transparent. If your normals are facing every direction then it looks like that picture, apparently!... (rofl I resized the quote so it's smaller) That is so bizarre! So the backward normals, I got them because I actually have two versions of blender. I normally use 2.79b and I switch to 2.70 for cuts and whatnot. The normals sometimes do that when I work in 2.70 and then save it and then work again in 2.79... The bizarre thing is this doesn't always happen, so I assumed it didn't really matter (it didn't do this with the first hair I converted) But looks like it does matter, and I'll take it into account. Thank you so much for taking a look at it! I appreciate it lots <3 |
|
|
|
Post by squari on Aug 14, 2019 0:09:06 GMT -5
No problem, good luck with your hair :D
|
|
b0re
Member
How hilarious / You just set off my trap card / Your death approaches
Posts: 11
|
Post by b0re on Aug 14, 2019 0:09:54 GMT -5
No problem, good luck with your hair :D Edit/update: I've fixed the normals, but it still didn't solve the problem. I also tried importing the blend file of that first hair I converted into the same file I'm trying to import over in S4S and it works just fine... This thing must really be cursed for me lol. I'm sorry, I hate to bother you, but would you mind sending me the package file that you have where you imported the blend file into S4S? |
|
|
|
Post by squari on Aug 14, 2019 0:20:03 GMT -5
|
|
b0re
Member
How hilarious / You just set off my trap card / Your death approaches
Posts: 11
|
Post by b0re on Aug 14, 2019 0:21:15 GMT -5
OH I see what you mean! alright, thank you so much again! |
|
|
|
Post by mauvemorn on Aug 14, 2019 1:05:59 GMT -5
Hi. Glad everything is ok now, just a few tips:
- im not sure if it will work in this case, but you can try selecting everything with A, Mesh -Normals - Recalculate outside instead of fixing each 'strand' individually;
- for the love of everything, no matter how good or experienced you think a creator is, do not use their cc as a reference for what to do. It's not just a matter of many people not knowing why they are doing what they are doing (because usually in tutorials people only show how without explaining why), game developers occasionally changes how things work (which is what happend to vertex paint some time ago, fortunately, this creator was aware of it). So yeah, always use ea hairs as a reference;
-the meshgroups in the blend you import in the package must have the same vertex groups as the corresponding meshgroups in the blend that is being replaced. When it is not the case, you might get distortions. This issue is relatively new and does not happen to anyone. So you need to start a package from hair that is the closest in shape to yours as it can get (and is base game if you intend on sharing it with others) and make sure that every meshgroup of your new blend has the same vertex groups, even if they do not belong there(do not assign anything to them, just create a bone with the same name)
Anyway, if you know you're doing something right, yet nothing happens, try a few things:
- Mesh -clean up - delete loose - this will delete possible stray vertices. If the number Blender will show you is 0, then its not that;
- Add triangulate modifier to split any n-gones. Doing it through Clean up doesn't always work;
-Re-start a package.
|
|
b0re
Member
How hilarious / You just set off my trap card / Your death approaches
Posts: 11
|
Post by b0re on Aug 14, 2019 2:26:42 GMT -5
Hi. Glad everything is ok now, just a few tips: - im not sure if it will work in this case, but you can try selecting everything with A, Mesh -Normals - Recalculate outside instead of fixing each 'strand' individually; - for the love of everything, no matter how good or experienced you think a creator is, do not use their cc as a reference for what to do. It's not just a matter of many people not knowing why they are doing what they are doing (because usually in tutorials people only show how without explaining why), game developers occasionally changes how things work (which is what happened to vertex paint some time ago, fortunately, this creator was aware of it). So yeah, always use ea hairs as a reference; -the meshgroups in the blend you import in the package must have the same vertex groups as the corresponding meshgroups in the blend that is being replaced. When it is not the case, you might get distortions. This issue is relatively new and does not happen to anyone. So you need to start a package from hair that is the closest in shape to yours as it can get (and is base game if you intend on sharing it with others) and make sure that every meshgroup of your new blend has the same vertex groups, even if they do not belong there(do not assign anything to them, just create a bone with the same name) Anyway, if you know you're doing something right, yet nothing happens, try a few things: - Mesh -clean up - delete loose - this will delete possible stray vertices. If the number Blender will show you is 0, then its not that; - Add triangulate modifier to split any n-gones. Doing it through Clean up doesn't always work; -Re-start a package. Hello! thank you for the tips, I appreciate it! :D |
|


 please let me know if the link doesn't work or what ^_^
