|
|
Post by ChippedSim on Aug 22, 2019 16:18:10 GMT -5
Hey I'm currently trying to add an animation to a gramophone I'm working on. I managed to get the record turning by cloning the ceiling fan. My only problem is that I would like to get the handle turning into the right direction too (around itself instead of floating around). Can someone point me in the right direction what I need to change to fix this? Thank you in advance! 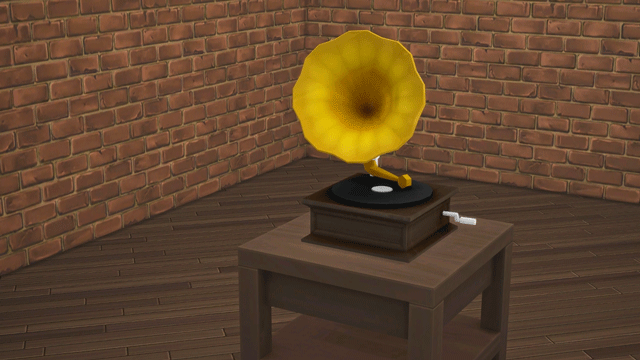 |
|
|
|
Post by hyousora on Aug 22, 2019 16:44:44 GMT -5
Did you try weight painting it so when the record moves the handle doesn't.
|
|
|
|
Post by ChippedSim on Aug 22, 2019 16:52:03 GMT -5
I don't think the method I used requires any weight painting. I cloned the ceiling fan and checked the weight painting and it wasn't painted.
And I want the handle to move just not in that direction :D I tried splitting into another mesh group but ran into the issue of that mesh group not having a transform bone.
Additionally I can't figure out how to change the direction of the animation so it's turning on the y-axis instead of the z-axis
|
|
|
|
Post by hyousora on Aug 22, 2019 18:21:17 GMT -5
Have you've seen this tutorial it seems like a good place to start. I was wondering if you could assign a new bone to the handle. |
|
|
|
Post by menaceman44 on Aug 23, 2019 7:52:09 GMT -5
Hiya! So, you can control the axis, speed, and direction of the spin from within the Model and Model LOD resource entries. In the warehouse tab select one of your Model LOD entries (but don't bother with the shadows) then in the right window click on Edit Entries... next to Meshes. In the next window click on the Instanced Pinwheel entry and then scroll down on the right until you find the Edit Items... button next to Entries under Material. Click Edit Items... The new window that pops up shows the default texture set for the object you cloned and a set for every swatch you have added to your package. It is always best to do this before adding any swatches otherwise you have to manually alter the settings for EVERY item in this list. If you do it first then the settings are copied over automatically to newly added swatches. Your swatches will start with "VariantId: set#-materialvariant" and will have a Default and Burnt entry for each. Select your first entry and then click the Edit Items... button on the right. In here you are looking for the SpinAxis, SpinPoint, and SpinSpeed entries. Now I haven't played about with these other than the SpinSpeed entry. Positive numbers spin one way and negative numbers spin the other way. The higher the number the faster the spin. You can use decimals. I assume that the three entries for SpinAxis relate to X,Y, and Z and you just need to set the correct one to 1 for the relevant axis which will probably be trial and error to discover. I would also assume that the SpinPoint entry states where the centre of the rotation is. You can probably get this co-ordinate from blender. Hit Save before closing the pop-up windows to commit your changes. Now repeat these changes for the other entries.
You will need to do this for the Model resource as well. Click Edit Items... next to Lods, select the lowest detail entry there is that isn't a shadow, click Edit Items... next to Meshes and then carry on as before. The final thing to point out is that you MUST have seperate mesh groups for things that you want to spin differently from each other. If your handle and record are part of the same group then you can only apply one set of rotation rules to both of them. Your handle will need to be in a seperate group to the record, and both animating parts must be seperate from the main body that does not move. I hope that helps. |
|
|
|
Post by ChippedSim on Aug 23, 2019 9:30:07 GMT -5
Thank you that already helped a lot! I figured I needed to split the handle, record and rest of the mesh into separate mesh groups. My only problem is that I can't find any mesh with fitting cuts  I tried changing the shadow mesh group and edited the drop shadow shader but that only leads to the texture displaying wrong and the mesh stretching weirdly. Does anyone know any object that I could use for this or if there is any option to turn the drop shadow cut into a normal one? |
|
|
|
Post by menaceman44 on Aug 24, 2019 4:21:09 GMT -5
If you have backyard stuff then the spinner that this shader was made for already has three seperate mesh groups.
|
|
|
|
Post by ChippedSim on Aug 24, 2019 5:58:23 GMT -5
Oh good to know! Yes I have backyard stuff but just checked the base game meshes so it would be base game compatible. I settled on splitting the mesh into two objects now so the record is an extra object that snaps to a slot I added on top of the gramophon. That has the advantage that the record can be used as a separated clutter item too and can be used for different kinds of record players in the future  I may make a second version using the backyard stuff mesh though for the ones who own the pack and prefer a combined version. UPDATE I was able to fix the rotation axis but sadly the handle is still not rotating correctly (see GIF below) How would I need to adjust the SpinPoint to fix this? 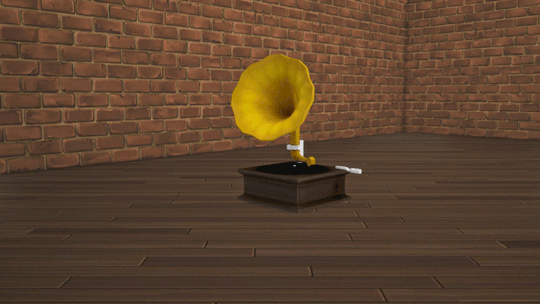 |
|
|
|
Post by hyousora on Aug 24, 2019 8:07:30 GMT -5
Did you check this at the bottom there's a link to here quaternions.online. My best guess is pick the middle part where your handle meets the wood and do a little adjustment. |
|
|
|
Post by menaceman44 on Aug 24, 2019 10:45:12 GMT -5
I would have thought you just need to go into blender with your mesh and take the co-ordinates from where the handle meets the body to enter into the SpinPoint resource.
Quarternions are usually used for the rotating of static slots. I did it once for some Sim feet slots on my sectional seating. It just tells the game which way they should point.
If you can't figure it out, share your package file and I'll take a look at it for you.
Also, nice idea with thinking to seperate the record. You could do loads of different label designs that players can swap out to their preference now!
|
|
|
|
Post by ChippedSim on Aug 26, 2019 10:34:16 GMT -5
Sorry for the late answer. My vacation is over so I‘m back at work now.
I tested it with the coordinates from the handle but that lead to the version shown in the GIF. I also tried leaving it at 0,0,0 or switching the coordinates because I thought maybe it isn’t x,y,z but x,z, y but nothing worked so far.
I‘ll upload the file today after work and would be really grateful if you could take a look at it.
I thought maybe the shape of the handle could be Problem since it isn’t symmetrical but I’m not sure.
|
|
|
|
Post by menaceman44 on Aug 26, 2019 11:37:01 GMT -5
I'll be happy to have a look at it and see if I can help.
|
|
|
|
Post by ChippedSim on Aug 26, 2019 13:56:27 GMT -5
|
|
|
|
Post by menaceman44 on Aug 27, 2019 7:24:43 GMT -5
Right, so I haven't managed to find which exact co-ordinates you need but I HAVE figured out which value is which axis.
Value [0] controls left and right movement. This probably can be left at 0 since the animation runs along that axis anyway.
Value [1] controls the height. I changed the value to 1 and it moved the centre of the rotation to about the height of a Sims' waist.
Value [2] therefore controls forward/backward movement. It would appear at the very least you need a negative value in this one.
I tried getting the values from blender but I couldn't seem to get anything that related to the centre point when applied to the shader so you may just have to use a lot of trail and error.
|
|
|
|
Post by menaceman44 on Sept 3, 2019 5:52:13 GMT -5
I just couldn't leave this alone. I have no idea if you have sorted this yourself or not given that you haven't replied since my last post but if not, I continued to mess with the values until I got this today!  The values you need are
[0] 0
[1] 0.076
[2] -0.116 |
|


