Step by Step Tutorial on Adding Effects to Objects
Aug 8, 2016 13:08:46 GMT -5
orangemittens, Bakie, and 16 more like this
Post by j on Aug 8, 2016 13:08:46 GMT -5
Huge thanks to peacemaker who essentially taught me to do this so I could bring you this tutorial!
For the sake of this tutorial I'll be adding a butterfly effect to a flower bush.
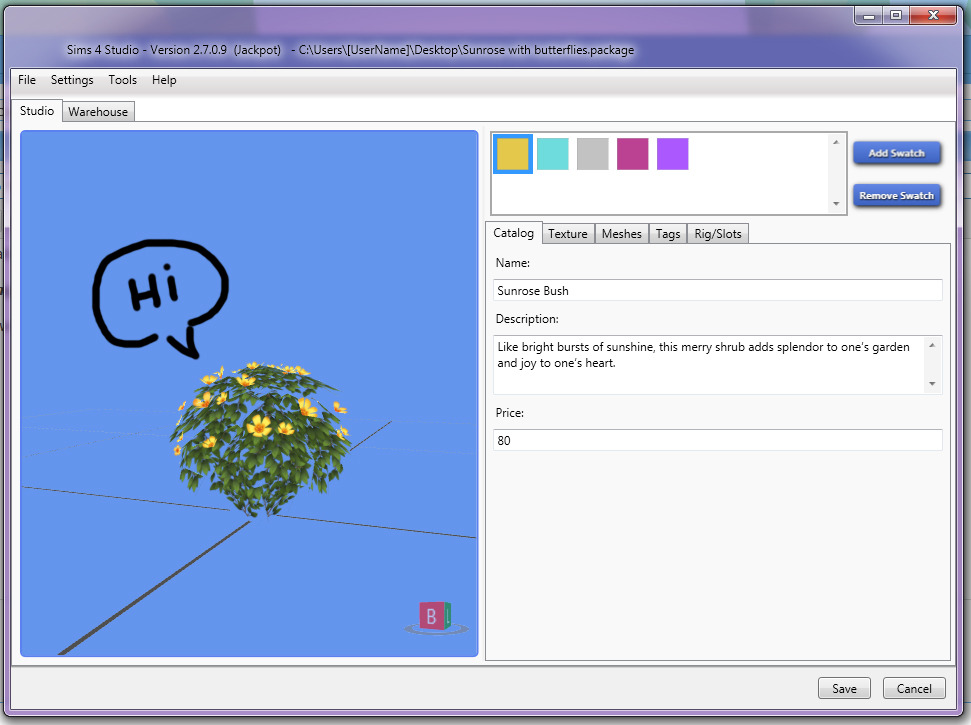
First of all, clone your bush. I'll be working with Sunrose Bush from basegame. I am cloning it via the Selective Clone option so I can have all of the swatches.
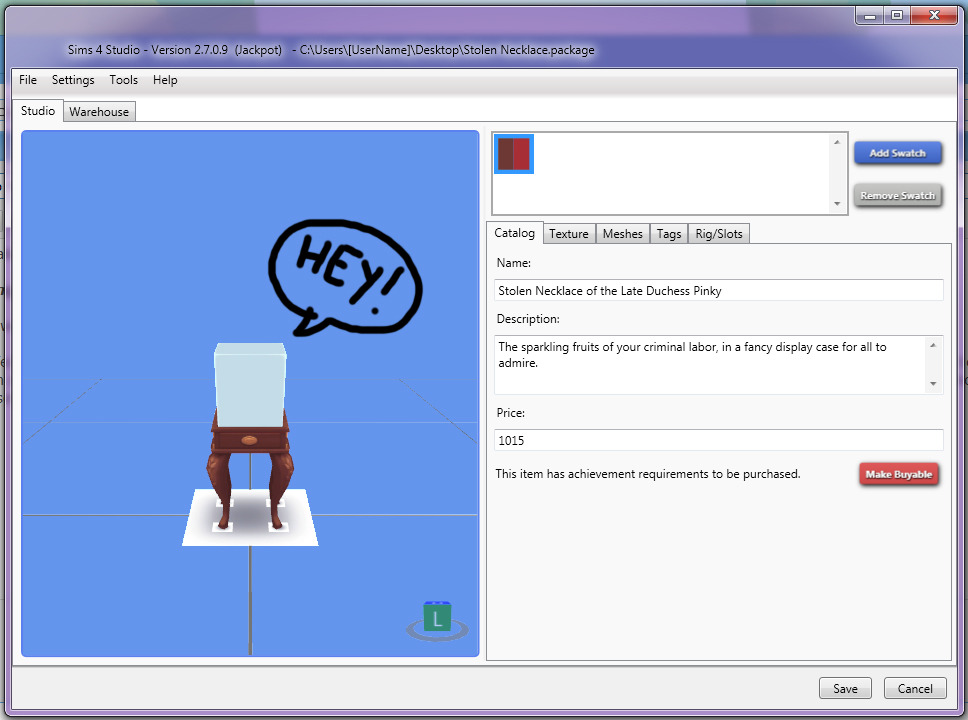
Now we need to clone an object with an effect so we can use its tuning. It does not matter what EFFECT the object you clone has, but it does matter how that effect IS PLAYED. So if you're working on a light that plays an effect (such as a candle) which needs an on and off switch, you would clone a candle. What I need for this project is an item that plays the effect non-stop without any trigger options, so I'll be cloning Stolen Necklace of the Late Duchess Pinky (which plays the laser effect non-stop).
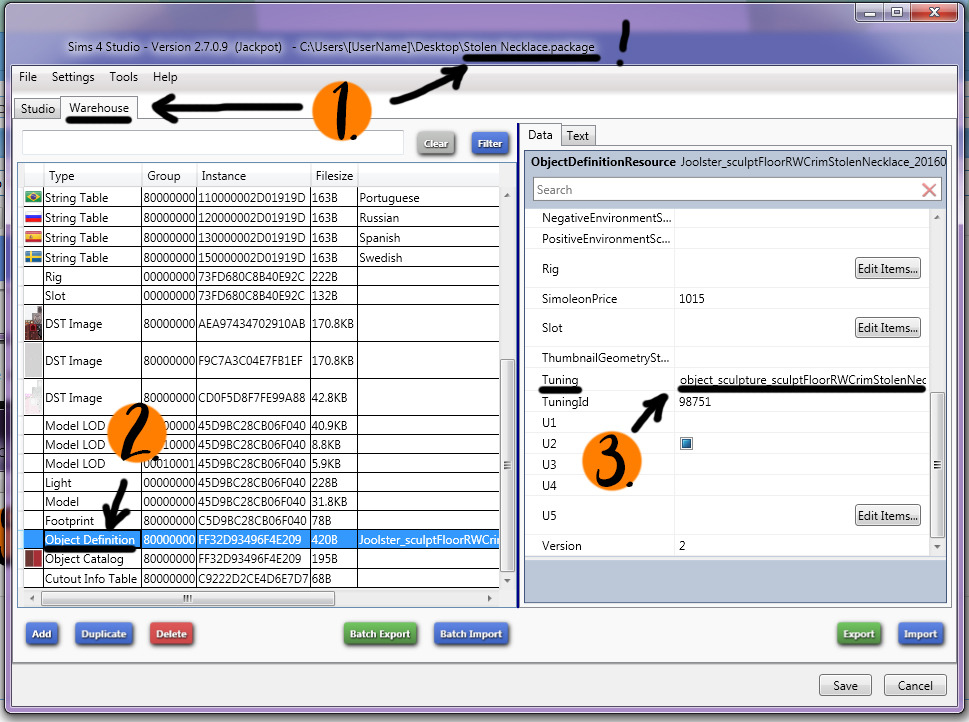
Next up, we need to grab its tuning. In the Warehouse tab of your Necklace (1.) click Object Definition (2.), scroll down until you find Tuning and copy the code (3.).
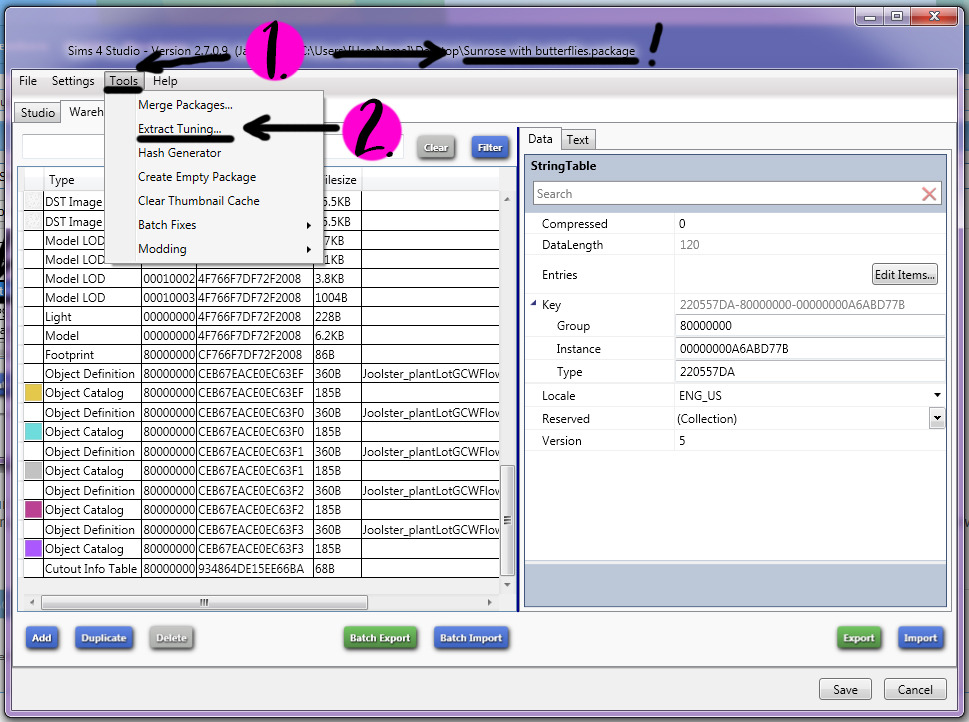
Now while in your Bush, click Tools (1.) and Extract Tuning (2.).
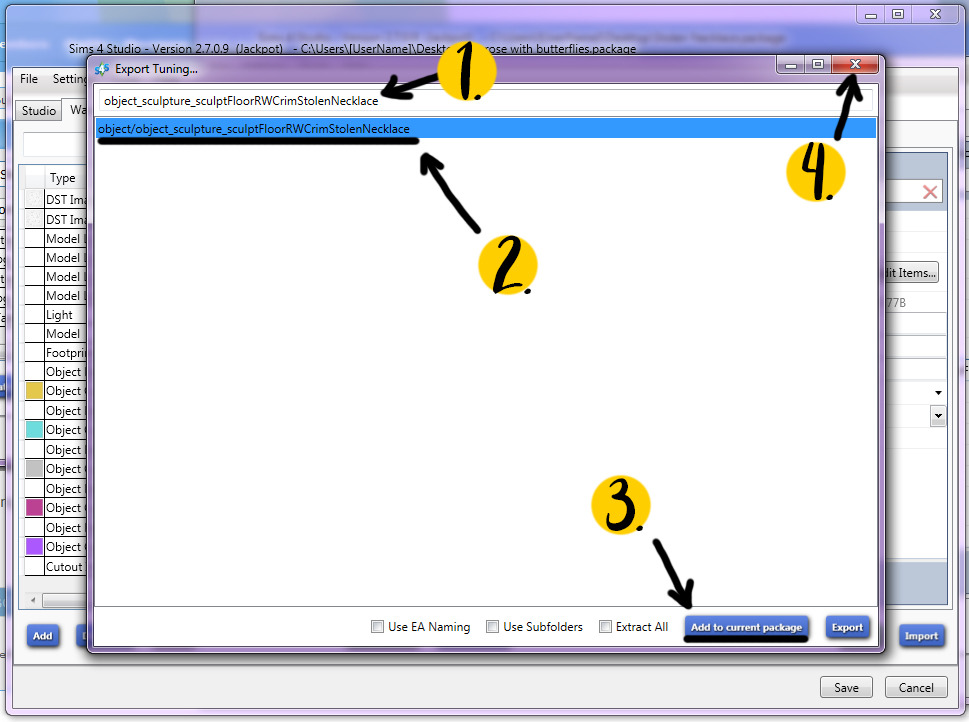
Paste your Tuning code into the search bar (1.), and select the one it finds (2.). Click Add to current package (3.). Close the Tuning window afterwards (4.)
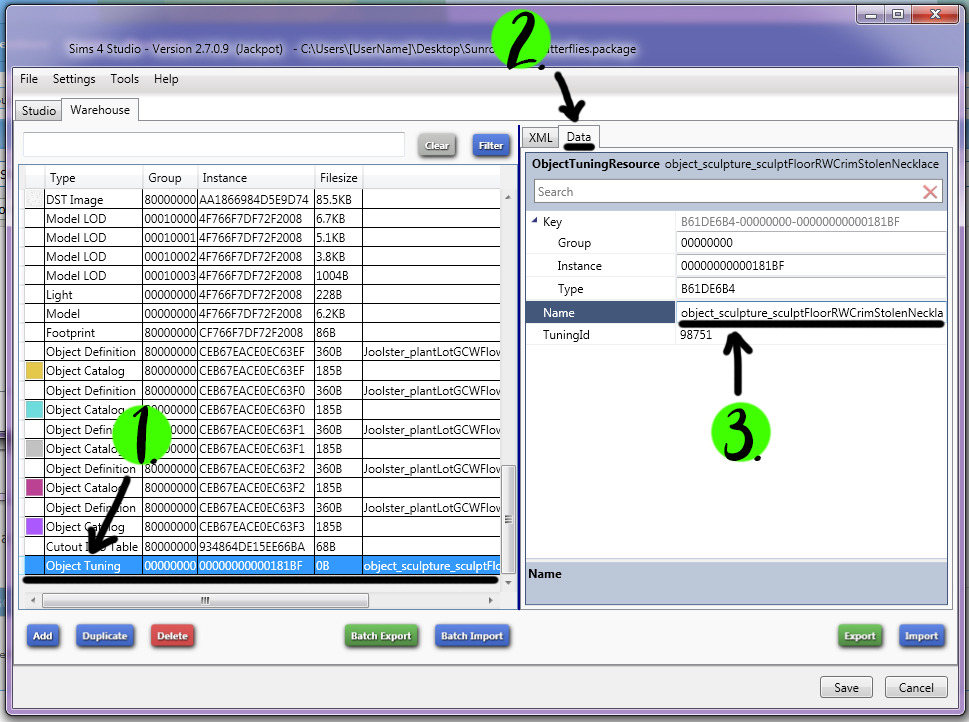
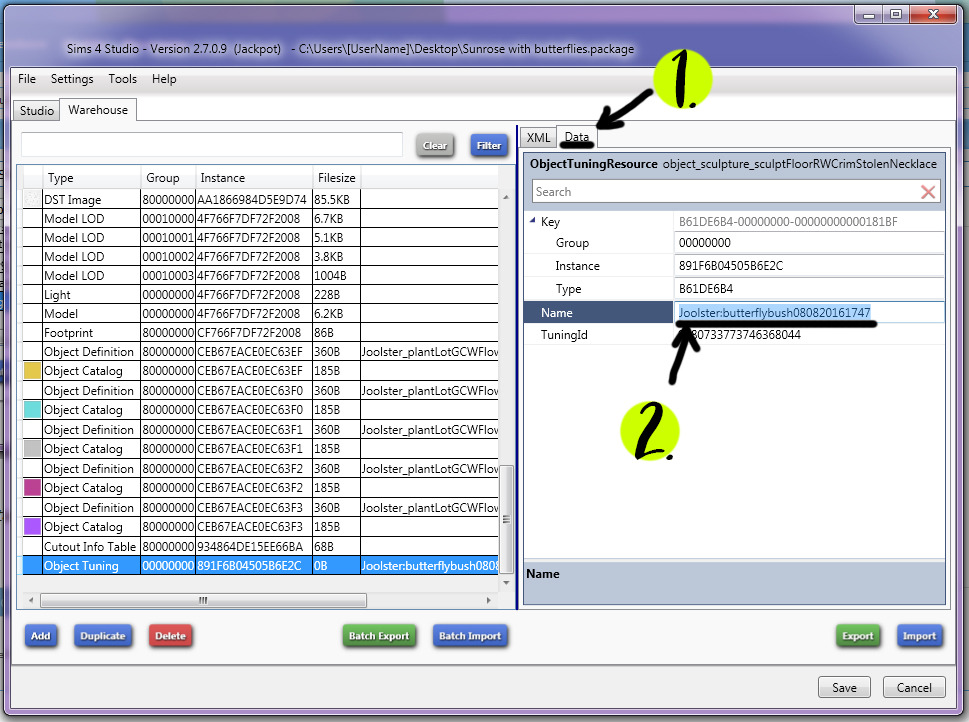
You should find a new resource on the bottom of the Warehouse tab of your Bush, called Object Tuning. Click it (1.), then click Data (2.) and find the Name line (3.). We will need to change it.
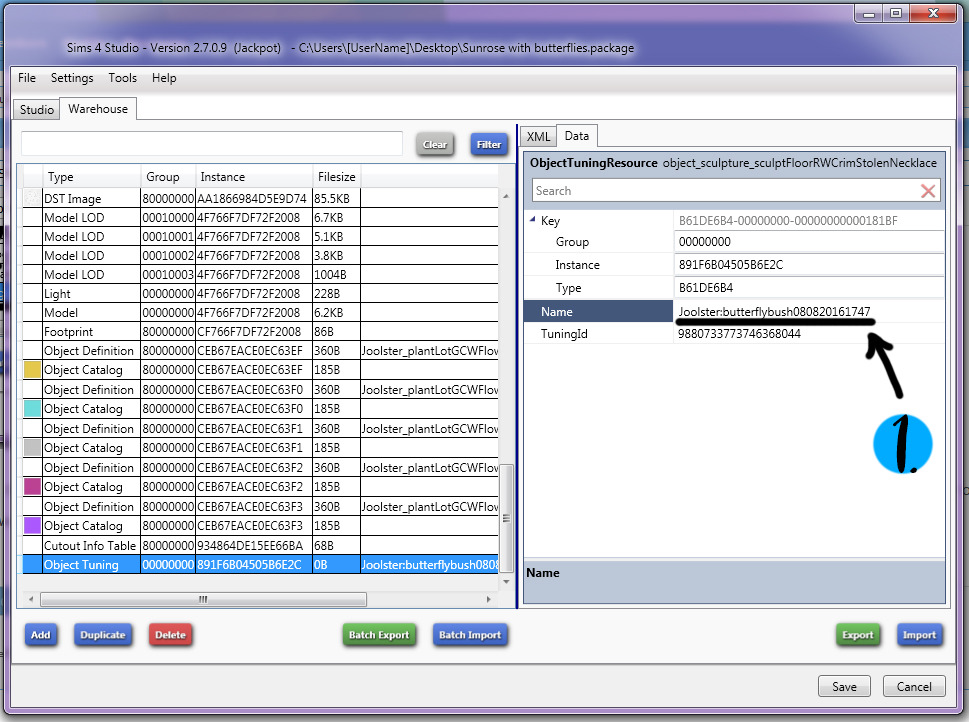
You need to use the format EA has requested tuning modders use. This format is creatorname:objectname. As orangemittens mentioned in her own tutorial, you can also add the date (and time) to the tuning name as well. So my new tuning name would be Joolster:butterflybush080820161747.
Edit the tuning name appropriately (1.), you should notice some values in the tab (such as the Instance and Tuning ID) will change also.
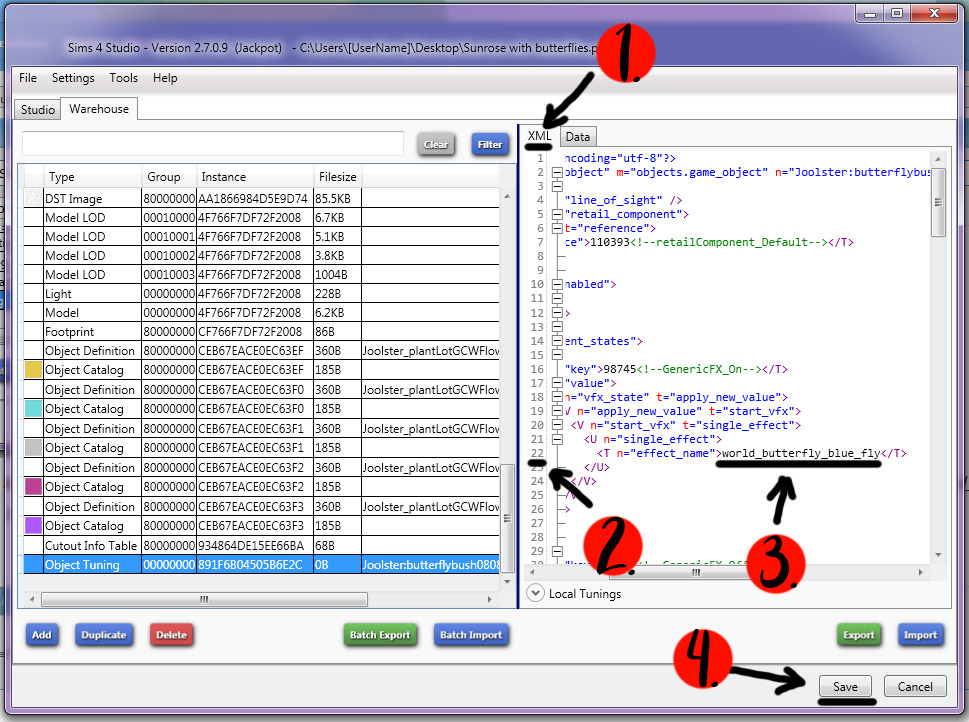
Click the XML tab (1.) and find the line with the effect (2.). In this case, line number 22. Change the default effect (s40_obj_criminal_lasers) to world_butterfly_blue_fly (3.). Click Save (4.).
This is just one of several butterfly effects in existence. You can find a better suited effect for your taste using andrew 's Studio Effect Player.
Back in Data tab (1.), copy your custom tuning name (2.).
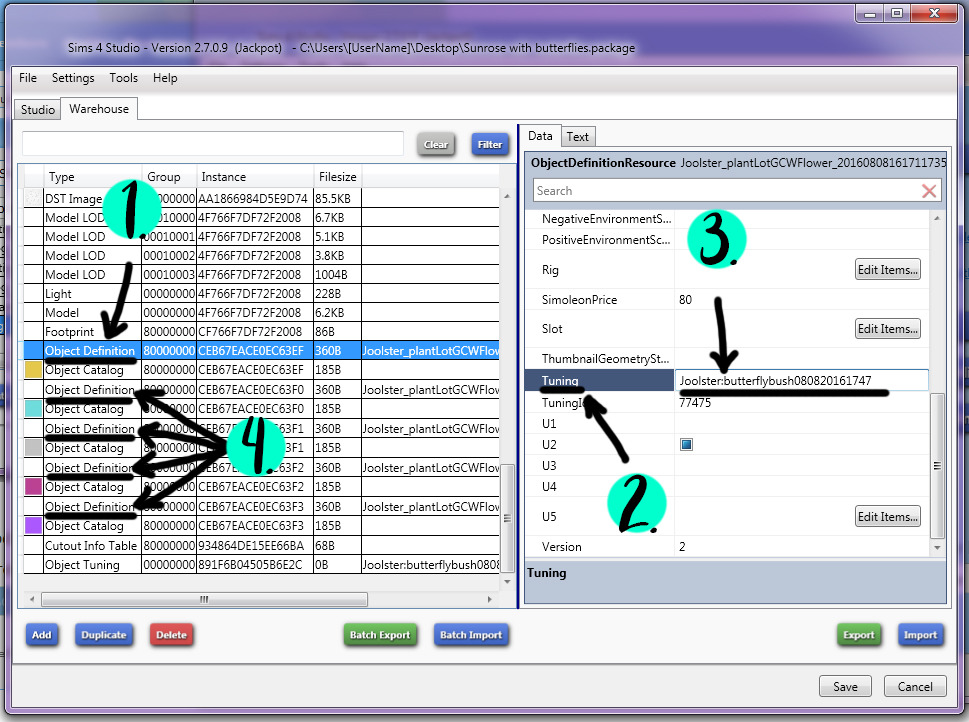
We need to update the tuning with our custom name. Click Object Definition (1.), scroll down until you find Tuning (2.), replace the default code with your custom code (3.). This bush has 5 swatches, therefore there are 5 Object Definitions, so you need to do this 5 times (4.).
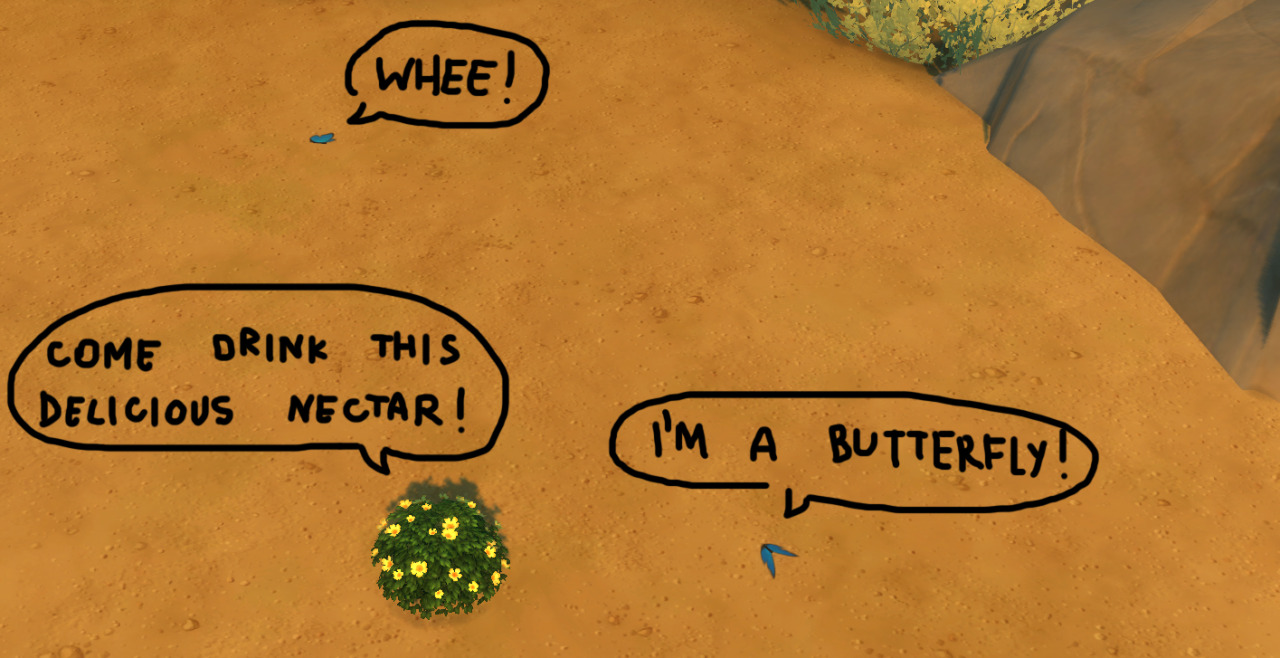
You have successfully added an effect to your bush! Click Save and test your object in-game!
~~~~~~~~~~~~~~~~~~~~~~~~~~~~~~~~~~~~~~~~~~~~~~~~~~~~~~~~~~~~~~~~~
Depending on the effect you've gone with, you may need to edit the size, rotation and coordinates.
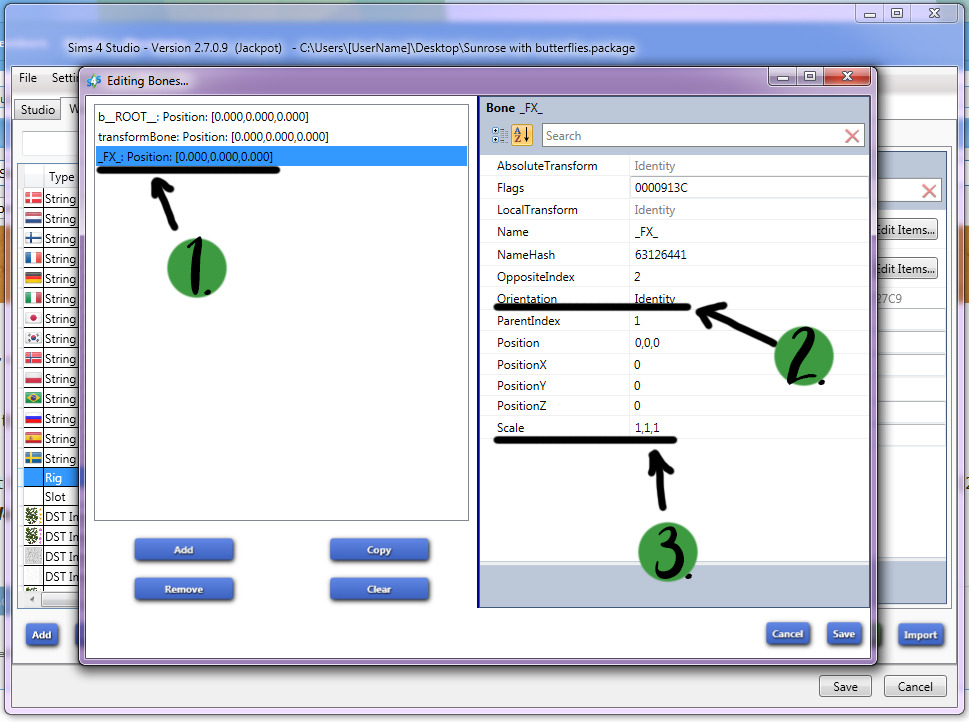
You would edit the size and rotation in the Warehouse tab, via the Rig -> Bones window. Select _FX_Position (1.). Orientation (2.) for rotation (uses Cartesian coordinates. Ex: 0.707,0,-0.707,0). Scale (3.) for size (XYZ/XYZ values, 1 for 100%, 0.5 for 50%, 2 for 200%, etc).
Scaling an effect significantly up or down in size may not yield perfect results. From personal experience I found that effects tend to get smooshed in length when decreased in size significantly.
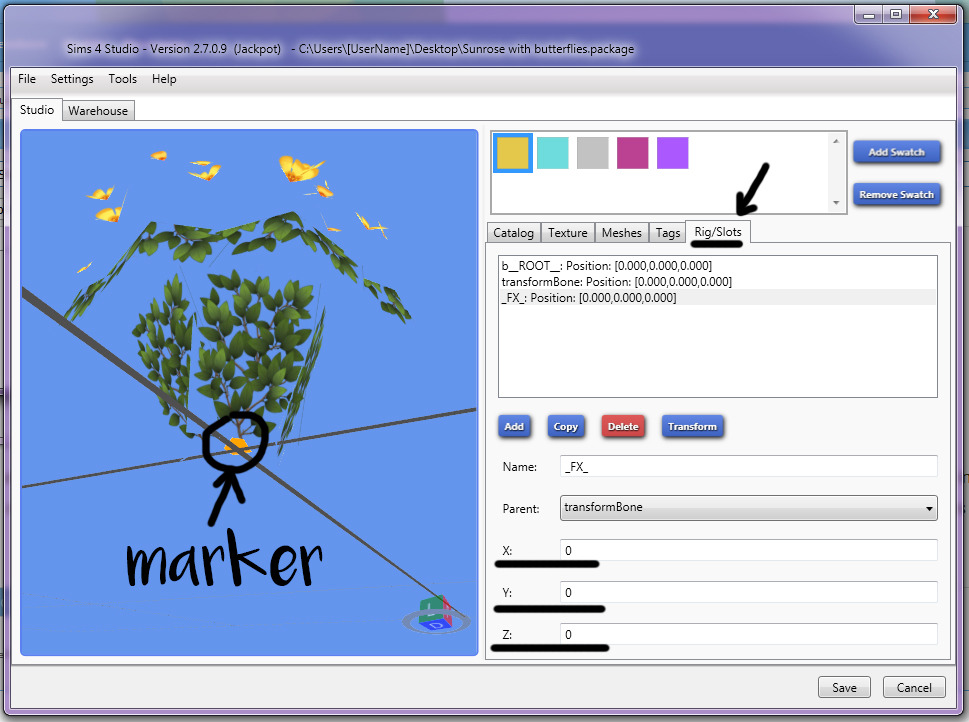
To change the effect positioning in relation to the object, you'd need to edit XYZ coordinates of the slot. This may require significant in-game testing to achieve perfect positioning. Some effects are off-center, meaning they will appear shifting to the side or higher/lower than intended even though the slot marker appears to be at the right position.
~~~~~~~~~~~~~~~~~~~~~~~~~~~~~~~~~~~~~~~~~~~~~~~~~~~~~~~~~~~~~~~~~
Happy creating!
For the sake of this tutorial I'll be adding a butterfly effect to a flower bush.
First of all, clone your bush. I'll be working with Sunrose Bush from basegame. I am cloning it via the Selective Clone option so I can have all of the swatches.

Now we need to clone an object with an effect so we can use its tuning. It does not matter what EFFECT the object you clone has, but it does matter how that effect IS PLAYED. So if you're working on a light that plays an effect (such as a candle) which needs an on and off switch, you would clone a candle. What I need for this project is an item that plays the effect non-stop without any trigger options, so I'll be cloning Stolen Necklace of the Late Duchess Pinky (which plays the laser effect non-stop).

Next up, we need to grab its tuning. In the Warehouse tab of your Necklace (1.) click Object Definition (2.), scroll down until you find Tuning and copy the code (3.).

Now while in your Bush, click Tools (1.) and Extract Tuning (2.).

Paste your Tuning code into the search bar (1.), and select the one it finds (2.). Click Add to current package (3.). Close the Tuning window afterwards (4.)

You should find a new resource on the bottom of the Warehouse tab of your Bush, called Object Tuning. Click it (1.), then click Data (2.) and find the Name line (3.). We will need to change it.

You need to use the format EA has requested tuning modders use. This format is creatorname:objectname. As orangemittens mentioned in her own tutorial, you can also add the date (and time) to the tuning name as well. So my new tuning name would be Joolster:butterflybush080820161747.
Edit the tuning name appropriately (1.), you should notice some values in the tab (such as the Instance and Tuning ID) will change also.

Click the XML tab (1.) and find the line with the effect (2.). In this case, line number 22. Change the default effect (s40_obj_criminal_lasers) to world_butterfly_blue_fly (3.). Click Save (4.).
This is just one of several butterfly effects in existence. You can find a better suited effect for your taste using andrew 's Studio Effect Player.

Back in Data tab (1.), copy your custom tuning name (2.).

We need to update the tuning with our custom name. Click Object Definition (1.), scroll down until you find Tuning (2.), replace the default code with your custom code (3.). This bush has 5 swatches, therefore there are 5 Object Definitions, so you need to do this 5 times (4.).

You have successfully added an effect to your bush! Click Save and test your object in-game!

~~~~~~~~~~~~~~~~~~~~~~~~~~~~~~~~~~~~~~~~~~~~~~~~~~~~~~~~~~~~~~~~~
Depending on the effect you've gone with, you may need to edit the size, rotation and coordinates.
You would edit the size and rotation in the Warehouse tab, via the Rig -> Bones window. Select _FX_Position (1.). Orientation (2.) for rotation (uses Cartesian coordinates. Ex: 0.707,0,-0.707,0). Scale (3.) for size (XYZ/XYZ values, 1 for 100%, 0.5 for 50%, 2 for 200%, etc).
Scaling an effect significantly up or down in size may not yield perfect results. From personal experience I found that effects tend to get smooshed in length when decreased in size significantly.

To change the effect positioning in relation to the object, you'd need to edit XYZ coordinates of the slot. This may require significant in-game testing to achieve perfect positioning. Some effects are off-center, meaning they will appear shifting to the side or higher/lower than intended even though the slot marker appears to be at the right position.

~~~~~~~~~~~~~~~~~~~~~~~~~~~~~~~~~~~~~~~~~~~~~~~~~~~~~~~~~~~~~~~~~
Happy creating!


