TayHD
New Member

Posts: 6 
|
Post by TayHD on Dec 5, 2016 22:50:39 GMT -5
Currently in the progress of creating a whole look book of new CC for people based on popular brands such as MCM & Supreme. Prior to making custom dds files for base game recolors I had a few CC installed that never had any issue. Somewhere along the line something went wrong and now 75% of top pieces are causing their color pallete to be applied over the custom shoe items I have. Including screen shots below.  Edit: Based on other post many people seeking to resolve others issues need PKG files. I have included a zip below. MEDIAFIRE |
|
|
|
Post by Mathcope on Dec 5, 2016 23:51:41 GMT -5
Hello. I don't think this is your fault at all since you were doing just recolors. Every shoes that you linked have UV map "issues" The thing is, that the creator of the shoes used a place in the UV map (which is a template for where your texture will be) that is meant for "extras". That includes extras from tops, bottoms and shoes. The texture of the shoes is not right assigned. I'm quite surprise you didn't get this error before? Studio won't change your game in a way that this error could start happening. If you have the original files and the errors are there, unedited, the errors have been always there. I believe the second top is from EA. They use extra parts in that place that is exactly where the shoes are. Check THIS thread for the template and more information. I would say this tops are incompatible because of the creators who made them and because they didn't have those little things in mind when doing it. By you doing a recolor, is not possible to change the uv settings and fix this sadly... You could ask for permission to edit their meshes and textures in order to make your book, but that depends on what they say and if they allow it. If so, you would have re clone the items as a 3d mesh, open it in Blender and edit the UV map in order to make it compatible. If we get to that point and they allow the edits I can give you more inside on it. Good luck! For more graphical understanding, this is what happens with your textures in game. As you see, the UV maps overlaps, causing this problem. 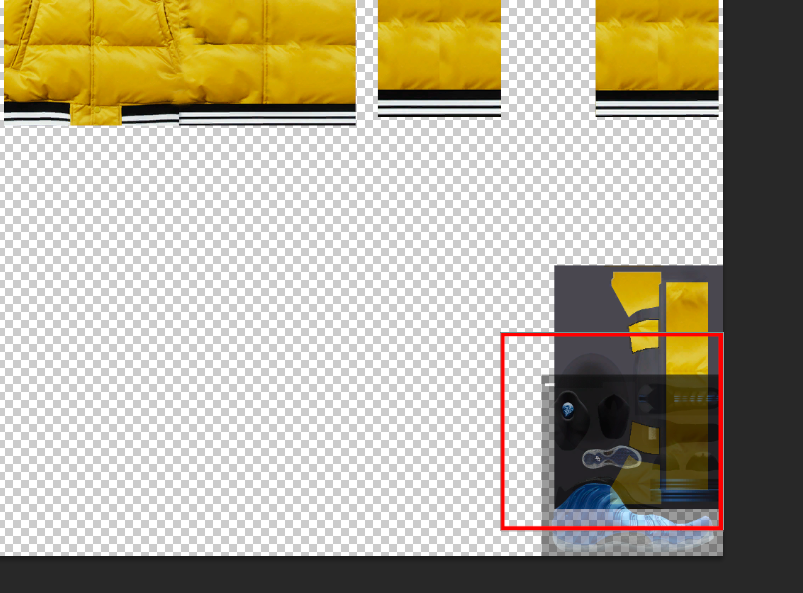 |
|
TayHD
New Member
Posts: 6
|
Post by TayHD on Dec 6, 2016 11:34:28 GMT -5
Thank you for this, I sent you a message. Hoping to fix this myself if possible.
|
|
|
|
Post by Mathcope on Dec 6, 2016 15:30:51 GMT -5
Hi! I recieved your message. However, the process you would have to do to fix this is not simply a "recolor". We would have to edit the uv map and therefore the whole mesh. (Uv is part of the mesh). The TOU you linked to me says the it allows recoloring the stuff, but says nothing about editing it.
I don't have any issue in pointing out how to fix this to you, but I do take seriously the TOU of the people who create the content. I don't know the reason why they choose to make this uncompatible with some items and why they would choose to keep it that way.
You can ask them if you could edit the UV map. You can say to them that you won't share it and that it will only be for personal use.
In the mean time, do you have any experience with blender and uv maps?
|
|
TayHD
New Member
Posts: 6
|
Post by TayHD on Dec 6, 2016 15:33:27 GMT -5
I fully understand and agree with you on the TOU. As for blender, I am Novice level but I do understand the interface and can follow instructions, for now I would like to fix just for personal use and will clarify with them as soon as they get back with me. Thanks!
|
|
|
|
Post by Mathcope on Dec 6, 2016 16:22:06 GMT -5
Ok. I will try to take some pictures and write some instructions for today's night.  It shouldn't be so hard to achieve. |
|
TayHD
New Member
Posts: 6
|
Post by TayHD on Dec 6, 2016 16:33:35 GMT -5
Ok. I will try to take some pictures and write some instructions for today's night. It shouldn't be so hard to achieve. Okay thank you! I will be refreshing every hour! |
|
|
|
Post by Mathcope on Dec 6, 2016 18:58:04 GMT -5
Well, here are the steps you should follow. This is the same for anything you need to make compatible, for these reason I will only work in one of the shoes. You can repeat the process for anything else. I think mostly is easier to modify the shoes rather than the top. This is beacause some EA tops also are incompatible with the shoes. We did this by opening the .package with "My project" button, so we're replacing the original. Make sure to do a backup first. 1- As we are moving the uv map, we will need to modify ALL the images that comes with the item. That includes all diffuses (colors and texture) and the bump map, specular and shadow map. For this particular item, the creator did not include shadow, bump and specular, so we only need to export the diffuse to modify in a 2d editor. For other projects, you may need to change someting else too.  2- Now, you need to go to the mesh tab, and click the export button. Make sure that LOD0 is selected.  3- Open the Blend file you just exported. Click the shoes, and press the TAB key to go to Edit mode. Press "A" to select all and in the left side you will notice the UV map of the item. Now you need to open an image to use as template to relocate the uv map. There're two of them in the forum, you can download them HERE. In this case I used the second one. You have to open the image in blender as shown in the picture.  4- As you see, the uv map is in the right bottom corner. We need to move that so it doesnt clip with the other uv of the top. Press "B" for box selection and select the whole uv map (the one in the corner, dont move the parts of the feet that is in the left). After it become yellow, you can press "G" to move and "S" to scale down the uv map until it's in a correct place. In this case I moved it a little to the left and scale it down so it doesn't cause trouble with the top texture, but it might depend on the top you use. You can play around with it. Just don't scale to much down because the texture quality will be affected.  5- Now export the uv layout, this is an image that will help you resize the texture in the 2d editor to fit the new uv. Then save the blend file . Go to File/Save.  6- In the 2d editor, I edited the texture diffuse for the first swatch (color) and move it and scale it down. You base your uv layout to know where to replace it and make it fit. After you're done, save the image and hide the layout first. Or it will show up in the texture of the feet. You will need to do this with every swatch in the package.  7- Import to Studio the new mesh, by going to the mesh tab and clicking the import button. You need to do it for every LOD, the creator didn't reduce the polycount of the LODS, and for a picture porpouse I guess you don't need to..  8- Save the .package in Studio and check in game. It should now not make conflict with the top. We did this by opening the .package with "My project" button, so we're replacing the original. Make sure to do a backup first.  |
|
TayHD
New Member
Posts: 6
|
Post by TayHD on Dec 6, 2016 22:01:32 GMT -5
Okay so I have completed all the steps but now my Diffuse is causing the leg models to go white? Any way around this?
|
|
|
|
Post by Mathcope on Dec 6, 2016 23:08:46 GMT -5
That is a common issue I think and is probably because you save your image with a white background.
If you save as .dds you need also to make an alpha. And then export from the 2d editor as Interpolated Alpha DXT5
But honestly, just save as .png and make sure nothing but your shoe texture is in the image. All the other background should be transparent.
if that is not the issue, post the files and I can take a look. (the .package)
|
|
TayHD
New Member
Posts: 6
|
Post by TayHD on Dec 6, 2016 23:49:11 GMT -5
Fixed, it was me forgetting to un-check alpha when saving DDS. Thank you for all the help! Truly great trouble-shooter! Included below is the fixed UV Wrap now unaffected by the top. (However I did lose quality in the Diffuse :( , will probably do a full custom Defuse for these over the exported UV wireframe instead of using the included diffuses.)  |
|


 It shouldn't be so hard to achieve.