Beginner's Recolor Tutorial Using Paint Shop Pro + Gimp by SamanthaGump
Feb 17, 2015 16:22:38 GMT -5
teagarden and simdistic like this
Post by samanthagump on Feb 17, 2015 16:22:38 GMT -5
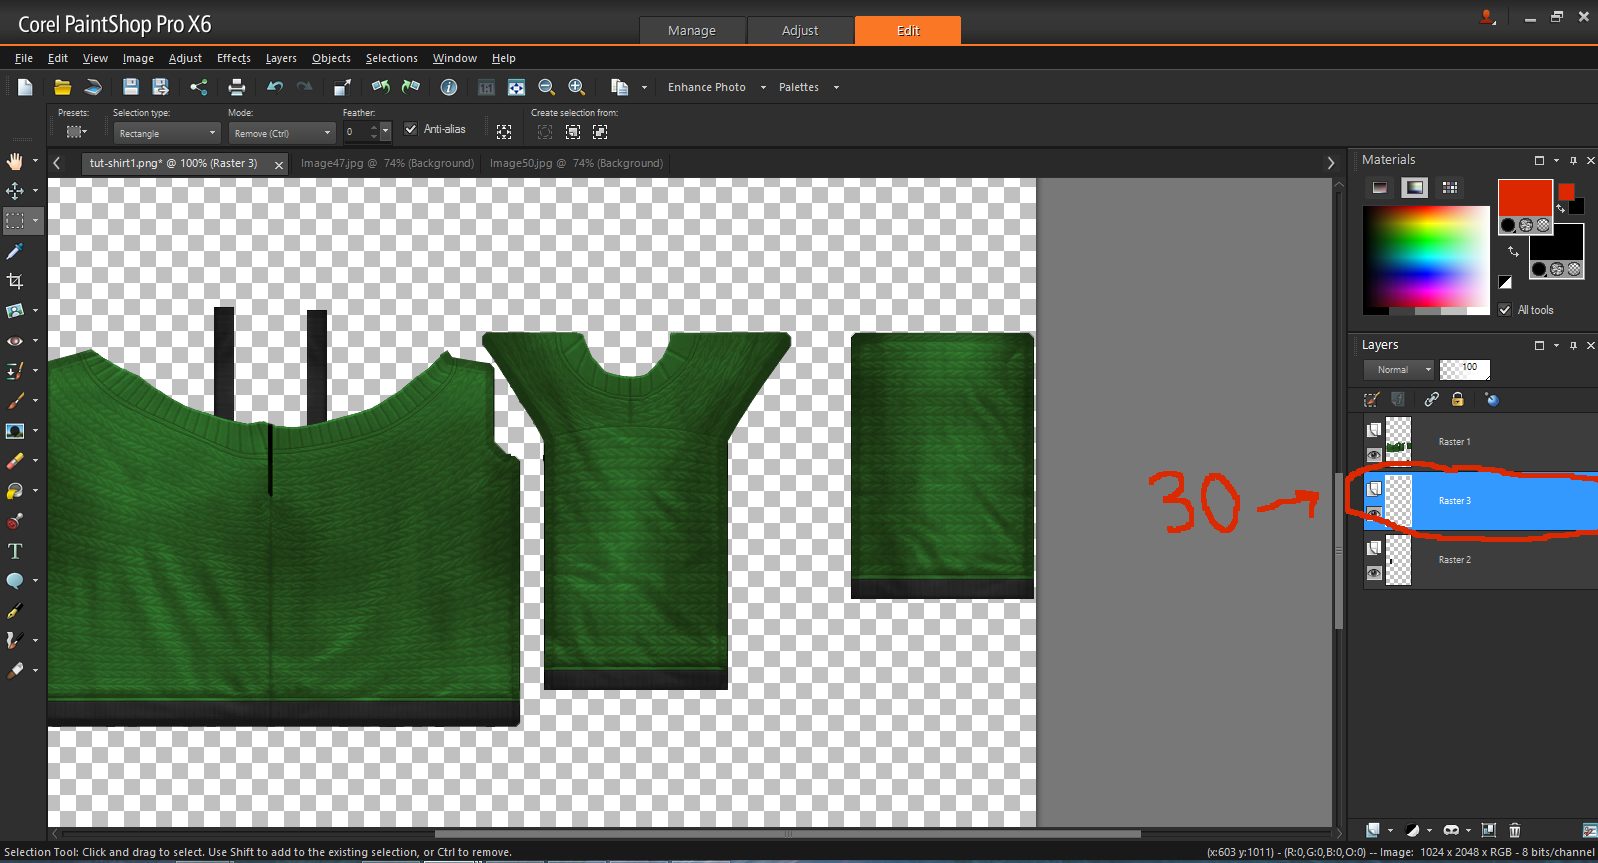
This is a basic tutorial for beginners, learning to recolor and retexture a top, using Sims 4 Studio (Flora version), Paint Shop Pro (X6 version), and Gimp (2 version). Paint Shop Pro is not a free program, but if you are serious about making CC, it is a good program to go with, and much cheaper than Photoshop. Paint Shop Pro offers a free trial, so you can download it and try it.
Sims 4 Studio (Flora) - Download
Gimp 2.8 - Download
Paint Shop Pro - Download (The current version is 7, and I am using 6, but it shouldn't make a difference for this tutorial.)
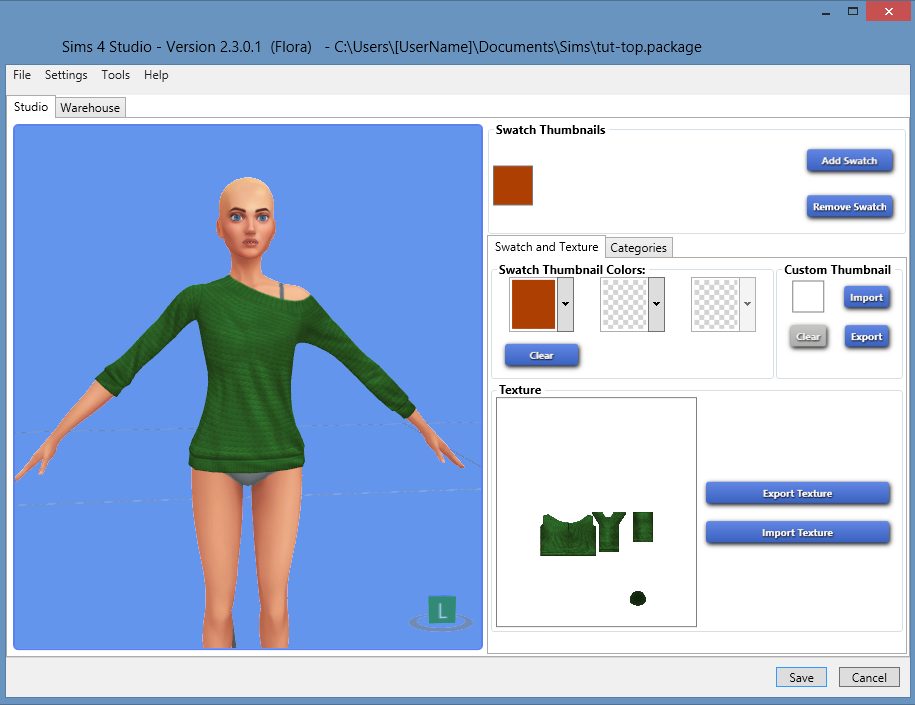
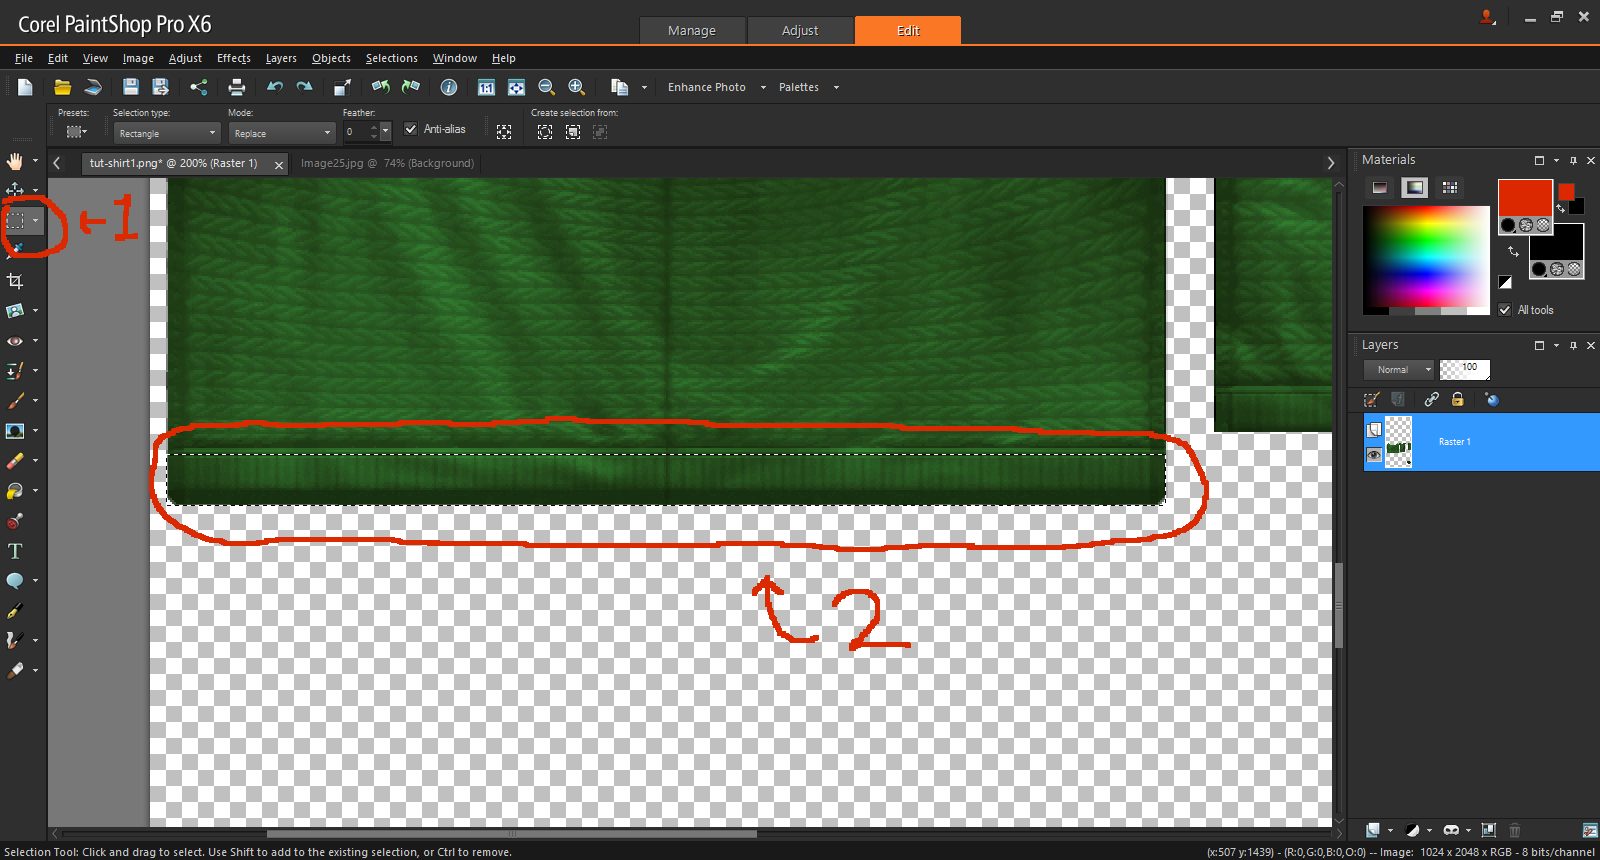
This is what we will be making today: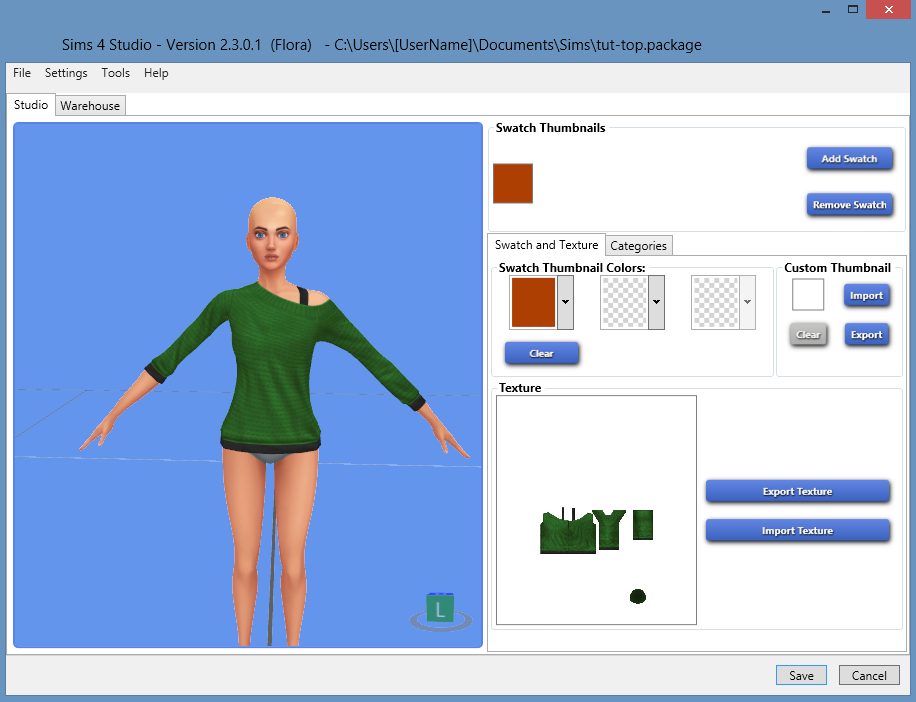
Part I -Importing the texture file to Paint Shop Pro-
Let's get started! Open Sims 4 Studio.
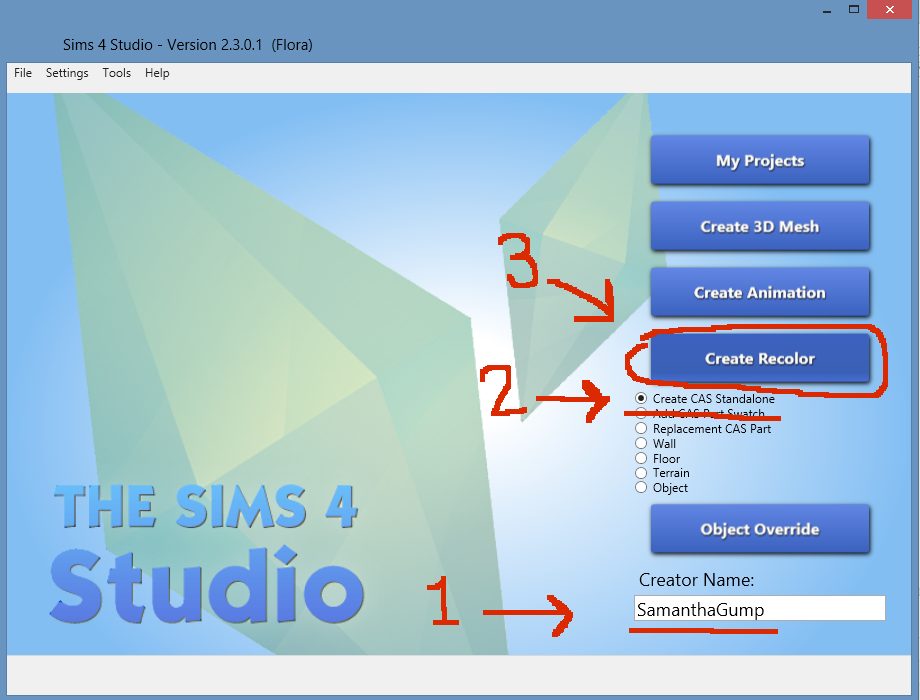
1. Make a Creator Name. You can't get to the next screen until you choose a creator name. I use my real name, because that's just how I roll, but you can use whatever you'd like. =)
2. Click "Create CAS Standalone."
3. Click the big "Create Recolor" button.
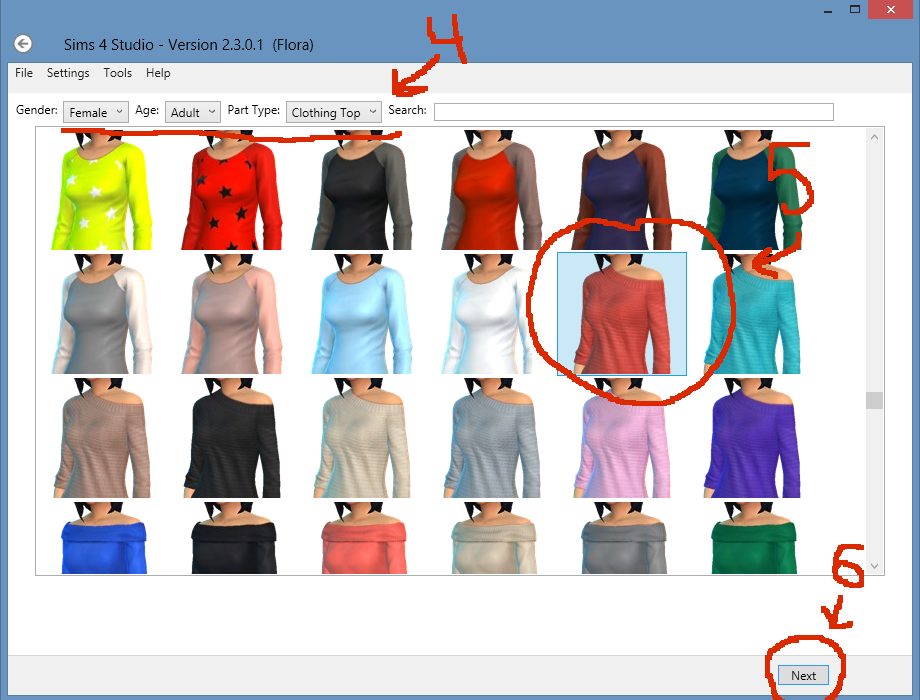
4. Select Gender: Female, Age: Adult, and Part Type: Clothing Top, from the top left tabs.
5. Scroll down until you get to this off the should top, and select it.
6. Click "Next" in the bottom right corner.
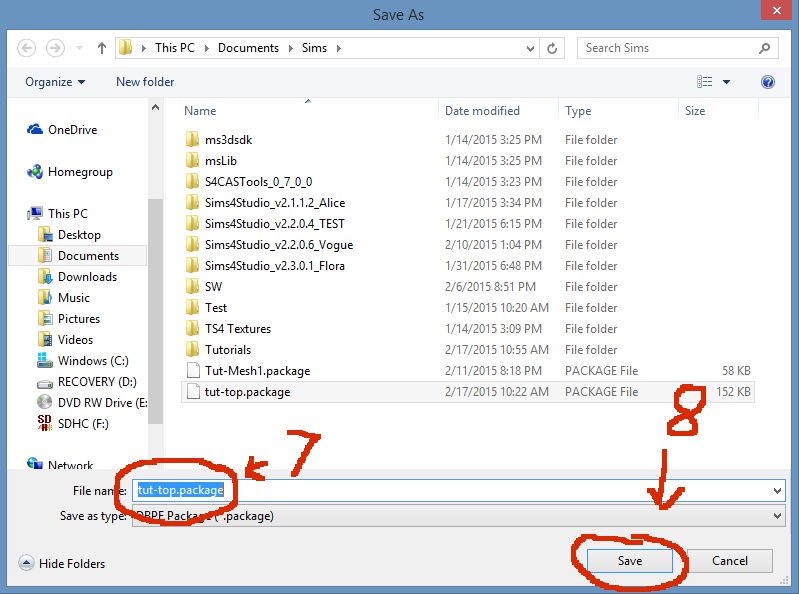
7. Name your .package file. This is the file that essentially is your CC, the one you need in your game. For now, save it where ever you'd like.
8. Click "Save."
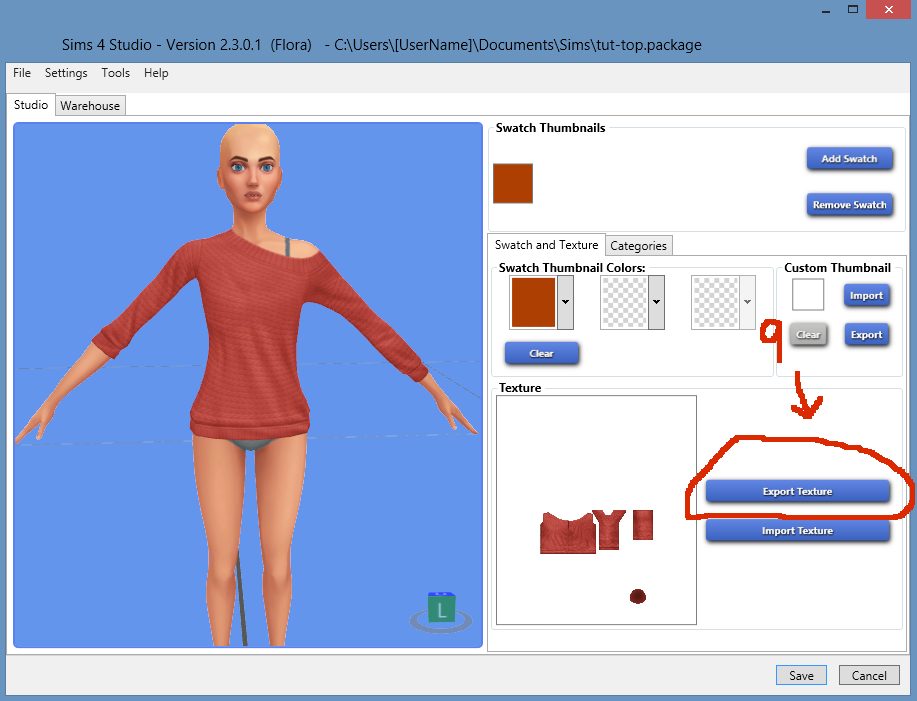
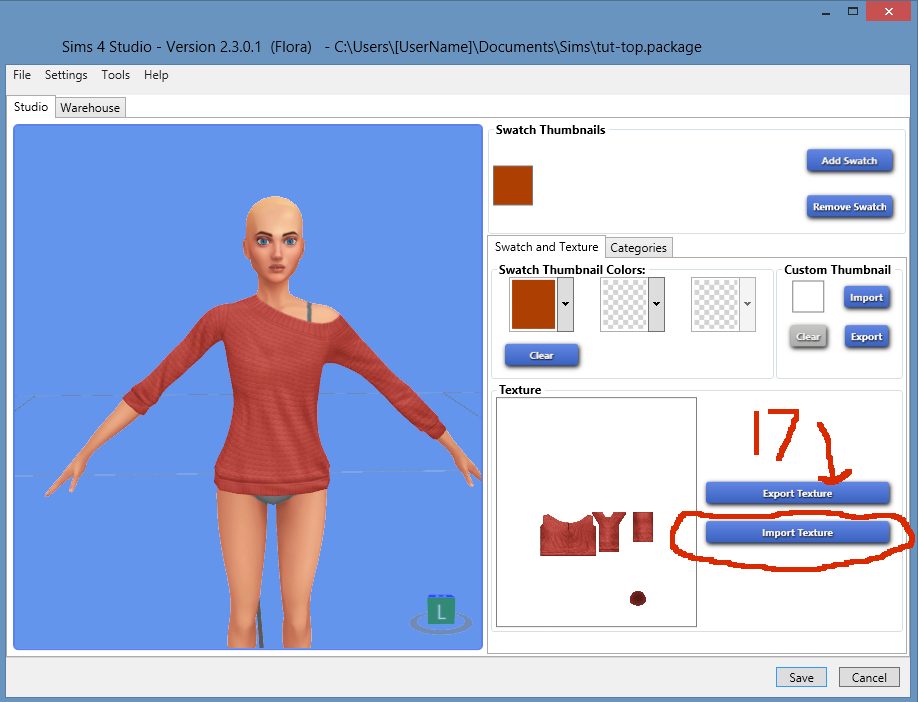
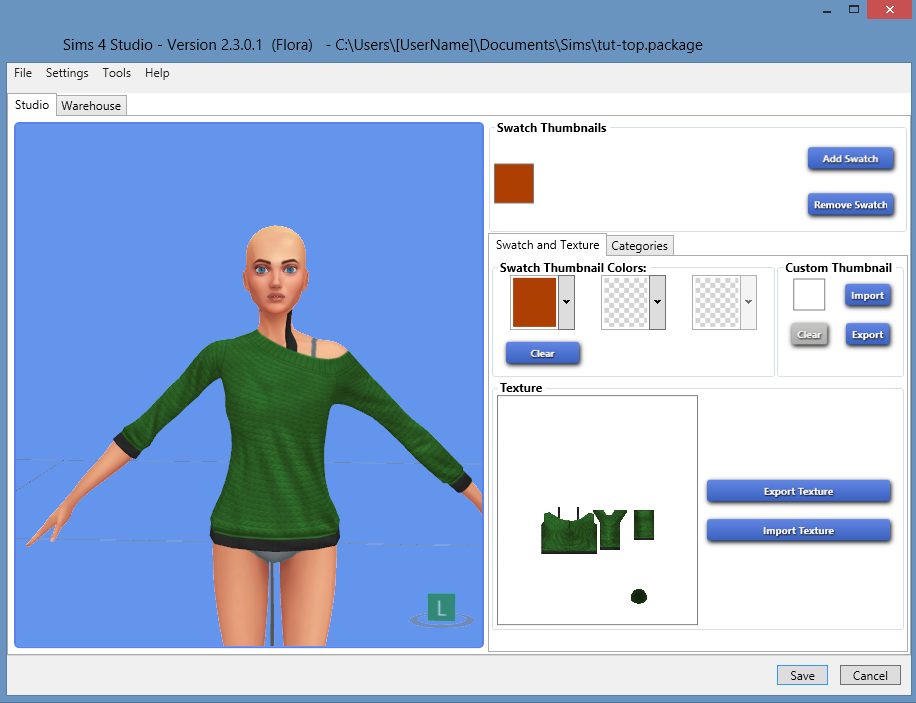
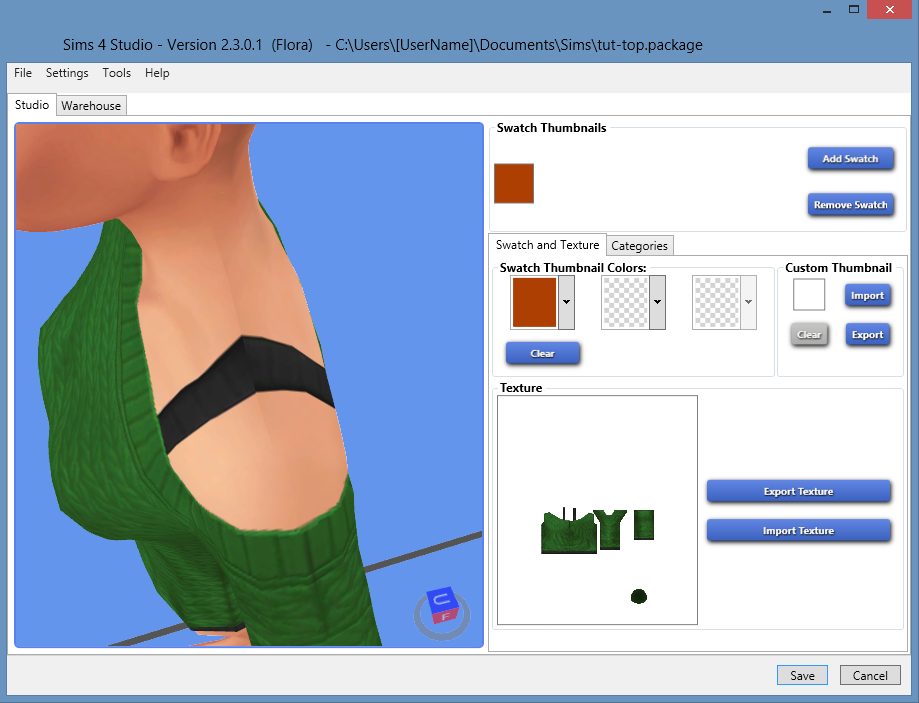
9. You will notice that along with the shirt, the model automatically has underwear on. Ironically, adding a tank top strap, like the one you see now, is part of what we're doing with this tutorial. In the regular game, you would not see the strap displayed right now. Click the "Export Texture" button.
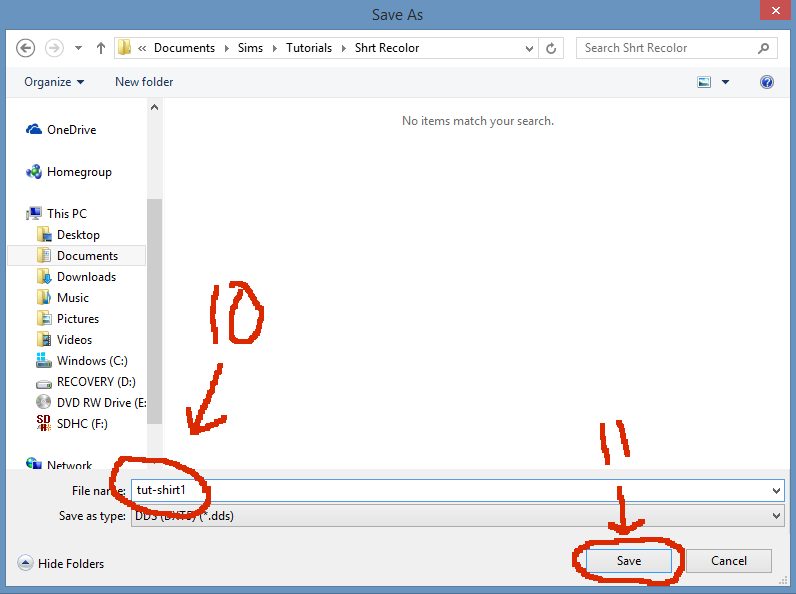
10. Give your shirt a name. This will not show up in the game.
11. Save your file.
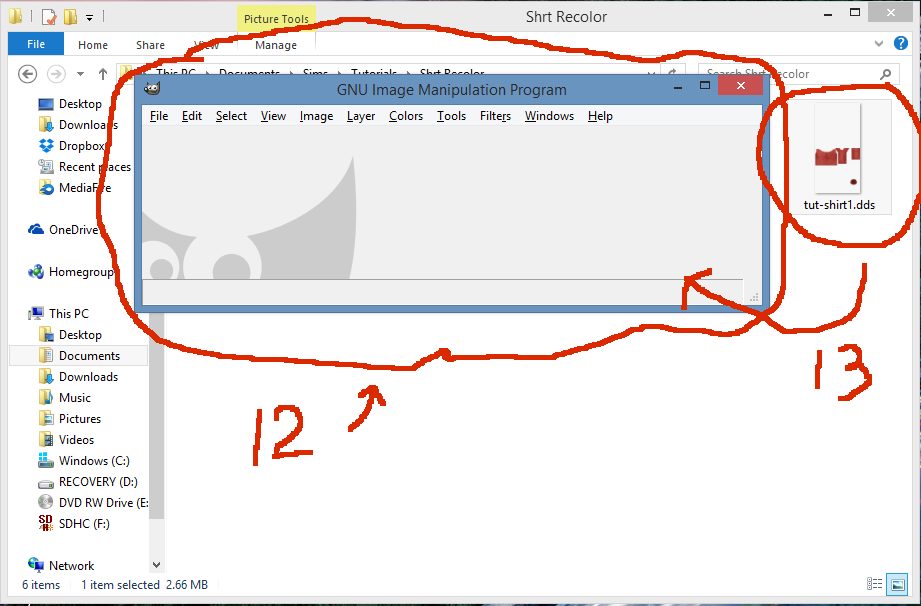
12. Open up Gimp. It should open as 2 windows. Don't worry about the toolbar window, we won't even need it. The only reason we're using gimp is to convert the dds file to a png. Paint Shop Pro, does not open dds files, and even with trying plug ins, I have had trouble with it, so we will use Gimp.
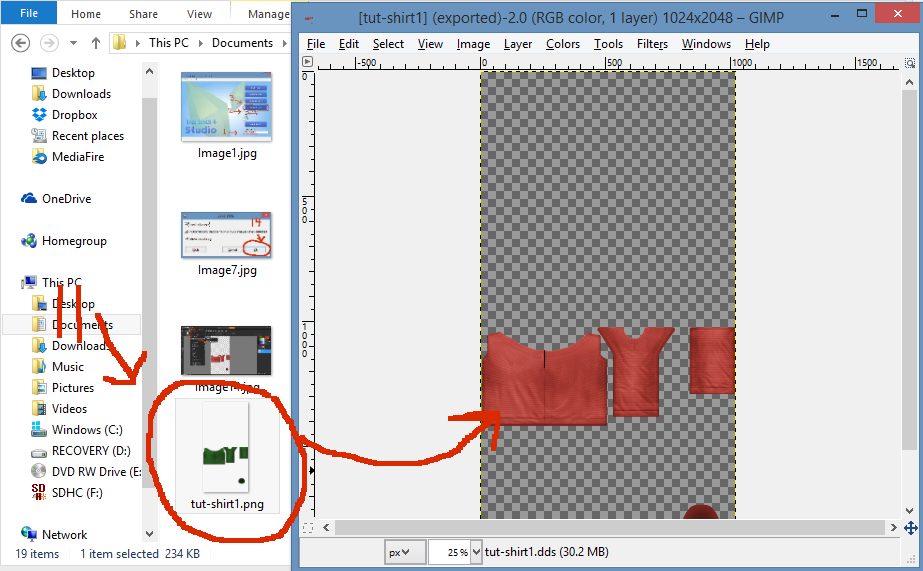
13. Open the folder you saved your shirt texture to, that is, the dds file. Drag it into Gimp.
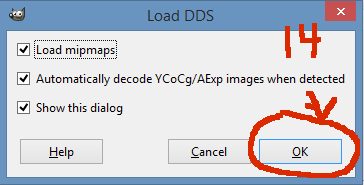
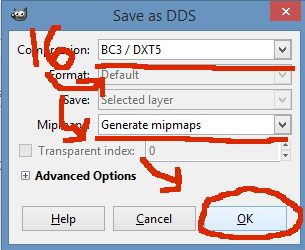
14. You will get this pop-up. Feel free to uncheck "Show this dialog," if you'd like. Click OK.
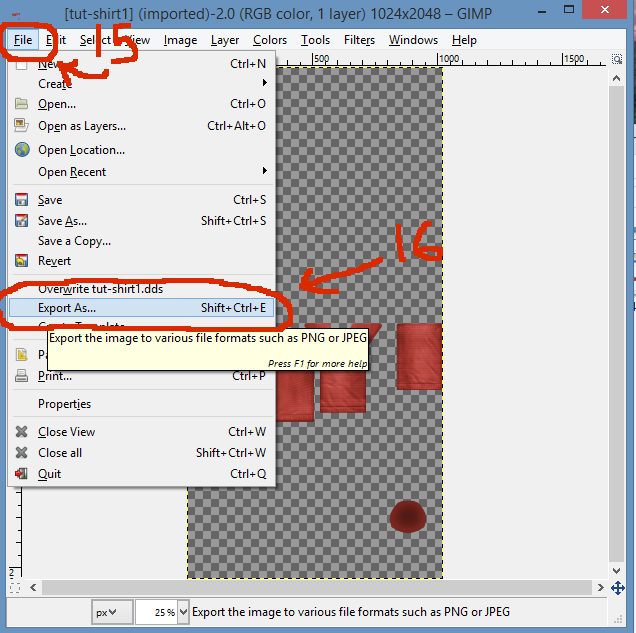
15. After the file opens up in Gimp, go ahead and click on the "File" Button in the top left corner.
16. Scroll down to "Export As..." and click it.
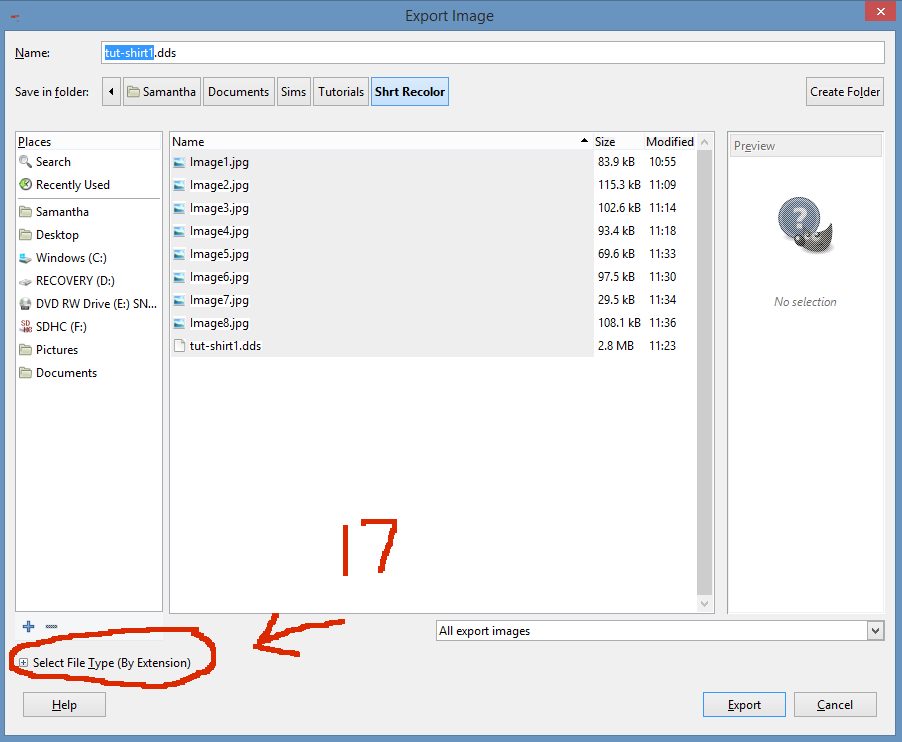
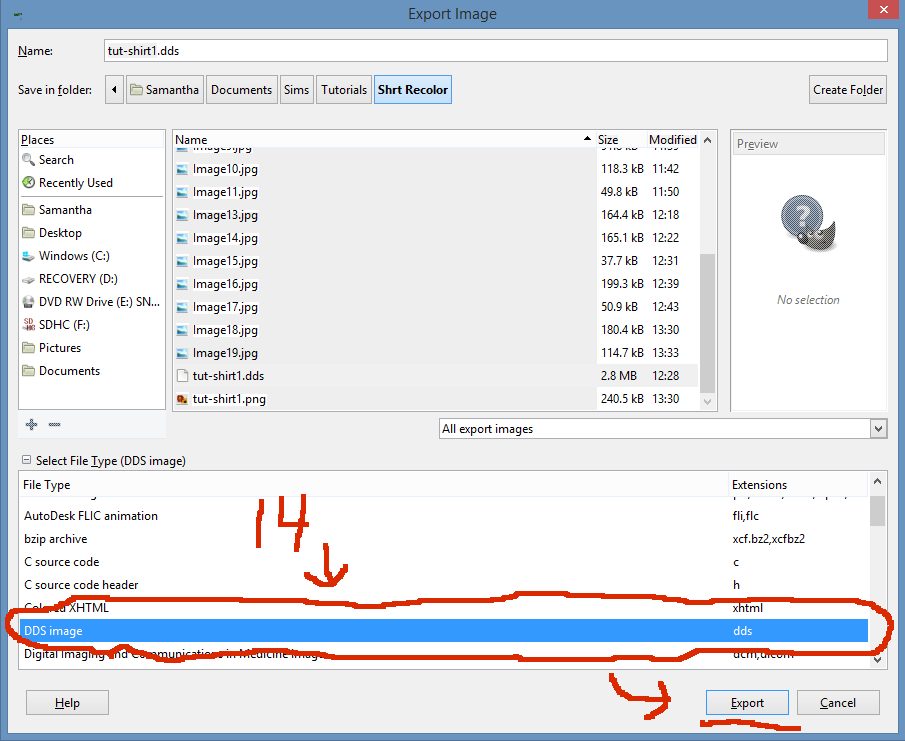
17. In the bottom left corner, right above the "Help" button, there is a small plus sign, which says, "Select File_Type" by it. Click on the plus.
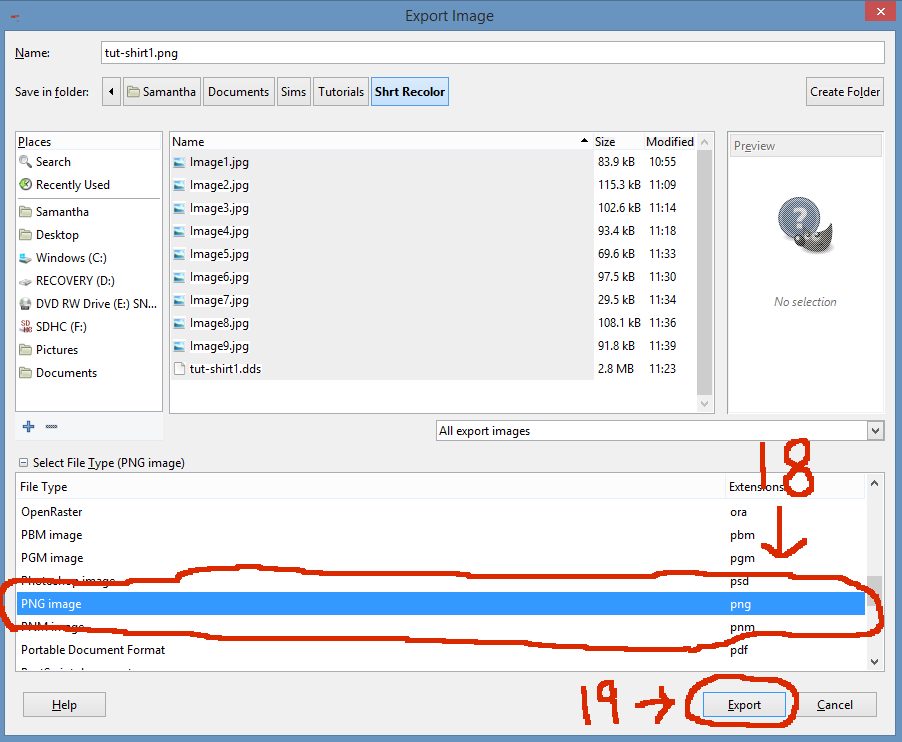
18. The menu will expand. Scroll down until you see "PNG Image." Select it.
19. Once it is selected, click "Export."
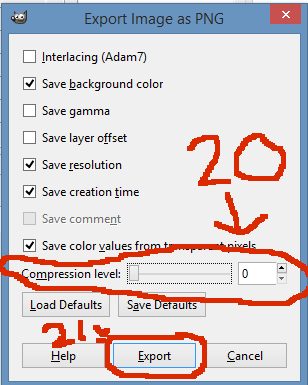
20. The default check marks, and menu that pops up is fine, except for the compression level. Pull the bar down to 0. The higher the compression the more distorted the image will be, to save space. We want it as uncompressed as possible for the highest quality image.
21. After changing the compression to 0, click the "Export" button.
Part II in next post.
Sims 4 Studio (Flora) - Download
Gimp 2.8 - Download
Paint Shop Pro - Download (The current version is 7, and I am using 6, but it shouldn't make a difference for this tutorial.)
This is what we will be making today:

Part I -Importing the texture file to Paint Shop Pro-
Let's get started! Open Sims 4 Studio.

1. Make a Creator Name. You can't get to the next screen until you choose a creator name. I use my real name, because that's just how I roll, but you can use whatever you'd like. =)
2. Click "Create CAS Standalone."
3. Click the big "Create Recolor" button.

4. Select Gender: Female, Age: Adult, and Part Type: Clothing Top, from the top left tabs.
5. Scroll down until you get to this off the should top, and select it.
6. Click "Next" in the bottom right corner.

7. Name your .package file. This is the file that essentially is your CC, the one you need in your game. For now, save it where ever you'd like.
8. Click "Save."

9. You will notice that along with the shirt, the model automatically has underwear on. Ironically, adding a tank top strap, like the one you see now, is part of what we're doing with this tutorial. In the regular game, you would not see the strap displayed right now. Click the "Export Texture" button.

10. Give your shirt a name. This will not show up in the game.
11. Save your file.

12. Open up Gimp. It should open as 2 windows. Don't worry about the toolbar window, we won't even need it. The only reason we're using gimp is to convert the dds file to a png. Paint Shop Pro, does not open dds files, and even with trying plug ins, I have had trouble with it, so we will use Gimp.
13. Open the folder you saved your shirt texture to, that is, the dds file. Drag it into Gimp.

14. You will get this pop-up. Feel free to uncheck "Show this dialog," if you'd like. Click OK.

15. After the file opens up in Gimp, go ahead and click on the "File" Button in the top left corner.
16. Scroll down to "Export As..." and click it.

17. In the bottom left corner, right above the "Help" button, there is a small plus sign, which says, "Select File_Type" by it. Click on the plus.

18. The menu will expand. Scroll down until you see "PNG Image." Select it.
19. Once it is selected, click "Export."

20. The default check marks, and menu that pops up is fine, except for the compression level. Pull the bar down to 0. The higher the compression the more distorted the image will be, to save space. We want it as uncompressed as possible for the highest quality image.
21. After changing the compression to 0, click the "Export" button.
Part II in next post.


