


Post by stephantom on Jan 25, 2017 21:55:28 GMT -5
Hi. I'm working on my first "frankenmesh" and I think I'm happy enough with the mesh as it looks in blender, but I can't figure out the last few steps of this process. I've looked at the tutorials here but I'm just having trouble following what's going on with the uv mapping portions of those tutorials. So, what I'm trying to do is add a modified version of the get-to-work vest to a long-sleeved shirt. The vest in this is an appended mesh, and I have a texture for it saved as a png. I opened that png texture in the uv editor and saw the mesh mapped onto it fine, tried to set the "texture" and "material" tabs' setting to use that image, while the rest of the meshes use the default "diffusemap" (the texture for the long-sleeved shirt underneath). Then I joined the vest mesh to one of the other meshes, saved, and tried to import into Sims 4 Studio.
![]()
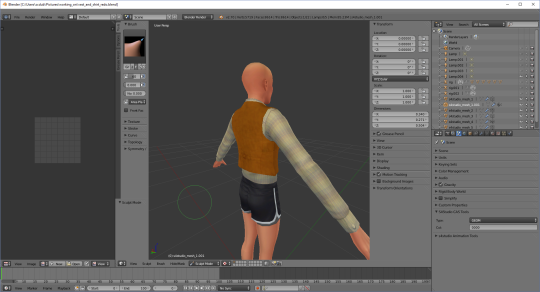
Here's the mesh for in Blender (above) and the mesh in Sims 4 Studio (below).
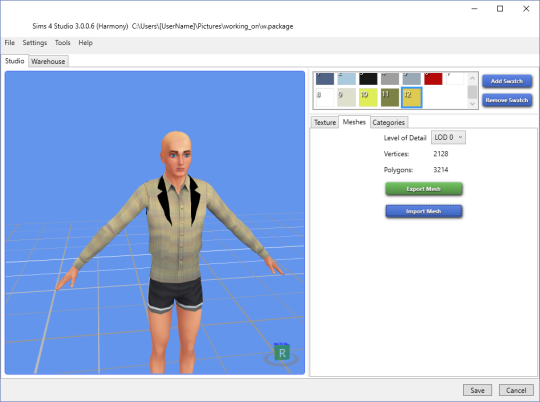
Clearly the texture for the vest part of the mesh isn't getting applied, so how do I make that happen? I think I'm missing something really fundamental about how uv maps and textures work. Is there a way to put two different maps together? If anybody could help me out, I'd be really grateful.
Edit:
Okay, I guess the key things were that I needed to weld the meshes together to create one uv map (maybe? is that actually necessary?) and then edit the two textures together in photoshop. This tutorial got me through more or less. (A different tutorial I'd seen gave me the impression that you could import a second texture into blender for a different mesh and then just join them with a click. Not so, I guess.)
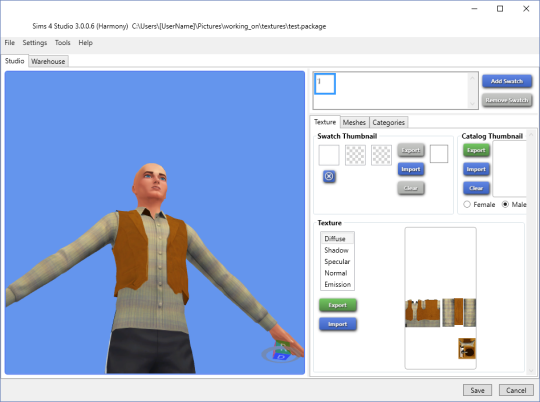
There was an attempt.
It's messy around the seams, probably because I didn't actually bother making real seams, beyond a little bit connecting the pieces toward the bottom of the vest. Is that important for getting the texture to fit neatly onto the finished mesh? I'm also unclear on whether adding and using the alpha channel (as described in the tutorial I linked) was needed for editing the texture, or if that was just a method for making all the parts visible while editing.
If you have quick advice or answers in response to this, I'd still appreciate it, but I guess my main issues are resolved and I can continue my haphazard attempts to figure all this stuff out.
Here's the mesh for in Blender (above) and the mesh in Sims 4 Studio (below).
Clearly the texture for the vest part of the mesh isn't getting applied, so how do I make that happen? I think I'm missing something really fundamental about how uv maps and textures work. Is there a way to put two different maps together? If anybody could help me out, I'd be really grateful.
Edit:
Okay, I guess the key things were that I needed to weld the meshes together to create one uv map (maybe? is that actually necessary?) and then edit the two textures together in photoshop. This tutorial got me through more or less. (A different tutorial I'd seen gave me the impression that you could import a second texture into blender for a different mesh and then just join them with a click. Not so, I guess.)
There was an attempt.
It's messy around the seams, probably because I didn't actually bother making real seams, beyond a little bit connecting the pieces toward the bottom of the vest. Is that important for getting the texture to fit neatly onto the finished mesh? I'm also unclear on whether adding and using the alpha channel (as described in the tutorial I linked) was needed for editing the texture, or if that was just a method for making all the parts visible while editing.
If you have quick advice or answers in response to this, I'd still appreciate it, but I guess my main issues are resolved and I can continue my haphazard attempts to figure all this stuff out.
