|
|
Post by wingly on Apr 12, 2017 14:38:26 GMT -5
I figured out how to make the item blink but I have no idea how to make it glow. I am not sure if it is even possible to get a solid glow without blinking or appearing distorted. Can anyone help me figure this out?  |
|
|
|
Post by Mathcope on Apr 13, 2017 20:34:16 GMT -5
Hi! To make the glow permanent and not to blink you need to make the emission map's alpha fully black. That will make the part you painted to be static.
|
|
|
|
Post by wingly on Apr 18, 2017 14:43:45 GMT -5
Thank you. It stopped the blinking and is a permanent glow. But, why is it distorted? Is there a way to fix this? Thank you   |
|
|
|
Post by inabadromance on Apr 18, 2017 17:03:44 GMT -5
hi! Can you share the .package file and emission texture?
|
|
|
|
Post by Mathcope on Apr 19, 2017 23:19:39 GMT -5
My guess it's that this is a issue with the uv_1. This map controls how the mesh will work with sliders. So it will deform it depeding on the body of the sim is wearing it. This map is not rendered in Studio's preview so it's normal that it looks different. You can try re-doing the data transfer with another option, or subdiving the reference mesh before applying the modifier and see if that helps.
|
|
|
|
Post by wingly on Apr 20, 2017 21:48:27 GMT -5
My guess it's that this is a issue with the uv_1. This map controls how the mesh will work with sliders. So it will deform it depeding on the body of the sim is wearing it. This map is not rendered in Studio's preview so it's normal that it looks different. You can try re-doing the data transfer with another option, or subdiving the reference mesh before applying the modifier and see if that helps. Thank you. That solved the distortion image. Mathcope is there a way to increase the glow? Make it more vivid and bright? |
|
|
|
Post by Mathcope on Apr 20, 2017 22:24:27 GMT -5
The RGB channel in the emission map controls the glow. You should make it brighter and vivid in that image.  I'm glad that worked . I think I saw your message yesterday about applying the data transfer to each part of the mesh. That's not what I meant. I mean that the mesh you use as a reference for the data transfer can be subdivided. This is a method to increse its polycount and so your mesh gets better results. If you select the EA mesh you use as reference (not your mesh) and go to edit mode, select everything and press W. Then choose subdivide. Do it as many times as you can. Take a look at THIS tutorial. This explains that subdiving helps for a smoother weight transfer. But it works the same for the data transfer. It will make your uv_1 look better. |
|
|
|
Post by wingly on Apr 20, 2017 22:28:49 GMT -5
I never knew about subdivding. Thank you for the tip! Can you take a look at the .package I sent you to help me with the coloration? I have tried to make it brighter but this makes it turn white.
|
|
|
|
Post by wingly on Apr 20, 2017 22:50:48 GMT -5
Ingame  |
|
|
|
Post by wingly on Apr 23, 2017 15:29:21 GMT -5
The RGB channel in the emission map controls the glow. You should make it brighter and vivid in that image. I'm glad that worked . I think I saw your message yesterday about applying the data transfer to each part of the mesh. That's not what I meant. I mean that the mesh you use as a reference for the data transfer can be subdivided. This is a method to increse its polycount and so your mesh gets better results. If you select the EA mesh you use as reference (not your mesh) and go to edit mode, select everything and press W. Then choose subdivide. Do it as many times as you can. Take a look at THIS tutorial. This explains that subdiving helps for a smoother weight transfer. But it works the same for the data transfer. It will make your uv_1 look better. I have tried to change the colour of the RBC to make the item glow with little luck. I am not sure what I am doing wrong to make it glow. |
|
|
|
Post by Mathcope on Apr 23, 2017 15:31:59 GMT -5
Hi! Sorry for the late reply, I'm quite busy in RL. I'm not sure what this could be. Can you post the .package again and the emission you are now working with? |
|
|
|
Post by wingly on Apr 23, 2017 16:17:15 GMT -5
Mathcope not a problem, i am not in any hurry, just was not sure if you were working on it or not, when you do find time, could you post a message saying checking it out :3 thank you
|
|
|
|
Post by Mathcope on Apr 25, 2017 18:22:59 GMT -5
Hi! I checked the files and those are the .blend files. I was talking about the .package of the item as well as the .dds emission map. This issue is related to the emission, so if it doesn't glow properly it should be the image the problem.
|
|
|
|
Post by wingly on Apr 25, 2017 23:42:37 GMT -5
How do I edit it to make it work properly? Could you give me a reference or could you edit the emission map I sent you so I know what I am doing wrong. Thank you.
|
|
|
|
Post by Mathcope on Apr 26, 2017 18:13:52 GMT -5
Hi again! I looked at the first emission map you linked. The problem is that in the RGB channel you didn't add any color. The emission map works with both, the RGB and the alpha channel. The alpha controls the frecuency of the emited light while the alpha controls the color effect. Although the diffuse also works for adding color the emission won't make the diffuse color to look brighter. If you do not add color to the emission map it won't show up in game. If you want the parts to emit bright green light you need to color the RGB channel in that areas. The alpha is not enoght by its own. Your RGB should look like this (or similar, you can choose the green color you want): 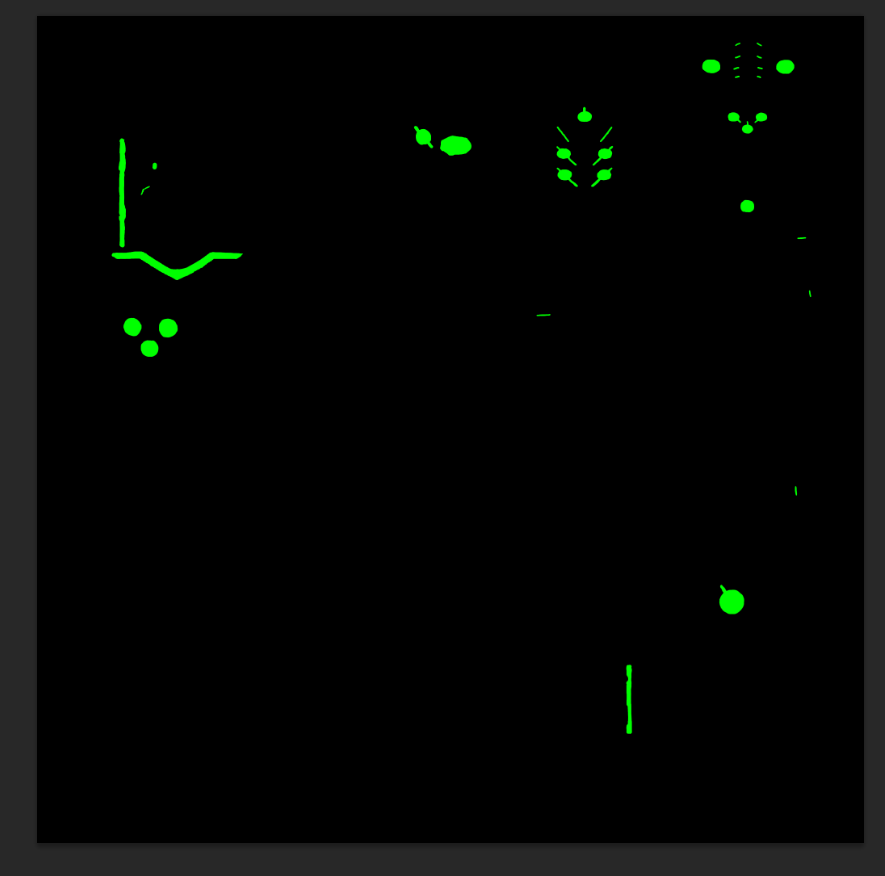
While the alpha is still the same one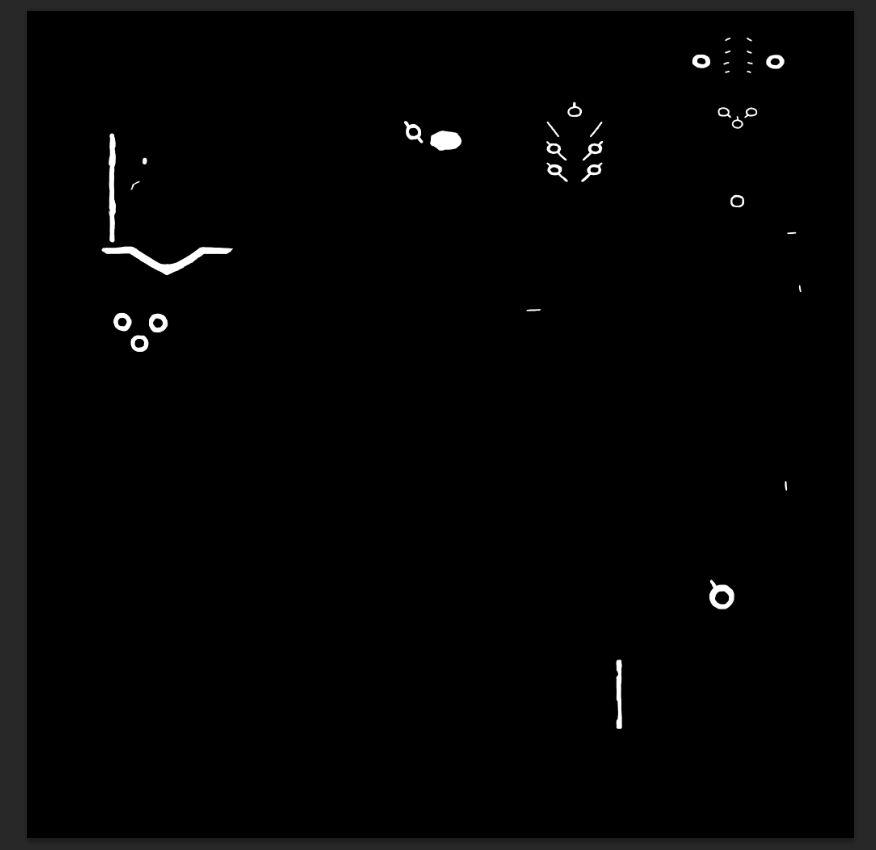 Save and Import back the new emission to Studio and check in game. If it doesn't work post the .package. |
|


 I'm glad that worked .