|
|
Post by Feyona on May 26, 2017 6:21:47 GMT -5
I checked both of .packages (next time post .blends as well, we need to see actual files that were imported in Studio), and both of them have the same problem which is incorrect weights on vertices. All inner vertices of the cap are assigned to right and left calves, therefor whenever your sim moves their calf, vertices move as well. Here is how to check it in Blender. Press rig, activate eye and arrow icons, also activate arrow icon on "bottom" part. Click on knees and on the bottom you will see the name of selected joint. Since vertices on the cap are assigned to the calves, select each calf joint and rotate it by pressing R. Your will see that vertices start poking outside, therefore it's not uv_1 problem in this case. You can cancel rotation by selecting calf joint and pressing Alt+R. 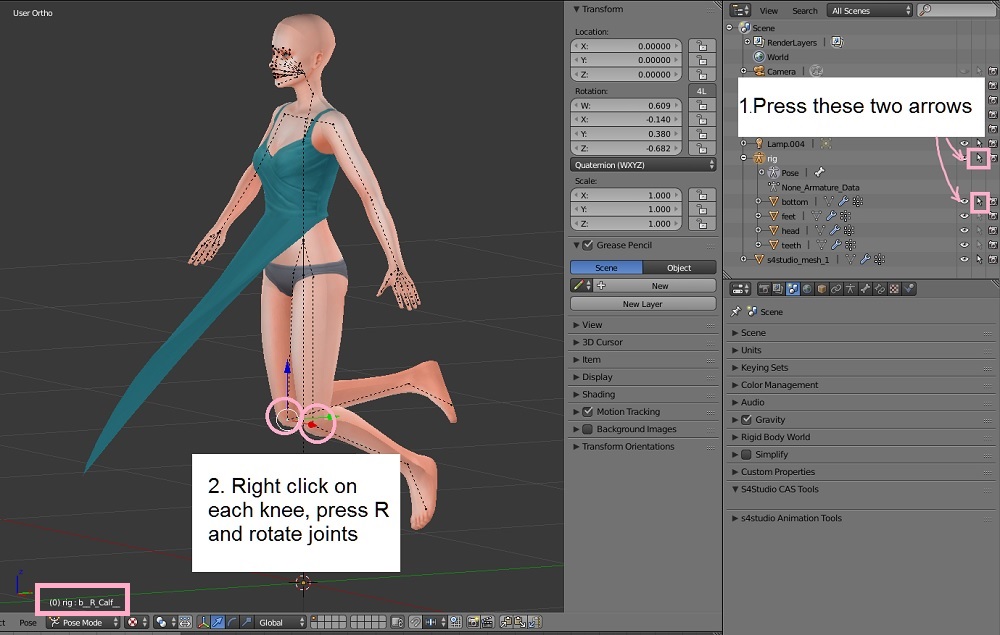 The fix is to take your primary .blend (the one before all extruding), select all vertices inside the cap, and delete bone assignment. When you done deleting, all vertices should be unassigned to any calf joint. Next step is to assign these vertices to correct joint, which is b__Spine0__ 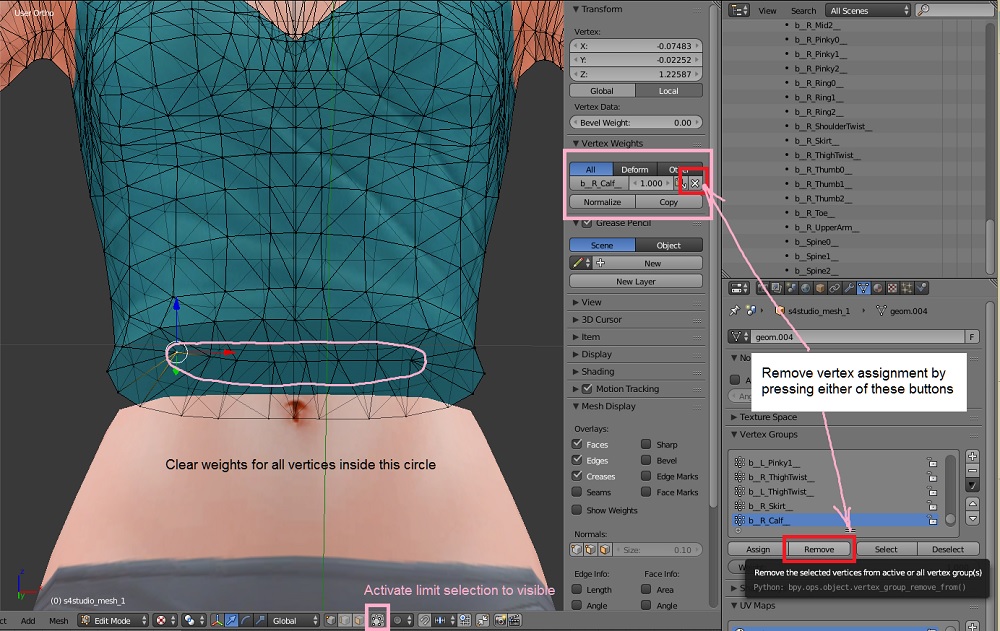 Scroll down and find b__Spine0__ bone while all of needed vertices selected, and press "assign". 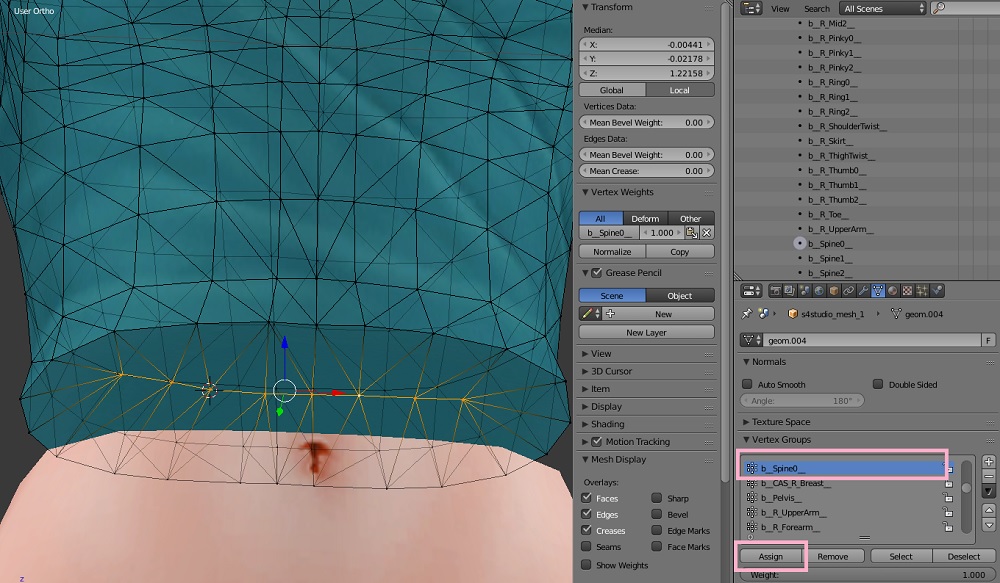 |
|
|
|
Post by Renorasims on May 26, 2017 16:02:05 GMT -5
Dear Feyona , Sorry for not adding the blend files! I will remember to do that in the future  Thank you so so so much for looking into it and helping me out  !!! I really was getting crazy over here  When I saw which weights were clinging onto that cap I also knew how it happened; I used the bottom-part of that BG dress to close the frankenmesh. Just a small note; when selecting all vertices within the circle you showed and then remove vertex weights I still had calves L/R clinging onto them at some places... not sure how that happened so I did that one by one. Maybe bc not all verts were merged? And one last quick question; Can this (calves L/R already assigned to the cap) also be a reason why brujah's tut wasn't working? or should is transfer weights even though there are already weights assigned from another vertex group? With your explanation I will be able to prevent this in the future and take the next step into meshing  Hopefully in the future I can help out others here who are struggling just as me now
And ofcourse also a shout-out to Zelrish @peterssparker and haya194 for the first aid and all your advice! They were not in vein!
Ignore the black flowers and the lack of shadow, it's far from finished :P

|
|
|
|
Post by Renorasims on May 26, 2017 16:05:06 GMT -5
I recommend subdividing the reference mesh for a better end result. Hi! I tried this but the top went from 2200 to 8000 verts and 14.000 poly's... which is a bit much for just a top  Not sure what you meant with this. You said reference mesh, as in for mapping the UV1? |
|
|
|
Post by inabadromance on May 26, 2017 18:51:06 GMT -5
I recommend subdividing the reference mesh for a better end result. Hi! I tried this but the top went from 2200 to 8000 verts and 14.000 poly's... which is a bit much for just a top Not sure what you meant with this. You said reference mesh, as in for mapping the UV1? is talking about the mesh you use to grab the information of weight and uv_1 from. You can read this tutorial about it. |
|
|
|
Post by Feyona on May 26, 2017 20:00:36 GMT -5
When I saw which weights were clinging onto that cap I also knew how it happened; I used the bottom-part of that BG dress to close the frankenmesh. I figured that out . Next time you can make a cap by selecting extruding edges (select all edges, click E, then click S and scale them down. Switch to vertex mode and click Alt+M to connect all vertices at center), and if you see that some newly created faces look inside instead of outside, you need to flip direction of normals on selected faces. Next step after extruding would be creating new uv for the cap, if you want to make a separate texture for it. Uv_1 will be fine in this case. Just a small note; when selecting all vertices within the circle you showed and then remove vertex weights I still had calves L/R clinging onto them at some places... not sure how that happened so I did that one by one. Maybe bc not all verts were merged? You need to click each vertex (you have doubles there, by the way, so you can remove doubles before deleting joints assignment) to delete joint assignment. Some of vertices are assigned only to one bone, other are assigned to 2 bones. And one last quick question; Can this (calves L/R already assigned to the cap) also be a reason why brujah's tut wasn't working? or should is transfer weights even though there are already weights assigned from another vertex group? I think it did prevent from inheriting correct weight from reference mesh. When you transfer data from your mesh it should be clean of any weights/joint assignment. Each vertex can be assigned to as many bones as needed, total weight of all bones will be 1.000 (one). If you vertex assigned to 2 bones (joints) and total weight is 1.000, you can't assign any more weight than it's already assigned. For future, if you see that your mesh works properly and there is only one glitch in particular place, you can re-assign weights to part of the mesh. Let's say you want to fix weights on the cap by transferring weights from another mesh. What I would do, I would detach the cap only, transfer weights to it, append in the file with working mesh, delete cap faces with incorrect weights and join 2 meshes in one (main mesh sans cap + cap with new weights). For me it's easier and faster to do the way I posted before, particularly if I had to fix weights on the cap because it's assigned only to one bone. But in other cases I would use the method I just wrote about. |
|
|
|
Post by Renorasims on May 27, 2017 9:00:47 GMT -5
To prevent a endless quote I'll tag you guys; inabadromance thank you for tip! I'll look into that tonight! Feyona okay that's probably better to do then what i did by using the cap (and all the unwanted other features that got with that  I can laugh about it know but I was getting pretty desparate!  ). I'm almost afraid to post this but i'm gonna try anyway  ; I have some weird shadows in the chest area and bottom that aren't in the diffuse (photoshop made shadows) and I have no idea where they come from  . I think it happened when maybe removing doubles (?) , haven't altered shading in the shading/UV's tab.which probably happened bc I used a UV1 from another top that does not have flowers/anything in that area. Gonna try to fix that now, not sure how but I'll keep trying If you guys still wanna lend a hand (I understand if you don't) HERE are the files (blend, package) As I am searching the forum here I see a tut of UNtraditionalnerd about splitting edges  Think I have it!!!*fingers crossed* Not sure though, gonna try and do it right now Think I have it!!!*fingers crossed* Not sure though, gonna try and do it right now And morphable flowers...  (Yay!!!  Redid the UV1 by taking back the original BG dress mesh and making it shorter to match the length of my top. Only miss a small a abdomen part (2 rings of faces) but in-game it does seem to be missed by the game (also stress tested sliders, no strange things). Redid the UV1 by taking back the original BG dress mesh and making it shorter to match the length of my top. Only miss a small a abdomen part (2 rings of faces) but in-game it does seem to be missed by the game (also stress tested sliders, no strange things).
It really feels like when I figured out one issue the new one arrives just around the corner. grrrr.... Gonna edit the title of this threat after this threat is 'done' so other (struggling) people can find this easier through using the searchbar.
YASS it's solved!!! Again thank you to all who helped!


|
|


 !!! I really was getting crazy over here
 Not sure what you meant with this. You said reference mesh, as in for mapping the UV1?
 I can laugh about it know but I was getting pretty desparate!
  ).
).  . I think it happened when maybe removing doubles (?) , haven't altered shading in the shading/UV's tab.which probably happened bc I used a UV1 from another top that does not have flowers/anything in that area. Gonna try to fix that now, not sure how but I'll keep trying
  Think I have it!!!*fingers crossed* Not sure though, gonna try and do it right now
 Redid the UV1 by taking back the original BG dress mesh and making it shorter to match the length of my top. Only miss a small a abdomen part (2 rings of faces) but in-game it does seem to be missed by the game (also stress tested sliders, no strange things).