|
|
Post by untraditionalnerd on Jan 2, 2016 12:07:00 GMT -5
Hi, I tried to make a map to show you where each part "should go". 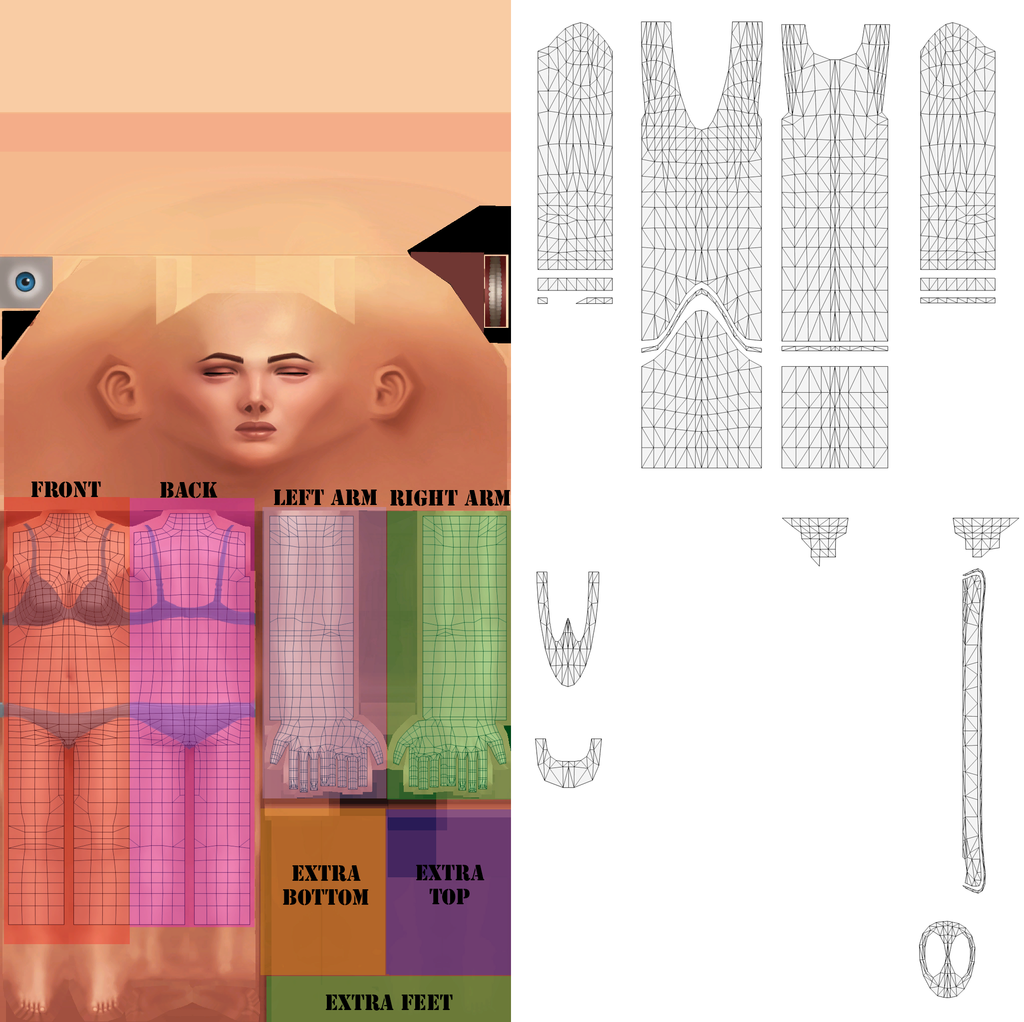 As you can see the body parts have to be moved in the left mid part. The sleeves on the right. The extra parts like the collar and some details can be either put in the extra parts slots or between the arms since it's a top. If it is an outfit you can freely put the collar and the other details in both extra slots if it is a top I suggest to put it on the right because this way texture overlapping is less likely to happen. Remember when you are moving the uv islands always check the uv maps of the body parts that your mesh will have. In this case you have to pay attention to not overlap the neck area, part of the legs and the hands. Let me know how it goes  UN |
|
|
|
Post by untraditionalnerd on Dec 30, 2015 17:08:36 GMT -5
Detailed Feet Simple edit. No random allowed. Female only. TA/E Human & Alien Available as Default replacement. Pick only one file
Download: Default Replacement FeetStandard FeetT.O.U. Please do not steal, re edit and publish as your own. Please do not re upload it else where. I do not take money for this and you should not even think about it. For real this is hard work to get this to work as I want so please don’t be mean! If used for photo shoots or something else let me know  I will love to like, and reblog. UN #cas #female #feet |
|
|
|
Post by untraditionalnerd on Dec 28, 2015 19:28:48 GMT -5
Detailed Feet Simple edit. No random allowed. Male only. TA/E Human & Alien Available as Default replacement. Pick only one fileDownload: Default Replacement Feet
Standard Feet
T.O.U. Please do not steal, re edit and publish as your own. Please do not re upload it else where. I do not take money for this and you should not even think about it. For real this is hard work to get this to work as I want so please don’t be mean! If used for photo shoots or something else let me know I will love to like, and reblog. UN #cas #man #feet |
|
|
|
Post by untraditionalnerd on Nov 27, 2015 18:59:11 GMT -5
Steampunk Sunglasses
M/F T/A/E No Random Allowed
7 Colors available
TOU
Do not re upload as yours. Do not edit the mesh. If u want to recolor let me know and I will provide the png :3. Let me know if you recolor anyway I want to see them and reblog/like if released. If you want to release a recolor it CAN’T be a stand alone version. It must need my package <3. If used pls tag me.
Please let me know if there is any issue. Let me know if you have any feedback or suggestions.
UN
#cas #man #wmn #Steampunk #sunglasses
|
|
|
|
Post by untraditionalnerd on Nov 26, 2015 23:38:58 GMT -5
Hello everyone! I started streaming while I work on CCs Since i'm not the best at tutorials I welcome you to come there and ask me what ever you want to know. In my first stream I covered few basics things. I showed how to add a normal map, how to create one and how to create a specular map. I also showed the basic rules of UV_1 editing. If you have anything that you want to know or something that doesn't work let me know here and I will add it to the list of things I will talk about I will post here when I plan to stream the next time. UN |
|
|
|
Post by untraditionalnerd on Nov 26, 2015 17:32:57 GMT -5
Fancy Mustache T/A/E No random Allowed EA match= 18 colors Download : Stubble Version : Download
Shaved Version : Download
UN #cas #man #mustache |
|
|
|
Post by untraditionalnerd on Oct 26, 2015 20:16:06 GMT -5
"I love you"
3 simple words and this wings are about them :3
Poly count: 34k
TOU
Do not re upload as yours. Do not edit the mesh. If u want to recolor let me know and I will provide the png :3. Let me know if you recolor anyway I want to see them and reblog/like if released. If you want to release a recolor it CAN’T be a stand alone version. It must need my package <3. If used pls tag me.
Please let me know if there is any issue. Let me know if you have any feedback or suggestions.
UN#cas #wings
|
|
|
|
Post by untraditionalnerd on Oct 23, 2015 16:08:40 GMT -5
Hello guys A new leather harness and a new pair of wings in one single CC!  6 colors - no random allowed. Lets talk about numbers.. The whole thing is about 11k poly. The torso is about 3k so the wings are about 8k :D I could provide this as accessory but it would clip with almost every top. If you guys want I can do it. TOU Do not re upload as yours. Do not edit the mesh. If u want to recolor let me know and I will provide the png :3. Let me know if you recolor anyway I want to see them and reblog/like if released. If you want to release a recolor it CAN’T be a stand alone version. It must need my package <3. If used pls tag me. Please let me know if there is any issue. Let me know if you have any feedback or suggestions. UN #cas #man #leather #wings |
|
|
|
Post by untraditionalnerd on Oct 19, 2015 18:51:14 GMT -5
Hello everyone ! This is Minotaur v2 tattoo converted for humans. 6 base colors + 2 gradients Male only. No random allowed. T.O.U As always do not re upload somewhere else, do not edit it and say it is yours. if you want to recolor send me a message . If used in any pic please tag me so I can see it <3 Let me know if there is a problem with it. I will try to fix it :3 UN #cas #man #tattoo |
|
|
|
Post by untraditionalnerd on Oct 18, 2015 17:58:48 GMT -5
Hi,
The idea is to lower the poly count and then fix any weight problem that could happen.
Try to use the Decimate modifier and reduce the poly count and use that. Test it in game and see if it works correctly. If not let me know :3
UN
|
|
|
|
Post by untraditionalnerd on Oct 13, 2015 11:39:49 GMT -5
Hi,
After you press P click on Selection.
As you can see from your screenshot you opened "Separate" menu and you simply have to select the way to split the mesh. In this case Selection is the way to go :3
UN
|
|
|
|
Post by untraditionalnerd on Oct 10, 2015 18:52:36 GMT -5
The file that you can use can be a 1024*2048 or 1024*1024 DDS. If you are working on a project that in the texture doesn't have anything above the head you have to use 1024*1024. ( like a top, a bottom or shoes) If your project is an accessory you can use the 1024*2048. If you want a part of the mesh to not have any glow you have to keep it black. Hi, so I checked your files and I can see that you used a 1024*2048 instead of a 1024*1024. Your project uses a bump map that is 1024*1024 and it has no extra parts in the accessory area. If you change your emission map to 1024*1024 the emission map will work if you still have problem with the map or notice any breaking I can tell you few things from my own experience: You might want to edit a bit the emission map and get it to be a one color image. I would also check the mask of the emission map. Try to cut it that the mask is one or 2 pixels bigger of the actual image. It will avoid the breaking of the light. Just remember that anything that is black on the RGB channel will not get the effect of the map so you don't have to worry about that. Let me know how it goes UN |
|
|
|
Post by untraditionalnerd on Oct 9, 2015 17:20:47 GMT -5
Spooky wings! no random allowed - one color - 48k poly If you use them with a CC that kills Specular map they will look bad so don’t complain :3 Told you! XD If you guys want any color combination drop me a message. I will be happy to provide it. Video TOU Do not re upload as yours. Do not edit the mesh. If u want to recolor let me know and I will provide the png :3. Let me know if you recolor anyway I want to see them and reblog/like if released. If you want to release a recolor it CAN’T be a stand alone version. It must need my package <3. If used pls tag me. Please let me know if there is any issue. Let me know if you have any feedback or suggestions. UN #cas #wings |
|
|
|
Post by untraditionalnerd on Oct 9, 2015 9:21:24 GMT -5
Yes, send me the folder I will look at it and let you know UN |
|
|
|
Post by untraditionalnerd on Oct 8, 2015 20:59:16 GMT -5
Thank you OM for answering. I wanted to answer but then I got dragged away by a project and forgot about it >.<
Only thing I will add is that if you want to have a custom Emission or Bump map you need to directly link it to the geometry. As OM said the only way for us to have them is to hit Create 3D mesh.
Thank you again OM
UN
|
|


 I will love to like, and reblog.