|
|
Post by HazzaPlumbob on Nov 17, 2017 13:08:35 GMT -5
It's that age old question, how do you get a custom Sim from CAS into Blender? I've seen it done by a few people here, but with no explanation of how they've done it! I've spent many hours searching for an answer and I can't find one anywhere. Does anyone have a clear tutorial or helpful hints on how to extract a custom Sim (I assume using NinjaRipper I guess?) and then rig it so it's poseable to use in renders? Any help would be most appreciated!  |
|
|
|
Post by HazzaPlumbob on Jul 15, 2017 11:11:06 GMT -5
Oh never mind, I've fixed it now! Turns out I hadn't vertex painted the mesh yet, that what was causing the issue! Hairline works perfectly now, thank goodness! :D
|
|
|
|
Post by HazzaPlumbob on Jul 15, 2017 10:51:55 GMT -5
This is so weird, I've done everything I can think of and nothing seems to work. I know the hairline matches the shape of the head perfectly inside Blender (and in S4S preview), it looks identical to any of the EA hairlines, I don't want to push it into the head because none of the EA hair's look like that. The hairline does in fact move as you push and pull the face around, except for the forehead as you can see in this picture..  As I pull the brow the hairline moves with it, but if I try to pull the forehead out, the hairline doesn't move at all (but it should because the EA hairs all do). I'll try transferring the weights from some other hairs and if that doesn't work then I'm out of ideas! |
|
|
|
Post by HazzaPlumbob on Jul 14, 2017 17:41:40 GMT -5
|
|
|
|
Post by HazzaPlumbob on Jul 14, 2017 17:31:50 GMT -5
As in the hair before I weighted it? Or the EA mesh I transferred the weight from?
|
|
|
|
Post by HazzaPlumbob on Jul 14, 2017 15:51:57 GMT -5
|
|
|
|
Post by HazzaPlumbob on Jul 14, 2017 10:53:42 GMT -5
I'm using 2.8 I think, do I need to download a previous version? I tried weight tranfer with the 2.8 version and it did nothing, the hairline is still static.
|
|
|
|
Post by HazzaPlumbob on Jul 14, 2017 8:59:08 GMT -5
Oh ok, I've got it working now! Thank you so much for all your help and for being so patient, I'll remember to organise my meshgroups from now on.
One last question, regarding the glitchy hairline, is it possible to link the hairline to the face so it moves and distorts as I move the Sim's face around? For instance, if I put an EA hair on my Sim and play around with the face, the hairline will distort along with it, where as my hair just stays static.
I have it linked with the head joint thingy, but can I join it with other parts of the face as well?
|
|
|
|
Post by HazzaPlumbob on Jul 13, 2017 15:13:40 GMT -5
Ok I'm stuck again, when you say the order should be '0001, 0002, 0003' are you talking about the hat chop GEOM numbers? If so, which number corresponds to which mesh? I read somewhere that the flat hat chop GEOM was '0000', the slanted hat chop GEOM was '0001' and the complete hair mesh GEOM was '0002' and that's how I've set mine up.
|
|
|
|
Post by HazzaPlumbob on Jul 13, 2017 14:57:50 GMT -5
Yay! That's good to hear that you got it working! The numbering of the hat chops really does confuse me because they appear to be different per hair mesh.
But I'll try out what you've suggested and see if I can replicate the results.
Thank you for all your help inbadromance, I really appreciate it! :D
|
|
|
|
Post by HazzaPlumbob on Jul 13, 2017 14:14:01 GMT -5
Well this is embarrassing, turns out I actually hadn't deleted any of what I said I had... Now I have the texture is perfectly clear! Still having trouble with the hat cuts though.  |
|
|
|
Post by HazzaPlumbob on Jul 13, 2017 14:02:11 GMT -5
The hair doesn't have a specular yet, I wanted to test it in game first before I added the specular and recolours. But I made sure to delete the specular, bump, shadows and everything from the hair that I was grafting onto. Just thinking about it, it could be the bump map, maybe it's the wrong size and isn't aligning properly. Here's the link to the package and .blend files: drive.google.com/open?id=0Bz9lXDRWBYS2Y2xlWWU4VHBQcUUThanks for the reply, I'll try that idea of sinking the hairline into the head. I would have thought it would align up perfectly seeing as it does in Blender, guess not. |
|
|
|
Post by HazzaPlumbob on Jul 13, 2017 12:51:02 GMT -5
Hi everyone, I'm Hazza! You might have seen some of my stuff on Twitter, I mostly make renders but I've decided to branch out into CC as well. I'm really excited to start making my own content and I've found the tutorials here to be really helpful. :D
|
|
|
|
Post by HazzaPlumbob on Jul 13, 2017 11:24:45 GMT -5
Hi all! I'm really excited to start creating my own custom content, it's something I've always wanted to explore and only recently had the guts to do so. I'm trying to create my own hair mesh, from scratch, and I've run into a few issues (as you'd expect) so I'd appreciate any help you can give! Because I'm new to creating CC, I've not yet wrapped my head around things like weight, or what the uv_1 does, and stuff like that. I can mesh fine, I can texture fine, but it's the rest that's left me scratching my head. Here's a few screenshots of my hair so you can see where I've gone wrong. I have no idea what is going on with the texture.. 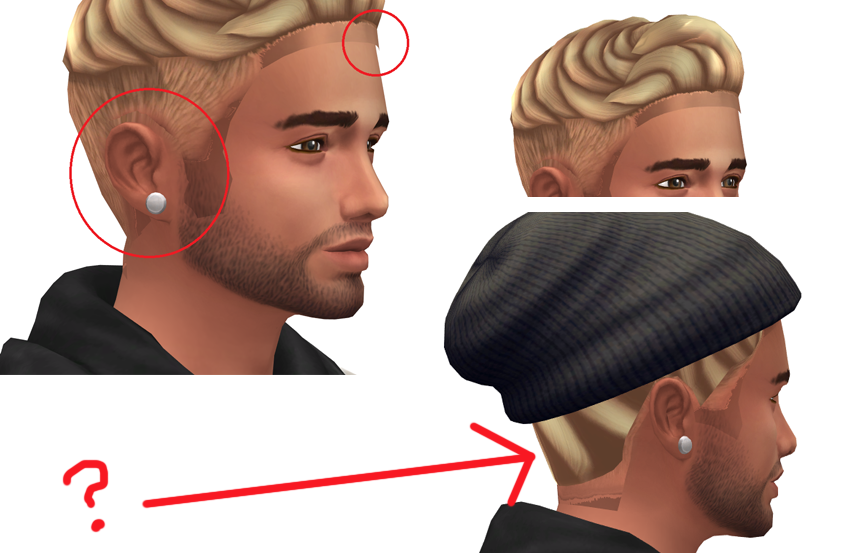 As you can see there are a few problems, the first is that the hair isn't blending seamlessly into the rest of the face, it sticks out at the front and the textures sort of glitch out around the edge of the hairline and around the ears. The second problem is that the textures for the hat cut meshes look really weird and don't match the main texture for the hair. I have absolutely no idea what's going wrong in either of these cases, but if anyone can help then that'd be super! Thanks a lot, Hazza. |
|
|
|
Post by HazzaPlumbob on Jul 13, 2017 10:48:40 GMT -5
Hi! Is there an updated version of this tutorial anywhere? The images aren't showing up anymore and I'm a visual learner so I kind of need images to go with the words or I just get lost. :-[
|
|


