|
|
Post by Galaxsim on Apr 15, 2019 0:25:52 GMT -5
Hi there, I recently converted a spacesuit from the sims 3 and it works relatively fine in my game; however, when I go to change my sims' outifts, there is always an issue where part of the right foot goes through the body/kind of distorts. This is what it looks like: 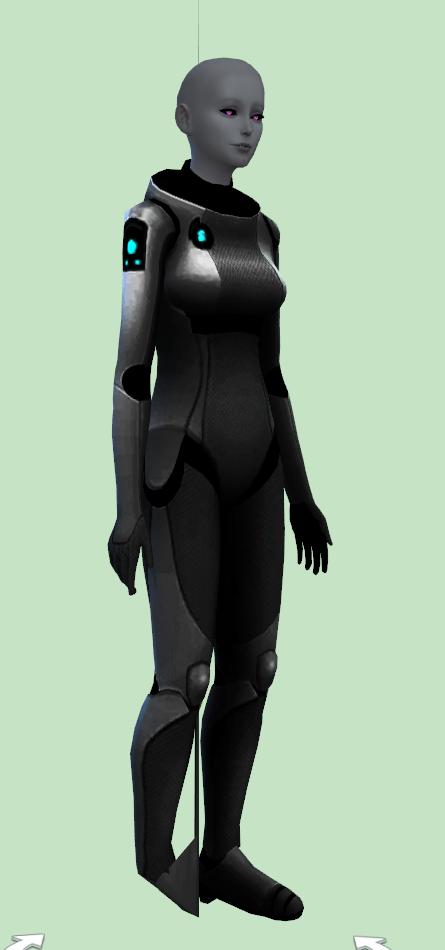 I tried re-doing the weights and cleaning them, but every time this foot issue pops back up (and it's only THIS foot). I double checked if the weight transferred properly in blender 2.70 and they did. I can't understand why this keeps on happening because when I go in game initially there is no problem with the mesh until I go back into CAS from live mode then THIS appears. Any help please? I can put links to the blend files (original and cleaned versions) if needed. Thanks |
|
|
|
Post by Galaxsim on Apr 15, 2019 0:35:49 GMT -5
UPDATE:I uploaded the .blend files for all the meshes (there's a male and a female version of the spacesuit, both have the same foot problem). This is the blend file for the female suit and this is the file for the male one (both are the most recent versions created, after re-transferring weights and cleaning to try and fix the problem—I got this solution from another creature converting a full body outfit on the forums so I thought it would work).
|
|
|
|
Post by Zelrish on Apr 15, 2019 2:08:44 GMT -5
Hi Galaxsim, I don't see anything wrong either here. It could be due to the base mesh you used as a clone. You could try cloning something different and see if the issue is still there. But generally this kind of issue is due to not having the same number of weight groups on the cloned mesh and on what you import back in. |
|
|
|
Post by mauvemorn on Apr 15, 2019 2:30:05 GMT -5
Hi. As Zelrish said, you should find an outfit that has foot and toe bones and use it to re-start your package.
|
|
|
|
Post by Galaxsim on Apr 15, 2019 8:52:18 GMT -5
Hi Galaxsim, I don't see anything wrong either here. It could be due to the base mesh you used as a clone. You could try cloning something different and see if the issue is still there. But generally this kind of issue is due to not having the same number of weight groups on the cloned mesh and on what you import back in. Hi thanks for answering. I followed a tutorial that said to merge all the cas groups into one and then clone a full body outfit with only one cut. Is there a list on the website somewhere that details base meshes Which also include weight groups for feet? Looking through s4s I’m not sure which of the costumes I should use (like the Star Wars one’s and the knight costume for example). Additionally, when I do find a new beads mesh to clone, do I also have to redo the weights or do I just have to separate the cas groups into the corresponding cuts of the base mesh? |
|
|
|
Post by mauvemorn on Apr 15, 2019 13:13:34 GMT -5
There is no such list, but you can use this outfit. It is split in a weird way, tho. Either separate fingers just like they did or select one polygon somewhere between legs, separate it with P - Select and give it 0001 cut number.  |
|
|
|
Post by Galaxsim on Apr 15, 2019 22:46:14 GMT -5
There is no such list, but you can use this outfit. It is split in a weird way, tho. Either separate fingers just like they did or select one polygon somewhere between legs, separate it with P - Select and give it 0001 cut number. Okay so I had to do another method because the one you suggested didn't work though I tried it three times. However, I've encountered another problem. There's a rogue vertex on the feet of the female suit and I don't know how to fix it: 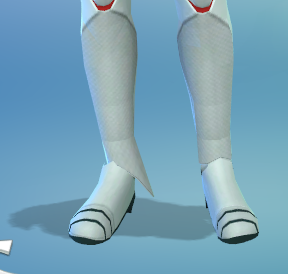 Since everything else now works fine, is this a weight issue or something to do with the cuts (of which there are 3 since I cloned a new, different, mesh) |
|
|
|
Post by mauvemorn on Apr 16, 2019 3:48:02 GMT -5
Weight problem. In Edit mode select vertices (one at a time) in this area and look if there is a vertex group that does not belong there. Once you find it, click on the x icon next to it and then on Normalize button  |
|
|
|
Post by Galaxsim on Apr 16, 2019 22:38:36 GMT -5
Weight problem. In Edit mode select vertices (one at a time) in this area and look if there is a vertex group that does not belong there. Once you find it, click on the x icon next to it and then on Normalize button Hi again. So I tried doing this, going through all the vertices in that area to see if there was a group that did not belong; however, all I saw were L_Calf and L_Foot for every one in that area. Nothing seemed amiss so I just deleted the foot vertex groups (for all the ones in that area) instead and I still got the same result in game: 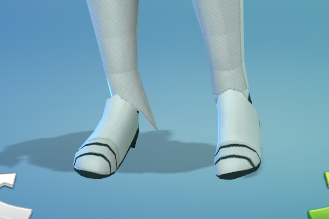 The weights look to have transferred fine, but I just couldn't see any ones out of place. Here's the blend file with the vertex groups removed (and normalized): link
And this is the link to the blend file before I removed the foot vertex groups (just in case I did it wrong/removed what I shouldn't have): link |
|
|
|
Post by mauvemorn on Apr 17, 2019 14:55:16 GMT -5
Your blend has 3 meshgroups while the outfit I suggested to clone has 2. This is the cause of your problem. The number of meshgroups and their cut numbers in the blend you're importing must correspond to that of the original blend that is being replaced. More about it here Since you're making a full-body outfit that has shoes attached to it, you can take all UV space for body parts. You should also set the background image ( use this one ) before editing the uvs to prevent them from being stretched like they are right now. Select all, set the background image, deselect the bare neck, press S Y .5 to shrink in half. Then scale and move UV islands to take all top+bottom+shoes space. Edit: and use the second blend that has foot and toe vertex groups |
|
|
|
Post by Galaxsim on Apr 17, 2019 17:31:43 GMT -5
Your blend has 3 meshgroups while the outfit I suggested to clone has 2. This is the cause of your problem. The number of meshgroups and their cut numbers in the blend you're importing must correspond to that of the original blend that is being replaced. More about it here Since you're making a full-body outfit that has shoes attached to it, you can take all UV space for body parts. You should also set the background image ( use this one ) before editing the uvs to prevent them from being stretched like they are right now. Select all, set the background image, deselect the bare neck, press S Y .5 to shrink in half. Then scale and move UV islands to take all top+bottom+shoes space. Edit: and use the second blend that has foot and toe vertex groups My blend has three meshgroups because I cloned a new outfit with three mesh groups instead as the one you suggested didn’t work (the outfit wouldn’t appear on the sim in cas). The meshgroups correspond in s4s as all the right parts appear in game too. When editing the uv, do you mean uv 1? Or the uv 0? If so, I placed the uv as it is because I could fit the left part of the texture to the body without uneven seams. Or is it a problem with how the uv around the feet are placed? |
|
|
|
Post by mauvemorn on Apr 18, 2019 10:55:18 GMT -5
Here are a package and a blend file. It looks ok in my game. The distortion in the ankle area was happening because the imported mesh had vertex groups that the original one did not. Not a whole blend, but this meshgroup specifically. Yes, I was talking about uv_0. It is in no way related to the problem, but scaling UV islands and taking up free space would result in better texture quality. I mean something like this  |
|
|
|
Post by Galaxsim on Apr 18, 2019 22:22:30 GMT -5
Here are a package and a blend file. It looks ok in my game. The distortion in the ankle area was happening because the imported mesh had vertex groups that the original one did not. Not a whole blend, but this meshgroup specifically. Yes, I was talking about uv_0. It is in no way related to the problem, but scaling UV islands and taking up free space would result in better texture quality. I mean something like this I looked at the fixed blend file you provided but that is where I am confused. I did exactly what you did: I cloned the star wars mesh, I separated the fingers and body into two meshgroups and imported into s4s (it looked fine) but when I opened it in game, the clothing would not appear on my sim no matter how many times I clicked the suit then selected another thing, then clicked the suit again. Someone who was helping me fix this removed a blank RLE2 file in the warehouse but when in game this resulted in the broken cc/question marks texture appearing on the sims body when they wore the suit. Could you please elaborate further so that I know exactly what to do for the future? Because I'm sure I did everything right, I just don't know where it went wrong in that attempt |
|
|
|
Post by Galaxsim on Apr 19, 2019 0:11:03 GMT -5
Also, I took your blend file into a new package and tested it game and the feet a looking fine but now there are parts of the separated fingers missing on the mesh: i.gyazo.com/5f8a3bb3d34b24615c5721539560314c.pngThis may be a non-issue in the long run but right now it’s faintly obvious and I’m not sure where the problem is in blender. |
|
|
|
Post by mauvemorn on Apr 19, 2019 8:17:41 GMT -5
After separating fingers, did you change cut numbers to corresponding ones of the original(0000 for the body, 0001 for the fingers) ? Also, I don't think it's the case for dissapearing mesh, but did you delete extra vertex groups that the original meshgroups with fingers didn't have(that would cause distortions)?
About no texture on fingers, were the uvs changed? If that is the case, you could have forgotten to do it for fingers.
|
|


