|
|
Post by mauvemorn on Sept 15, 2019 11:23:53 GMT -5
About top 1). The distortion you see is caused by "the meshgroups in the blend you import in the package must have the same vertex groups as the corresponding meshgroups in the blend that is being replaced. When it is not the case, you might get distortions" A I said, you should combine those type of outfits into one instead of top and bottom to avoid this issue. 2).You should also not leave any duplicated part in the rig ( top.001 ) 3). Make sure to select everything and use Mesh - Clean up - Delete loose, you have stray geometry; 4). But most importantly, you completely misunderstood the uvs. While a uv_0 map projects a texture on a 3D mesh surface, a uv_1 map defines how the mesh will deform in the process of adjusting body parameters in CAS. The template I linked you to is for uv_0. The first pic is what your uv_0 should look like, the second one is uv_1 About cape, if it is meant to be an accessory, it should not have any body part attached to it. It is also has no uv_1 map
|
|
|
|
Post by jennysyc on Sept 15, 2019 21:29:33 GMT -5
About top 1). The distortion you see is caused by "the meshgroups in the blend you import in the package must have the same vertex groups as the corresponding meshgroups in the blend that is being replaced. When it is not the case, you might get distortions" A I said, you should combine those type of outfits into one instead of top and bottom to avoid this issue. 2).You should also not leave any duplicated part in the rig ( top.001 ) 3). Make sure to select everything and use Mesh - Clean up - Delete loose, you have stray geometry; 4). But most importantly, you completely misunderstood the uvs. While a uv_0 map projects a texture on a 3D mesh surface, a uv_1 map defines how the mesh will deform in the process of adjusting body parameters in CAS. The template I linked you to is for uv_0. The first pic is what your uv_0 should look like, the second one is uv_1 About cape, if it is meant to be an accessory, it should not have any body part attached to it. It is also has no uv_1 map
Forgive this noob, but I don't know how to incorporate all the textures into one image that would be imported into the texture tab of s4s ^^ that's why I worked on them separately.
Thank you for the layout! I'll work on the mesh again when I get home and yes, I think my brain connected the wrong things with regards to uv_0 and uv_1.
Edit: After re-reading your previous advice, I think I got what you mean by using only one meshgroup. I'll fiddle with the textures and try again.
|
|
|
|
Post by jennysyc on Sept 19, 2019 8:49:48 GMT -5
I don't know what I'm doing wrong. But even after I do the data transfer step to get uv_1, when I check I still get something that resembles uv_0. I click on my mesh, go to uv_1, add data transfer mod using the duplicated feet/top/etc as source and follow the image's face corner data etc settings, and click apply. Then I check on my uv_1 and it looks like the uv_0 map.
|
|
|
|
Post by mauvemorn on Sept 19, 2019 13:42:30 GMT -5
Starting from 2:56 to around 3:30
|
|
|
|
Post by jennysyc on Sept 21, 2019 9:45:49 GMT -5
I think I got the hair right! But I can't figure out the transparency. Hair Also, I made progress on the cape. Just can't figure out where I went wrong with this one. Cape |
|
|
|
Post by mauvemorn on Sept 21, 2019 11:39:07 GMT -5
Use grim reaper dress to transfer weights and a uv_1 map. And again, necklace packages consist of 2 meshgroups while your blend has one. As for hair, make sure to change shader for all meshgroups in the warehouse tab. 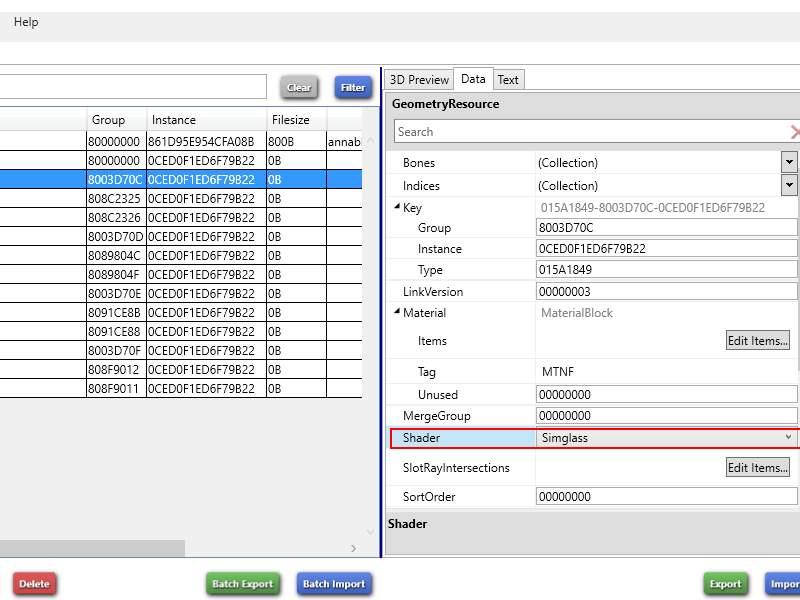 Hair should be vertex painted with 007F02 ( roots and hairline sometimes are painted with a different color ) |
|
|
|
Post by jennysyc on Sept 21, 2019 12:06:38 GMT -5
Use grim reaper dress to transfer weights and a uv_1 map. And again, necklace packages consist of 2 meshgroups while your blend has one. As for hair, make sure to change shader for all meshgroups in the warehouse tab. Hair should be vertex painted with 007F02 ( roots and hairline sometimes are painted with a different color ) Necklace has two meshgroups?? Didn't notice that. Thanks! I did the S4S Tools > Modding > Simglass method. Will that work fine? Also didn't know the exact shade for the vertex paint, so thanks for that! |
|
|
|
Post by jennysyc on Sept 25, 2019 8:56:16 GMT -5
Use grim reaper dress to transfer weights and a uv_1 map. And again, necklace packages consist of 2 meshgroups while your blend has one. As for hair, make sure to change shader for all meshgroups in the warehouse tab. Hair should be vertex painted with 007F02 ( roots and hairline sometimes are painted with a different color )
Vertex painting using 007F02 distorts the mesh ingame :( So I changed it back to green. But I still can't figure out how to get the transparency working. I saved as .dds with alpha channel but it erases the entire body. I saved as .png but I still get the black square shapes :(
|
|
|
|
Post by mauvemorn on Sept 25, 2019 10:36:45 GMT -5
Send a package file pls
|
|
|
|
Post by jennysyc on Sept 25, 2019 11:02:37 GMT -5
Ah, here. PNG
(Oh wait, I renamed them wrong. First is DDS and 2nd is PNG. I think.)
|
|
|
|
Post by mauvemorn on Sept 28, 2019 12:17:30 GMT -5
1). I exported png and deleted the white background, it worked 2). Set Simglass for all meshgroups manually; 3). There's a rendering problem. To fix it, separate planes from top to bottom and combine again Here is a tutorial for a different software but there is an adaptation for Blender sims4studio.com/thread/3857/most-transparency-issues-alpha-glassHere is an explanation I wrote for the process in Blender. Triangulate the entire hair. Then separate every plane in order from top layer to bottom (press L to select plane, then P to separate). Separate everything till s4studio_mesh_1 is just an empty mesh (in edit mod it should just be an origin to show the middle but there should be no verticies etc). You should have a bunch of separated meshes. Then, select them all from the highest number to low (for instance mesh_1.0075 then mesh_1.0074 then 73 etc etc etc), and when all selected, make sure you active selection is on mesh_1 (the empty mesh), and press ctrl + j. This worked for an alpha hair I made in Blender. |
|


