|
|
Post by maire024u on Nov 21, 2020 22:32:38 GMT -5
I thought it was just me, but I relaunched, made sure it was current version and even ran the game, paced it and played with it, and still nothing. I mean, yes theres a texture png there, but its no usuable for me to recolor the table itself, like for the 4 person kotatsu table. Am i missing something?
|
|
|
|
Post by Cidira on Nov 22, 2020 0:15:58 GMT -5
I was about to ask what you meant, but then I actually looked at it with object-preview and I see exactly what you mean. The large tables just don't have an ordinary (diffuse) texture image stored in their data. At first I thought they were repositoried to the small ones, but it quickly became clear that's not actually true when I started messing around with them. I couldn't find the real textures by digging around in the Material entries or even brute-forcing it in the game file cruiser. Just for giggles I even tried making a recolor package in TSR Workshop, but it has exactly the same problem. Seems like something peculiar may be going on in the actual game files.
|
|
|
|
Post by maire024u on Nov 28, 2020 21:53:53 GMT -5
Is this something that maxis needs to fix or a file they can provide on their end, or can the texture map be found by the team and provided via an update? I really really like this table and have a mighty need to use it....in pink! :'(
|
|
|
|
Post by MizoreYukii on Nov 29, 2020 1:52:44 GMT -5
I have the answer! I asked Pancake who identified it as some weird file composition. The texture is there, it's just hidden to our eyes. Here is my (ugly and quick) recolor attempt.  So you will need Gimp for this. It has a really special decompose feature that I just cannot replicate in PS. If someone knows how to do it in PS I'd love to know. 1. Export one of the textures as .DDS. This is required for it to work. Drag and drop/open the texture in Gimp. 2. Go to the Colors menu > Components > Decompose. When the popup appears, choose RGBA from the dropdown menu.  3. A new workspace will appear at the top and you will automatically be placed into it, and you can see a grayscale (but full) texture that was hidden. Click the eye on the Alpha layer to hide it. Go back to the Colors > Components menu and this time choose Compose, then select RGB from the dropdown menu as your format. (Note: Do not delete any of the new workspaces it creates so you can go back to any step.) 4. A third workspace will appear and redirect you again. You will now have an actual texture you can edit! Go ahead and recolor. If you recolor on a new layer, make sure to merge the layers when you are done. When done we now have to decompose again, so same location, decompose to RGBA. 5. For this next part, easiest thing to do is go back to the second workspace (your first decompose) and copy the Alpha layer, go back to your current workspace, select the current Alpha layer and paste, then right click the Floating Selection (alpha copy) and Anchor Layer. This will re-create the original alpha layer you need. 6. Now we have to recompose. Colors > Components > Recompose (instead of Compose) and now the third workspace will change back into the confusing texture we started with. Go back to that third workspace and simply File > Export to .DDS (probably with mipmaps but I'm not used to recoloring, I did on mine and it worked regardless). Import into your .package and the kotatsu should switch to the new one. If it turns black you probably exported/imported as a .png along the line. Hope that helps! |
|
|
|
Post by Cidira on Nov 29, 2020 10:36:39 GMT -5
WTAF, EA. WHY?
|
|
|
|
Post by simpossum on Nov 29, 2020 13:17:03 GMT -5
Thnx for the info! This Direct Draw Surface (DDS) tech is quite interesting. It's a package file format that contains other files. I think in this version of Direct Draw used with DirectX 9, the DDS can hold 8 8 bit channels. The clothing packages extracted by S4S show the channels in the texture pane. The main texture is the first 4 channels. Red, green, and blue visible image channels, and a transparency alpha channel. 4 channels total that can export to the PNG format, which contains a transparency alpha channel native to that image format. Then add the shadow, diffuse, and bump map channels that are not visible.
The objects are handled differently than the clothing from what I'm seeing. The diffuse and bump effects are separate images in the DST listings, and can be seen separately for this table. Any DST object textures I have exported so far have been the standard 4 channels of RGB+transparency.
From what I've gathered, some games are using the 4th transparency alpha for a different purpose. In this case, the main RGB texture has no transparency but the DDS file exported still shows 4 channels. It appears the transparency channel is used for a transparent overlay to depict a dirty table, and not to apply any transparency effects to the main RGB texture as default.
Great detective work by MizoreYukii. If the DST is exported as a PNG, it extracts only the texture in the one alpha channel. In Gimp with the DDS export, hiding the alpha from view exposes the RGB texture that is hidden from view. We see the process to extract it separately as MizoreYukii shows.
What I don't understand is why the transparency channel is chosen for the DST image in the warehouse and not the RGB channels? I'm sure there's an answer, but I don't know enough about it to say. I'm seeing some changes in the way JTB and SE EP objects are being handled it seems.
|
|
|
|
Post by simpossum on Nov 29, 2020 14:21:07 GMT -5
Tick-tock... This has been very cool. Horribly boring to most, I needed to get an idea of how to handle my graphics with these variations and changes in how EA is structuring these later objects they are adding to the game. I'm graphics artist, not a programmer, but I did get some understanding from reading tech material off the Microsoft Direct Draw developers site. Extracting the package with S4S, I grabbed the DST from table #8 in the DDS format. Opened in Gimp, I hid the alpha layer in the channel control on the right. The main RGB texture appeared. I selected all of it and did a "copy visible". Now my clipboard had the texture I would want to work with the same as always. I don't need the 4th transparency alpha (that is being used for something else), just the 3 RGB channels for a standard opaque raster image. Paste that into a new image somewhere, be it in Gimp or Paint.Net. I saved it as a .jpg file as I don't need or want a transparency alpha. After messing the texture to make what I want, I then selected and copied all to the clipboard. I was using Paint.Net. Back in Gimp, (or still in Gimp), I copied the clipboard to the DDS file from S4S. It only overwrote the 3 RGB channels and the dirty table alpha was still there. Export as DDS, DXT5, with mipmaps. Import back into S4S and I got this: 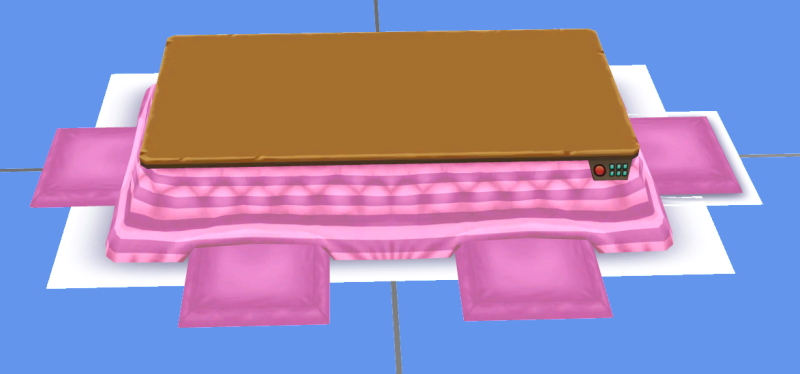 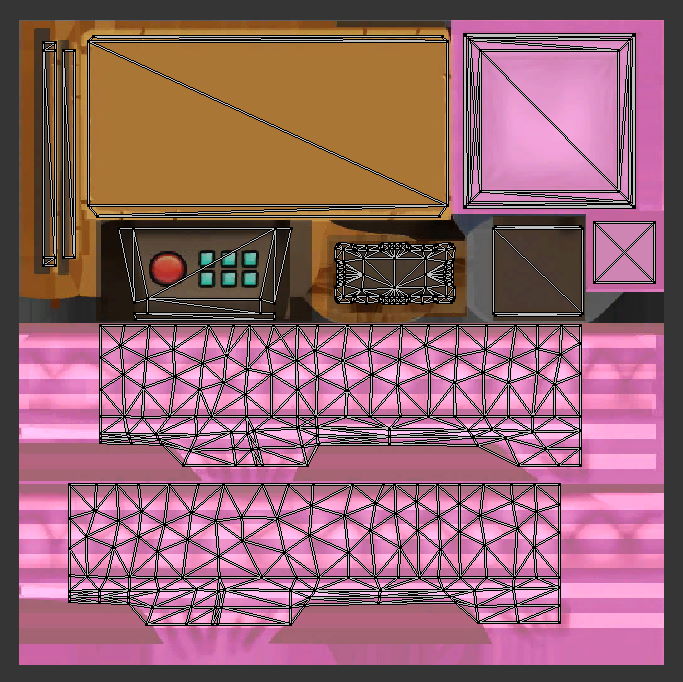 |
|
|
|
Post by Cidira on Nov 29, 2020 16:06:06 GMT -5
Oh, that sounds easier! No Decompose/Compose needed, simpossum ? |
|
|
|
Post by simpossum on Nov 29, 2020 16:55:16 GMT -5
Oh, that sounds easier! No Decompose/Compose needed, simpossum ? Well, I just went at this quick and dirty with a meat cleaver and crammed it back up S4S.  I did not try any composing. DDS tech goes far beyond what I know, I'm centered on the visual arts end of things. I saw this and was curious how these images were hiding also! AHA! Buried in the DDS formatting. I didn't try to run my package in the game. The DDS file may be altered and I don't know whether the dirty table feature will work as before. Somebody else would have to answer that question. DDS does a LOT of stuff, it's very cool. I need to know enough to allow me to do the graphics the way I want. In this case, I have to extract and manipulate the channels in the dds file directly. |
|
|
|
Post by Cidira on Nov 29, 2020 17:17:06 GMT -5
This is probably the kind of thing where if it looks right in S4S it'll look right in game, and testing that is just a matter of loading the game and placing the recolored object, while testing the dirty texture is just a matter of a little gameplay. If you upload your package or texture, though, I could have a look and make sure. (I am entirely too familiar with this method of just trying things quick and dirty to see if they work, though I usually describe it as duct tape, bubble gum and paper clips, MacGuyvering, etc.)
Sadly, however, MizoreYukii just confirmed that recoloring the table alone is not enough -- the fabric that covers a Sim's legs as they sit down is VFX, not part of the object, and doesn't automatically use the texture of a recolor. She's investigating further. I think I'm gonna go see if I can grab any of the couple of small kotatsu recolors I've seen and look at those in game... I assume I'll find the same issue. ETA: Yep.
|
|
|
|
Post by simpossum on Nov 29, 2020 18:09:08 GMT -5
This is probably the kind of thing where if it looks right in S4S it'll look right in game, and testing that is just a matter of loading the game and placing the recolored object, while testing the dirty texture is just a matter of a little gameplay. If you upload your package or texture, though, I could have a look and make sure. (I am entirely too familiar with this method of just trying things quick and dirty to see if they work, though I usually describe it as duct tape, bubble gum and paper clips, MacGuyvering, etc.) Sadly, however, MizoreYukii just confirmed that recoloring the table alone is not enough -- the fabric that covers a Sim's legs as they sit down is VFX, not part of the object, and doesn't automatically use the texture of a recolor. She's investigating further. I think I'm gonna go see if I can grab any of the couple of small kotatsu recolors I've seen and look at those in game... I assume I'll find the same issue. MizoreYukii, please jump right in here!  Put it in a house full of slobs, that will test it! I am VERY curious how this is working and how to insure the dds structuring is proper. I'm seeing newer things that are popping up, and now we see this use of the first alpha channel to apply the dirty table texture. And yes, here I am having dinner with my skeletons. When the fabric sections are altered for the sitting sim, that looks like the original blue texture. Where would that be? Here's the package I made: simfileshare.net/download/2170976/ticktock... That raised blanket mesh and the original texture on it is not in the package extracted by S4S that I can find. Every sim position has that same overlay on it. It's somewhere, and I'm not the possum that can say where. Plus, the dds file I altered showed the dirty table alpha in Gimp, but the dds file exported had that alpha cleared of the dirty table image. And THANK YOU MizoreYukii for helping out here!  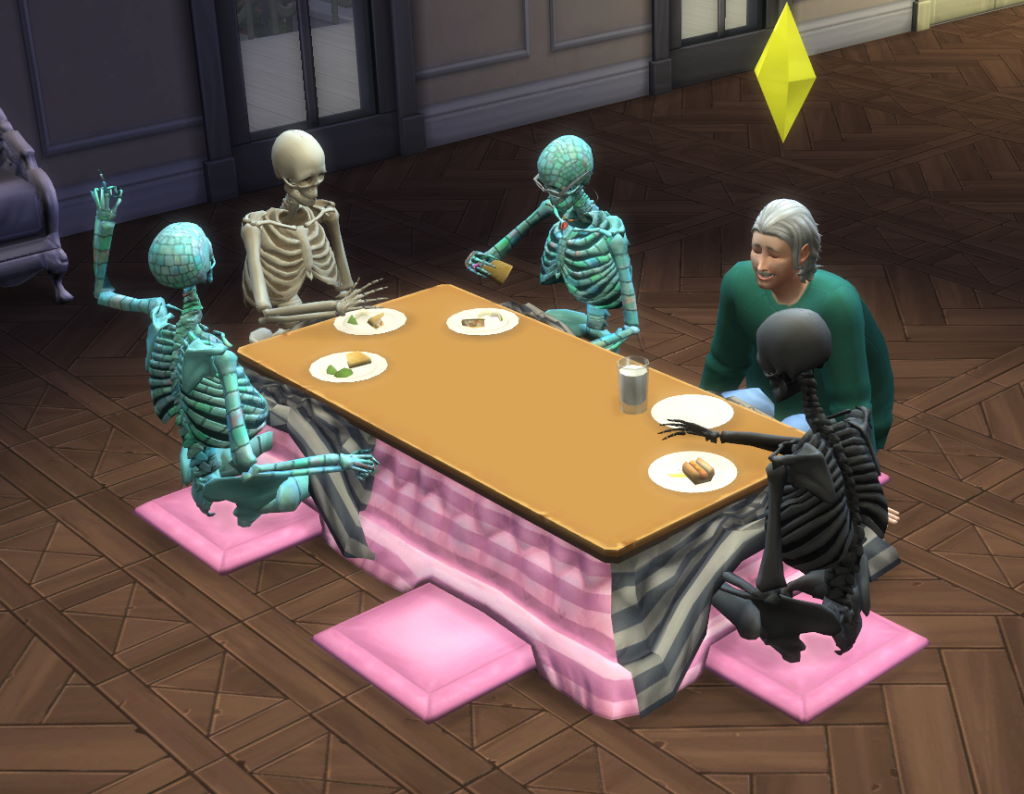 |
|
|
|
Post by simpossum on Nov 30, 2020 16:49:03 GMT -5
Fun geek stuff with this. For those interested in these alpha channel changes in these new objects anyway.
Dropping the three RGB channels into the dds from S4S worked quick and easy, but it disturbed the alpha used for the dirty table effect. The dds export did not have the proper alpha. MizoreYukii has a lot of good info there to reconstruct a dds with the original alpha intact. At #4 at the end, the decompose to RGBA returned an error to me for some reason. I'm using the current version of Gimp. Strange.
After copying the target texture image to the clipboard, (the elusive one that started all this!), it can be edited in any software as a .jpg or .png image file. The end goal is a properly constructed dds file that is the same as the S4S output of course. Two things worked well for me.
Working fully in Gimp, I edited the texture as I wanted, then copied and pasted it back into the original dds. To fix the disturbed alpha, I opened another copy of the original dds and did MizoreYukii's #5 copy and paste of the alpha channel. The export of my modified dds was proper.
Working in paint.net, it has the ability to export to .dds, (DXT5 and mipmapped always). Gimp, however, does far more, like edit the channels in the .dds. I then opened that in Gimp, which will show it has the wrong alpha channel in it. I did the copy/paste above into the paint.net dds file. The exported dds file was proper.
Back in S4S, both files generated displayed as before. All that was visible was the dirty table alpha image.
Any information regarding the raised blanket overlay and how to remedy that would be greatly appreciated!
Everyone have a great holiday season! :
|
|
|
|
Post by MizoreYukii on Dec 1, 2020 11:06:03 GMT -5
I stopped researching the kotatsu vfx, unfortunately there doesn't seem to be a way to break the connection, and I also can't find where this connection is located. It does seem to be related to the material variants somehow as each set on the table matches the VFX model, but something else controls how they are assigned and attached. No matter which tests I ran, switching stuff around or re-assigning them, the VFX stayed and never switched. The best thing to do, to avoid the VFX issues, is to either override the long kotatsu or override the vfx model file and it's material states. The VFX model is actually using the original long kotatsu textures, so if you override that one to get your recolors you will have matching VFX (until you go past 10). Haven't tested it yet but it should. If you do the small kotatsu, then overriding the vfx model file might work best, which it's number is 19C6B6D229FD25A9. I just can't figure out where the assignment is, it has to be something small I keep overlooking, or not visible at all in S4S.  |
|
|
|
Post by Cidira on Dec 1, 2020 13:21:31 GMT -5
Just to double check, does the game normally use the texture from the larger table as the VFX source texture for both sizes, and then... I'm not sure how it would decide it should use different ones for the small table? Or does it use the larger table's texture for the larger table's VFX and the VFX model texture for the smaller table's VFX? (i.e. if I wanted to make nice matching default replacements for both sizes, will recoloring the larger table take care of ALL the VFX?)
|
|
|
|
Post by MizoreYukii on Dec 1, 2020 15:07:06 GMT -5
Both tables use the same VFX model/textures, so it seems that by overriding the large one it will take care of the textures for the small one too. Nifty for matching override sets, not so much if you do them individual or as recolors. xD
|
|


 I did not try any composing. DDS tech goes far beyond what I know, I'm centered on the visual arts end of things. I saw this and was curious how these images were hiding also! AHA! Buried in the DDS formatting.

