Very simply put,
normals are the shading of the mesh itself. You can for instance choose to either smooth out or keep the edges between one part of a mesh and another part, to make edges show, or hide them in seams.
If you hide the texture in Blender so you just see the greytoned mesh, that's basically the shading, or normals. It's easier to see it without the texture (in case you're having problems with areas not behaving properly).
You can add a normal map (also called bump map) to "fake" more details in a mesh, which adds the details visually on the screen but not to the polycount. This is used quite a lot to add high-res details without needing to add it to the polycount (but you can make a high poly model, render out a normal map from this, and use it for a lower-poly version of the same model ingame, which would work quite well)
------
Why low-poly? (and smaller textures)
Generally, to reduce the general load on the game, meshes are made as low poly and with as small textures as possible (while still looking alright)for most games, unless they're in the hyper-realistic genre (even then there's often a lot of mesh/texture "cheating" going on). So if you want to fill your game up with CC, the lower poly and smaller textures you use, the more capacity you technically have to fill up before the game can't handle more.
The more polys and the larger textures you use ingame, the more computing power and memory/RAM is needed to keep it all in place.
Think of high-poly meshes and HQ textures as tasks on your computer. A few can be fine, but the more you throw at your game, the slower and less handleable things will eventually get, and you could suddenly get a crash or unresponsive game or something else happening. Large files, lots of polygons, big textures, along with everything else going on at the screen - it will of course depend on the system you've got and how much you throw at it, but eventually there probably will be some kind of limit.
I'm not sure where TS4 starts to buckle - no idea if it has similar problems as the previous 32-bit sims games do, but you may want to be on the safe side and save on the HQ and polys where you don't need them.
Some would argue that newer games and newer PCs can handle the higher load, and that's probably true, but even newer games/PCs have their limits.
----
Mesh flow/UV
For the UVmap and the mesh, you want the mesh flow to travel as much as possible in neat lines so they form a grid pattern. There will be some places in the mesh where that's not possible, but those are necessary exceptions to the rule and should still be avoided if possible (if that makes sense).
An example:
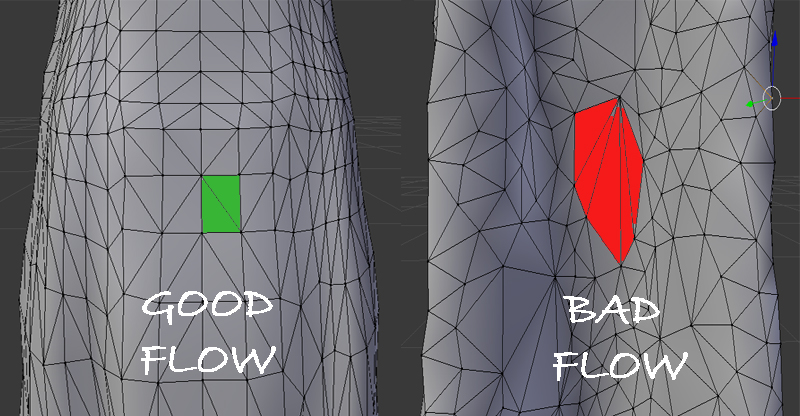
(Just a note for the picture - when you're working with the mesh, it's an advantage to work with squares and not triangles, because you'll have edge loops. They don't seem to work with triangles)
To the left, you shouldn't have any problems with bone assignments or animations, because everything is following horizontally and vertically (except for a few stray areas, but they're easily fixable). To the right, there's gaps everywhere, and nothing is following straight lines, so a lot of areas would most likely animate weird.
For the UVs you want the flow to be good because if the UVs are stretched or overlapped, the texture will also be stretched or overlapped. If the UVs look like a 1000-piece puzzle, it's pretty much impossible to texture the item in for instance Gimp/Photoshop, because you have no idea which piece is which, and everything is tiny and half invisible.
There's TS4 UVmaps in these two posts showing examples of how you can do it (if you use these as textures, you see how they overlap on the meshes - it's very useful when learning how UVmaps work)
A few tips for reducing polys:
{Spoiler}
Using Dessimate (the wrong way?) can give you a mesh flow that looks like the "bad flow" version.
If you start out with the "good flow" version but have a high-poly mesh and want to make it lower-poly, it's much smarter to reduce using edge loops and "dissolve edges". That way you keep the edge flow, and you can reduce by much more and still have the mesh look good. It is quite neat for high-poly meshes in that you can remove every other loop in "layers" until you're happy with the result.
If you start out with a modifier that has any kind of polygon modifier that adds or reduces polys, make sure to adjust this before applying the modifiers so you don't add ten times more than you actually need.
The mesh doesn't need to be super-smooth. You don't even see the smoothness of a hair increased beyond 30.000 polys (actually far lower than that, too) or for clothes. Think about what you actually see on your screen when you play with the item - do those earrings need to be 50.000 polys when they take up less than 100 pixels in a close-up? Do you need to drag the camera all the way down to the roots of the hair to glare at the smoothness of that shiny new hair? Probably not.


