|
|
Post by fursims on Nov 21, 2016 9:41:12 GMT -5
Whenever i need to curve an object, i am trying to use the array, decimate modifier to decrease the vertices and faces. Its a bit annoying and the texture doesnt always looks nice on it eventually, cause the object is too much deformed. Are there any other known tricks for sims 4 objects to have less faces/vertices?
I didnt know, but when you split egde, the vertices sometimes get 7 times more. And i need to split edge on most of my objects..
How do you deal with this?
|
|
|
|
Post by inabadromance on Nov 21, 2016 11:40:38 GMT -5
hi! i'm not sure i'm understanding.. can you post a picture of the item and what you mean by "curve" an object? thanks!
|
|
|
|
Post by Clown Confetti on Nov 21, 2016 12:00:07 GMT -5
It helps the more you try meshing from scratch (various methods). If you have full control over the amount of vertices and faces, you can imagine different ways to cut down on them. As for curved parts, it's just a matter of using as few vertices/edges/faces as possible and still manage to produce something that looks curved -- I normally spend some time moving around the vertices of the curve to see where the best place is to put them. I never use tools to decrease the amount of vertices -- I go the other way around, I start meshing as low-poly as possible by hand, and then I use subsurf modifier to smooth the curves out (mostly if I want to render them for other purposes than Sims). :-P
|
|
|
|
Post by fursims on Nov 21, 2016 13:47:51 GMT -5
hi! i'm not sure i'm understanding.. can you post a picture of the item and what you mean by "curve" an object? thanks! Theres a modifier in blender named curve. I use it to curve/bend objects such as pipes, legs (chairs for example). But for an object to bend proper with a round look, you need to subdivide and that increases the vertices etc. Maybe there is another way to bend/curve things, but im not familiar with another method. |
|
|
|
Post by fursims on Nov 21, 2016 13:50:02 GMT -5
It helps the more you try meshing from scratch (various methods). If you have full control over the amount of vertices and faces, you can imagine different ways to cut down on them. As for curved parts, it's just a matter of using as few vertices/edges/faces as possible and still manage to produce something that looks curved -- I normally spend some time moving around the vertices of the curve to see where the best place is to put them. I never use tools to decrease the amount of vertices -- I go the other way around, I start meshing as low-poly as possible by hand, and then I use subsurf modifier to smooth the curves out (mostly if I want to render them for other purposes than Sims). :-P 'Good idea, never thought about just moving the vertices.. I will try to do that  I do mesh from scratch and i learned a lot since a few months of meshing now. But I usually split edges in the end of the mesh and today i realised that doubles the vertices.. Using decimate to get it down messes up the shape.' |
|
|
|
Post by Clown Confetti on Nov 21, 2016 15:11:26 GMT -5
'Good idea, never thought about just moving the vertices.. I will try to do that I do mesh from scratch and i learned a lot since a few months of meshing now. But I usually split edges in the end of the mesh and today i realised that doubles the vertices.. Using decimate to get it down messes up the shape.' I see, I got the wrong impression since I was imagining the way I mesh from scratch but people definitely have their different methods :-) Yes, I think manually moving the vertices will help you. You probably already know this but sometimes the mirror modifier (or just duplicating the part after you're done moving stuff around) can help make that easier too, so you don't have to worry about marking and moving the correct parallel vertices on every side of your mesh when you're moving them around. Good luck! :-D |
|
|
|
Post by fursims on Nov 21, 2016 15:37:13 GMT -5
'Good idea, never thought about just moving the vertices.. I will try to do that I do mesh from scratch and i learned a lot since a few months of meshing now. But I usually split edges in the end of the mesh and today i realised that doubles the vertices.. Using decimate to get it down messes up the shape.' I see, I got the wrong impression since I was imagining the way I mesh from scratch but people definitely have their different methods :-) Yes, I think manually moving the vertices will help you. You probably already know this but sometimes the mirror modifier (or just duplicating the part after you're done moving stuff around) can help make that easier too, so you don't have to worry about marking and moving the correct parallel vertices on every side of your mesh when you're moving them around. Good luck! :-D I would ask that, but yes.. a mirror would be the way. I actually just did your method and geez.. its so much better :p Sometimes things are so simple and we dont see it haha. Its just frustrating when i use 'edge split' and it multiplies my object sometimes with 3 or more. I had 256 vertices with a chair (EA originally had 400) and i thought with split edge i would have the same amount, but it turned out i have 800 vertices again. Dont get why? I just used cubes and for the pillow i moved vertices for rounder edges. I only made cuts in the corners, so the edges could get round. Nothing else... I used 'smooth' for a softer look, but after splitting edges.. its all squary again. Seems like that smooth effect is totally gone. How do you get it right? |
|
|
|
Post by Clown Confetti on Nov 21, 2016 15:41:12 GMT -5
I decided to take some screenshots of how I sometimes work to create curved objects, I absolutely don't mean that you should do it this way, but it's just to give you some example of a manual method that I use. Hope it might help give you some ideas for your workflow :-) 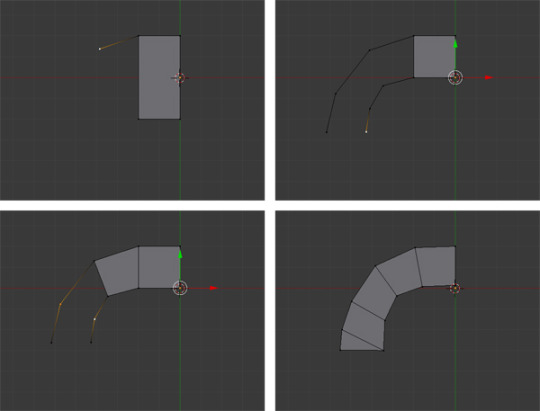 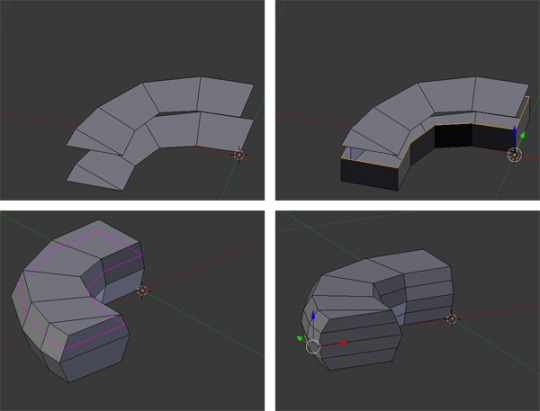 Edit: Sorry I just saw your other reply *was a bit slow haha*. Sadly I don't know much about edge split, I wonder what the problem is. |
|
|
|
Post by Clown Confetti on Nov 21, 2016 15:52:10 GMT -5
|
|
|
|
Post by anska on Nov 22, 2016 7:00:24 GMT -5
Hi, I usually only use the decimate option when creating the lower lods for my objects. Additionally split edges and decimate don't go well together. Once you have split the edges of your object, you technically don't have one object anymore but a number of planes which just look as if they were connected. If you now decimate your "object" blender will decimate the separate planes and the result will of course look distorted. So when using the decimate modifier you should in fact make sure your object does not have any of those loose edges left in order to get agreeable results.
That being said, you might be overdoing the edge splitting a little too. Edge split literally splits all edges of your current selection, while you usually only want certain larger portions of your objects not to be connected to each other to avoid wonky shadows.
|
|
|
|
Post by fursims on Nov 22, 2016 17:20:12 GMT -5
Hi, I usually only use the decimate option when creating the lower lods for my objects. Additionally split edges and decimate don't go well together. Once you have split the edges of your object, you technically don't have one object anymore but a number of planes which just look as if they were connected. If you now decimate your "object" blender will decimate the separate planes and the result will of course look distorted. So when using the decimate modifier you should in fact make sure your object does not have any of those loose edges left in order to get agreeable results. That being said, you might be overdoing the edge splitting a little too. Edge split literally splits all edges of your current selection, while you usually only want certain larger portions of your objects not to be connected to each other to avoid wonky shadows. Thanks for this clear insight. Thats what i needed Could use a bit more info on what split edging actually is and what it does. Didnt find that in the tutorials here. Could u explain what u mean by this? 'not have any of those loose edges'. Maybe with a screenshot? I would like to know. I used split edge just to be sure the object would be safe from shadows, cause i was a bit done with testing my objects ten times after each adjustment or parts. Loading the game, editing, testing etc. takes a while doing. |
|
|
|
Post by MisterS on Nov 22, 2016 18:20:59 GMT -5
I make curves (or bends) in 3ds max in two ways, one being this method shown here in how you would achieve the same result in blender.  The best way to keep faces down is not to make that many in the first place, always using dissolve get rid of edges you don't need. If you remove and edge through the center of a face and the face does not change shape it means you don't need it. When I put something from max into blender I never have to decimate because I keep them low poly from the onset. Also keep in mind the definition of low poly, any object under 1000 is fine as far as Im concerned, most of my tables/chairs are only in 100's The best way of increasing poly count is the use of modifiers, if you don't use them its hard to make anything to high of poly if you stay away from spheres and too many tubes Bump maps are a good way of creating the illusion of geometry. Baking textures hides flaws in low poly meshes, that's why you make them :D Verts while the count is annoying, will not impact the game Edit - are you using the latest version of studio, it supports the latest version of blender, Ive only started playing around with it but apparently hit handles the smoothing of objects better reducing the need to split edges. |
|
|
|
Post by Industrisims on Nov 25, 2016 2:26:32 GMT -5
I make curves (or bends) in 3ds max in two ways, one being this method shown here in how you would achieve the same result in blender. The best way to keep faces down is not to make that many in the first place, always using dissolve get rid of edges you don't need. If you remove and edge through the center of a face and the face does not change shape it means you don't need it. When I put something from max into blender I never have to decimate because I keep them low poly from the onset. Also keep in mind the definition of low poly, any object under 1000 is fine as far as Im concerned, most of my tables/chairs are only in 100's The best way of increasing poly count is the use of modifiers, if you don't use them its hard to make anything to high of poly if you stay away from spheres and too many tubes Bump maps are a good way of creating the illusion of geometry. Baking textures hides flaws in low poly meshes, that's why you make them :D Verts while the count is annoying, will not impact the game Edit - are you using the latest version of studio, it supports the latest version of blender, Ive only started playing around with it but apparently hit handles the smoothing of objects better reducing the need to split edges. Learnt something new ! thanks MISTER S |
|
|
|
Post by MisterS on Nov 25, 2016 4:15:24 GMT -5
I export into it from max so Im not the best person to ask for anything about blender and the way it behaves, Ive just read it does.
|
|
|
|
Post by fursims on Nov 25, 2016 9:27:28 GMT -5
I make curves (or bends) in 3ds max in two ways, one being this method shown here in how you would achieve the same result in blender. The best way to keep faces down is not to make that many in the first place, always using dissolve get rid of edges you don't need. If you remove and edge through the center of a face and the face does not change shape it means you don't need it. When I put something from max into blender I never have to decimate because I keep them low poly from the onset. Also keep in mind the definition of low poly, any object under 1000 is fine as far as Im concerned, most of my tables/chairs are only in 100's The best way of increasing poly count is the use of modifiers, if you don't use them its hard to make anything to high of poly if you stay away from spheres and too many tubes Bump maps are a good way of creating the illusion of geometry. Baking textures hides flaws in low poly meshes, that's why you make them :D Verts while the count is annoying, will not impact the game Edit - are you using the latest version of studio, it supports the latest version of blender, Ive only started playing around with it but apparently hit handles the smoothing of objects better reducing the need to split edges. Didnt know that verts didnt count. I for example have a tv unit which is now 1500 verts, but only 350 faces. It happended after split edge, cause it had shadows all over the object. I was very upset, cause i couldnt see another easy way to fix it. Bit if you say verts don't matter for the game, im very pleased :D I now made a pillow and tried to make it look realistic and poofy. I think it worked very well. It had 56 verts and faces. After split edge it had 216, but the faces are still 56. So, this should be fine then? Also i didnt know the sims 4 studio had a new version. I kept looking the passed few months, cause i had to delete my newer version of blender. I will install it now. And thanks for all the handy tips! Thanks to everyone else as well |
|


