


Tutorial: Normal (bump) map baking in Blender
May 25, 2017 0:45:34 GMT -5
orangemittens, ViVie., and 11 more like this
Post by SLYD on May 25, 2017 0:45:34 GMT -5
Hello, this is SLYD on TSR and tumblr. I'm going to slowly copy&paste my tutorials from tumblr to here. Hope you find it helpful.
What you'll need:
Blender
Sims4studio
Photoshop or other 2d image editing tool
Marvelous Designer (optional)
Zbrush (optional)
For the Sims 4, normal map is best for details like fabric creases. Here’s an example showing the same mesh and texture with/without a normal map. I’m using a solid color as texture map so you can see the bumps clearer.
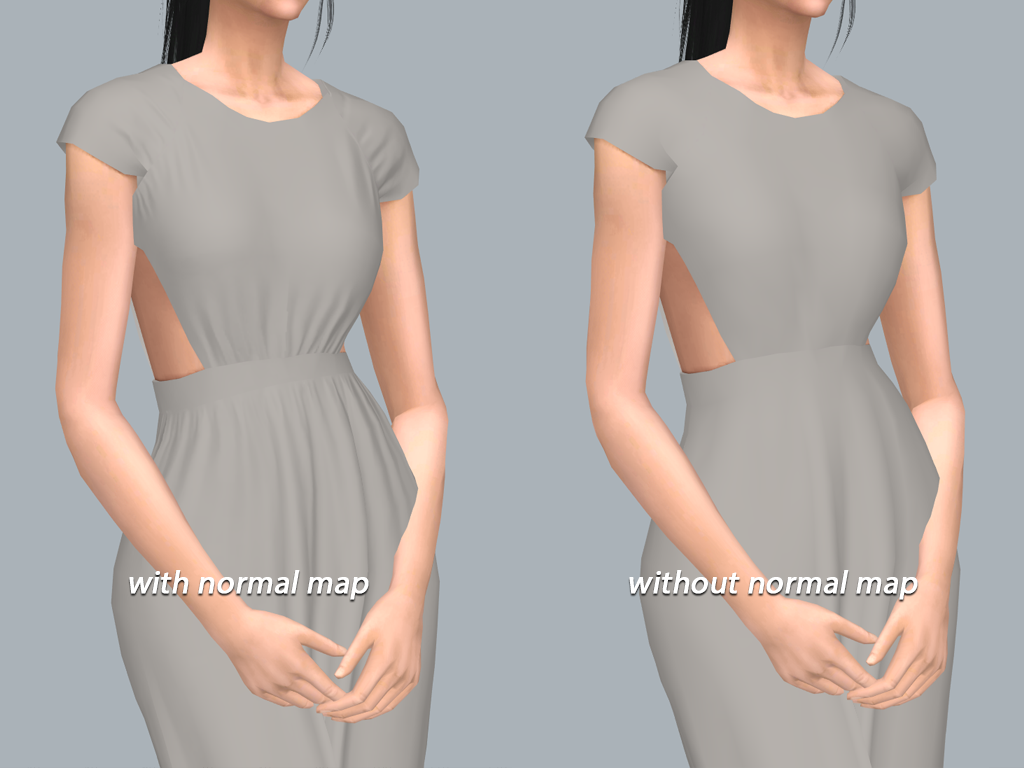
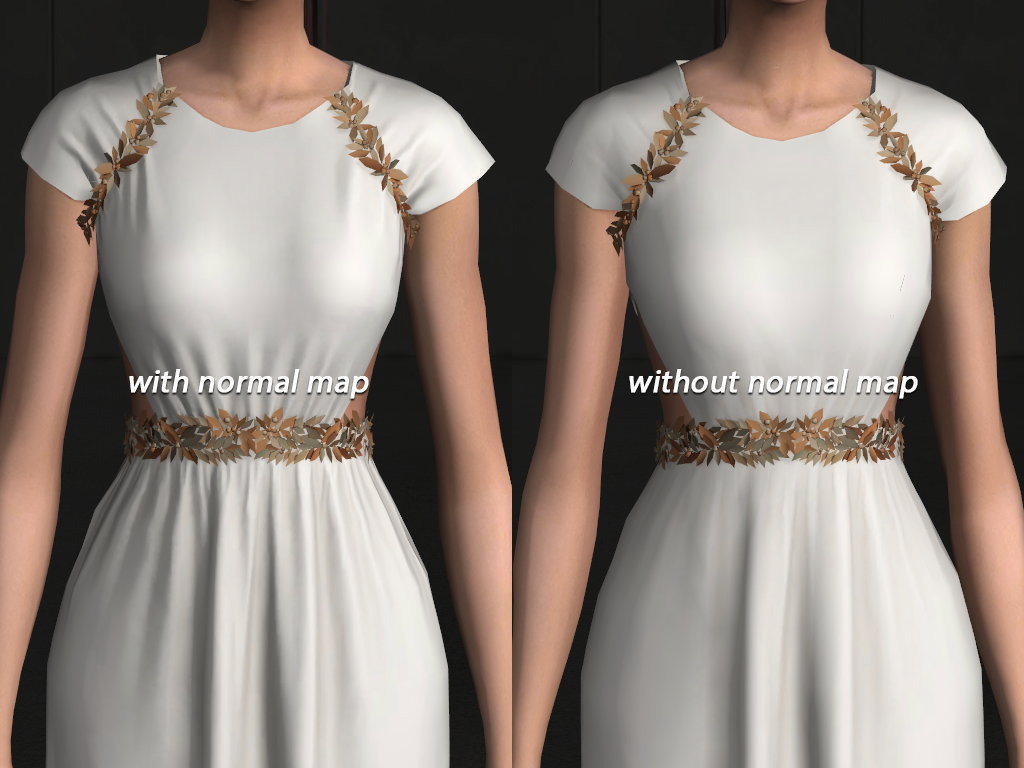
“Why not draw the details on the texture map”, you may ask. Because details generated from a normal map behave like real bumps and react to the light, which feels more realistic. While the texture map by itself doesn’t react to the light and looks flat. The difference is quite obvious from this in-game screenshot below.
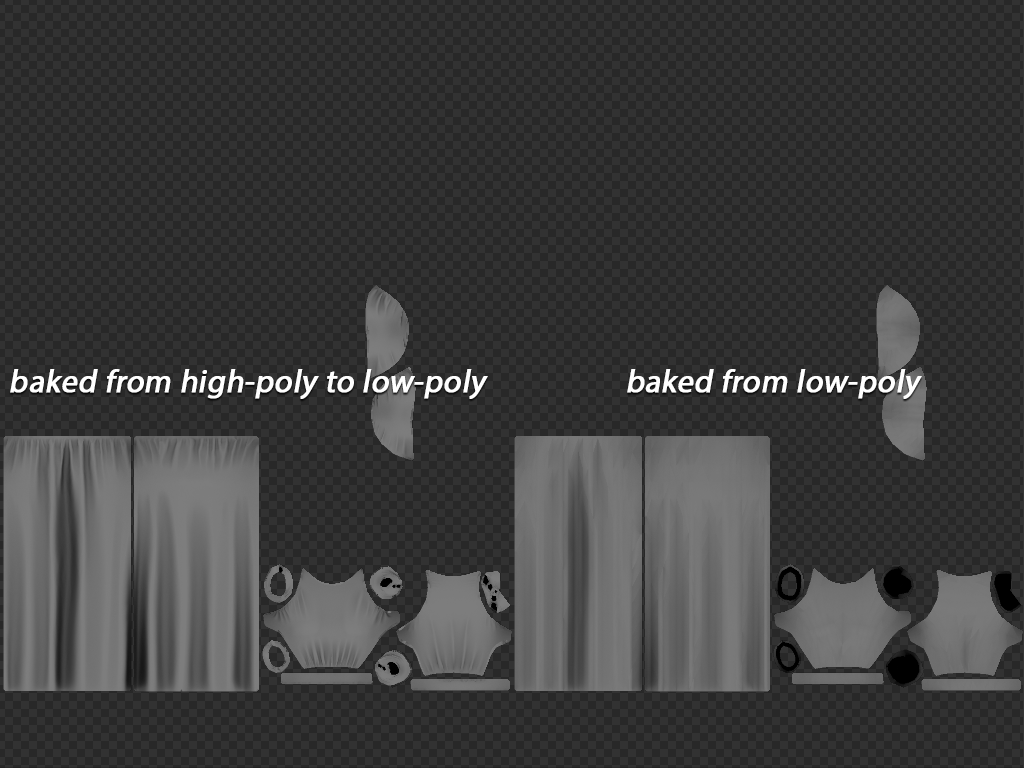
NOTE: This method requires a high-poly mesh and a low-poly mesh. It won’t work if you only have one mesh.
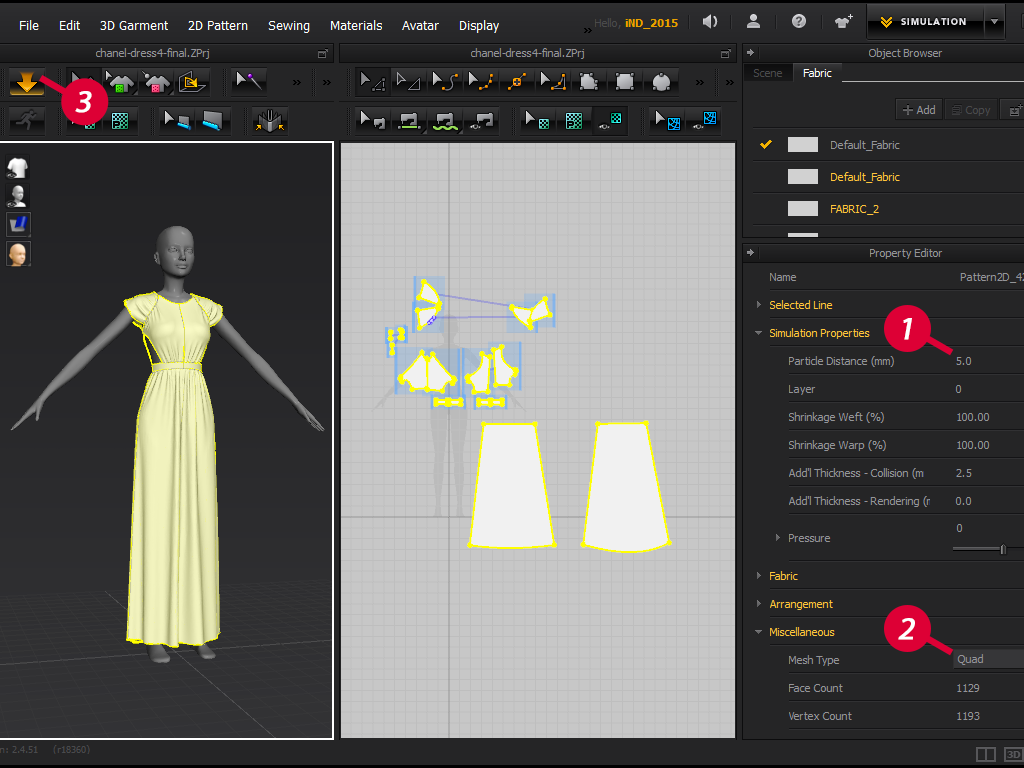
1-2-3. Prepare a high-poly mesh.
If you’re using Marvelous Designer, which I recommend for this particular tutorial, select the whole mesh and decrease Particle Distance. I usually set it to 5-10. Change mesh type from Triangle to Quad, and export to .obj after simulation.
If you’re editing an EA mesh or modeling from scratch in blender, you can apply a Subdivision Surface modifier and use the Sculpt tool to add some bumps and dents. However, this requires much more work than modeling in Marvelous Designer. I used this method on the Fenty bow slides.
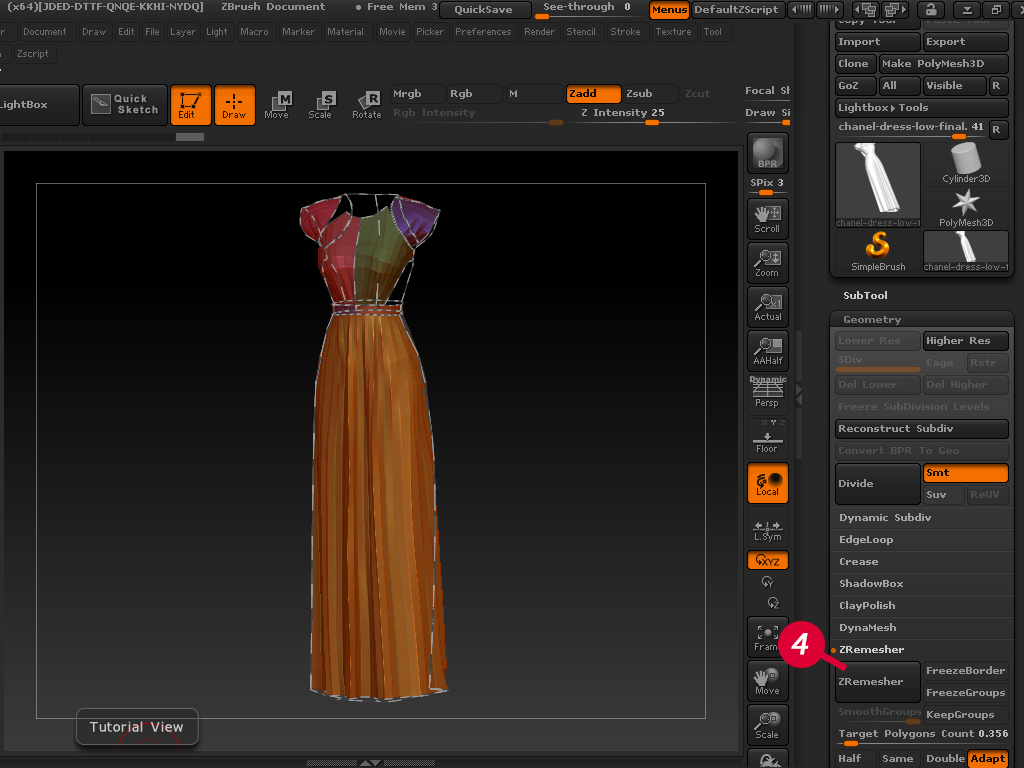
4. Prepare a low-poly mesh. Follow this tutorial to remesh the high-poly mesh in Zbrush. Don’t be afraid to lose the details you just created while reducing polycount. You’ll get them back in the end.
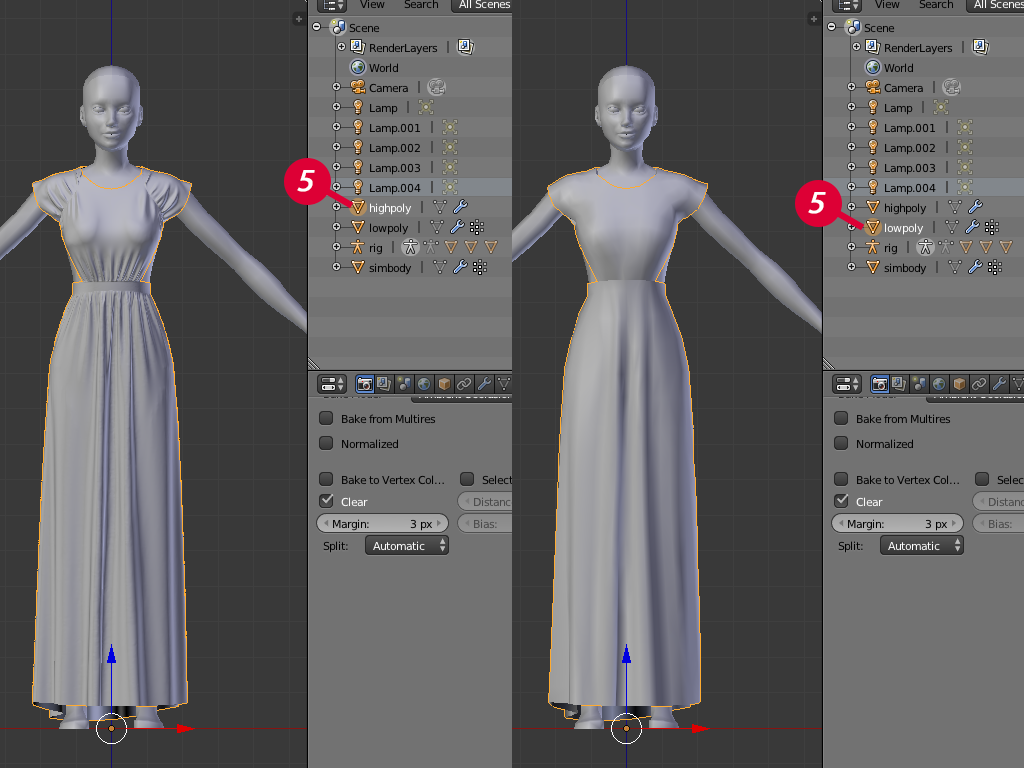
5. Import both high-poly and low-poly to blender. Polish the low-poly mesh. Merge vertices to remove gaps, delete unnecessary vertices, add extra vertices/edges/faces, etc.
6. Unwrap UV map of the low-poly mesh.
NOTE: You DO NOT need to unwrap the high-poly mesh.
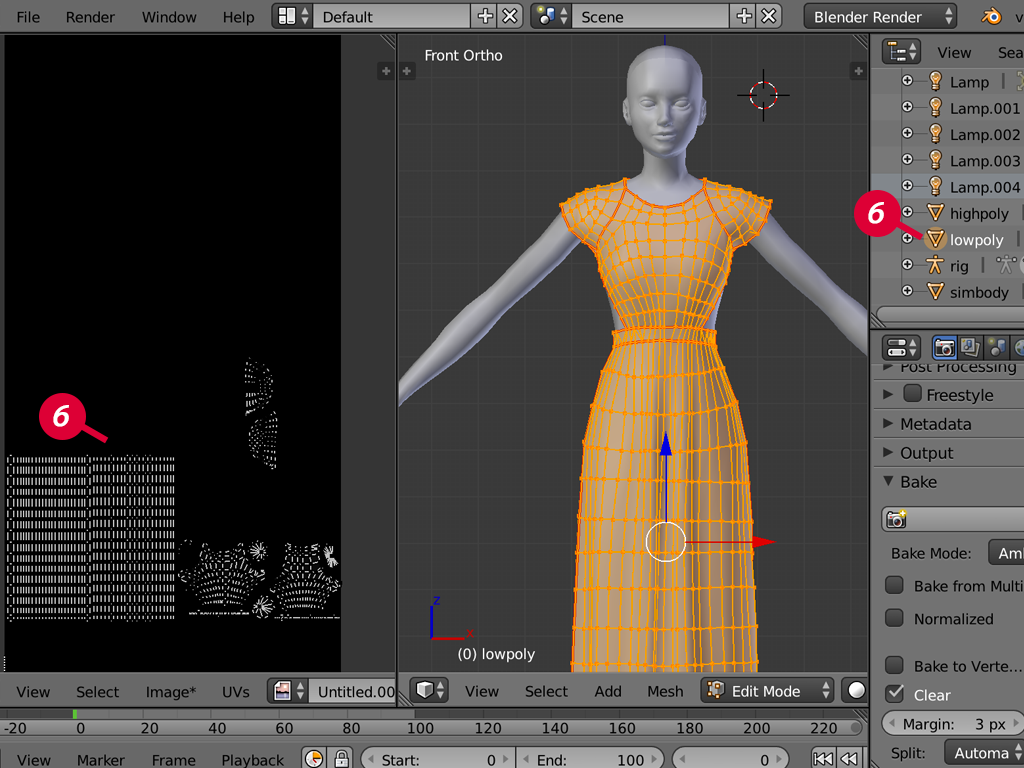
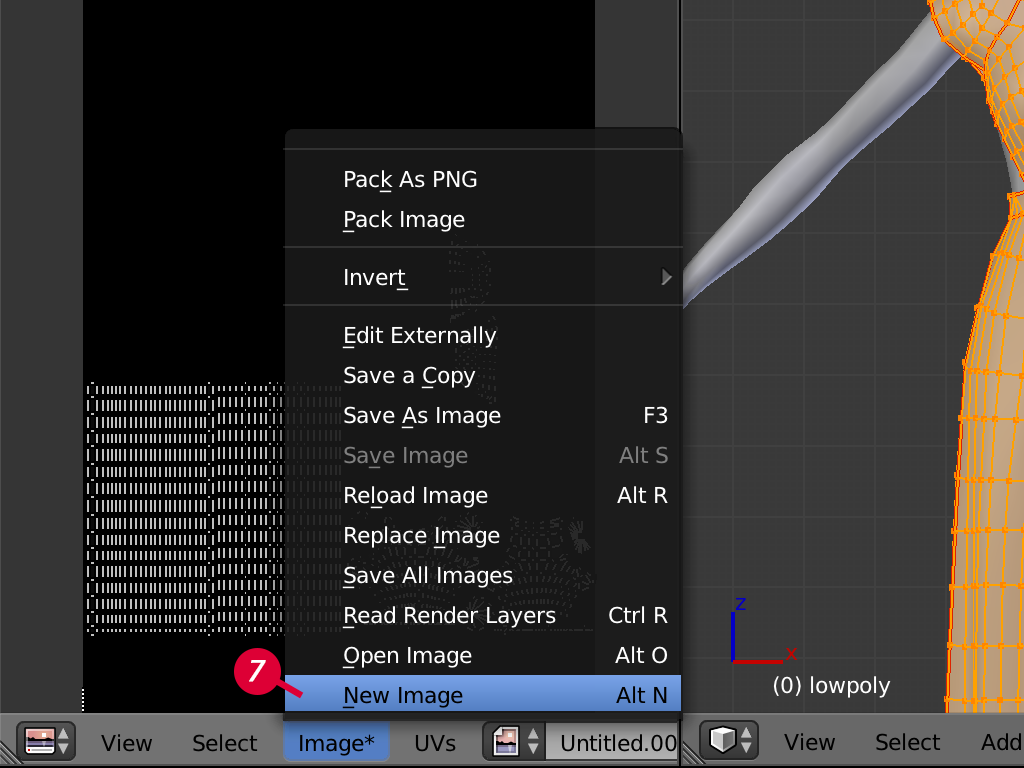
7. Create a new image and set width to 1024, height to 2048. Make sure the UV map is on top of this new image by first selecting the whole mesh in edit mode and then selecting the new image.
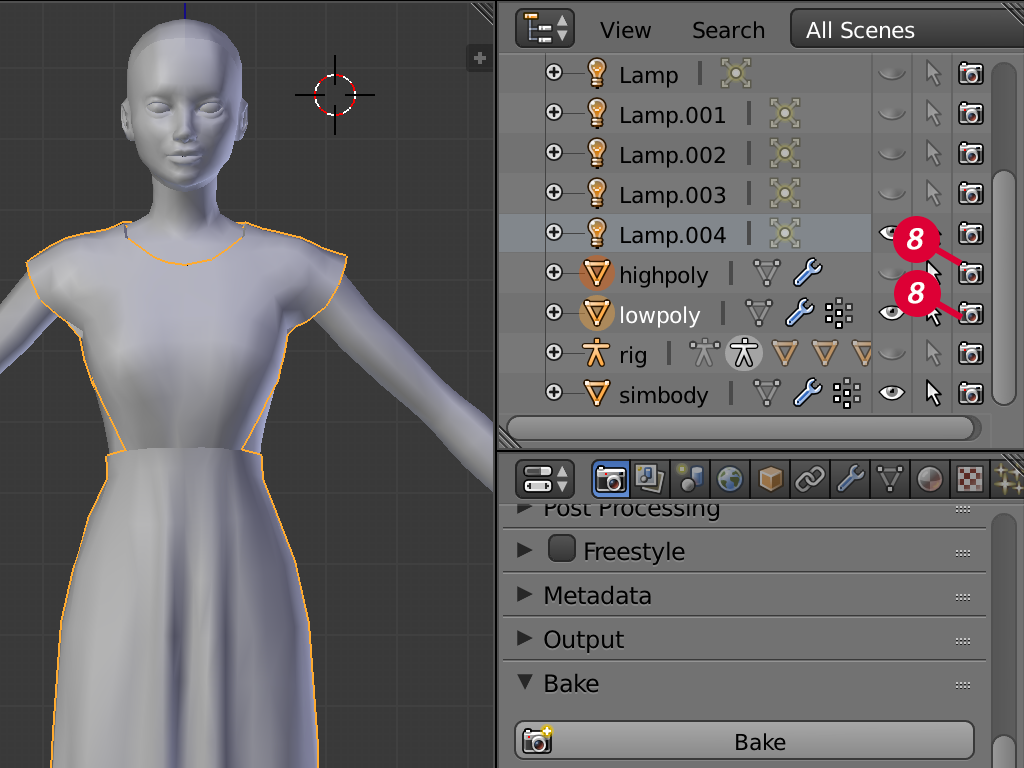
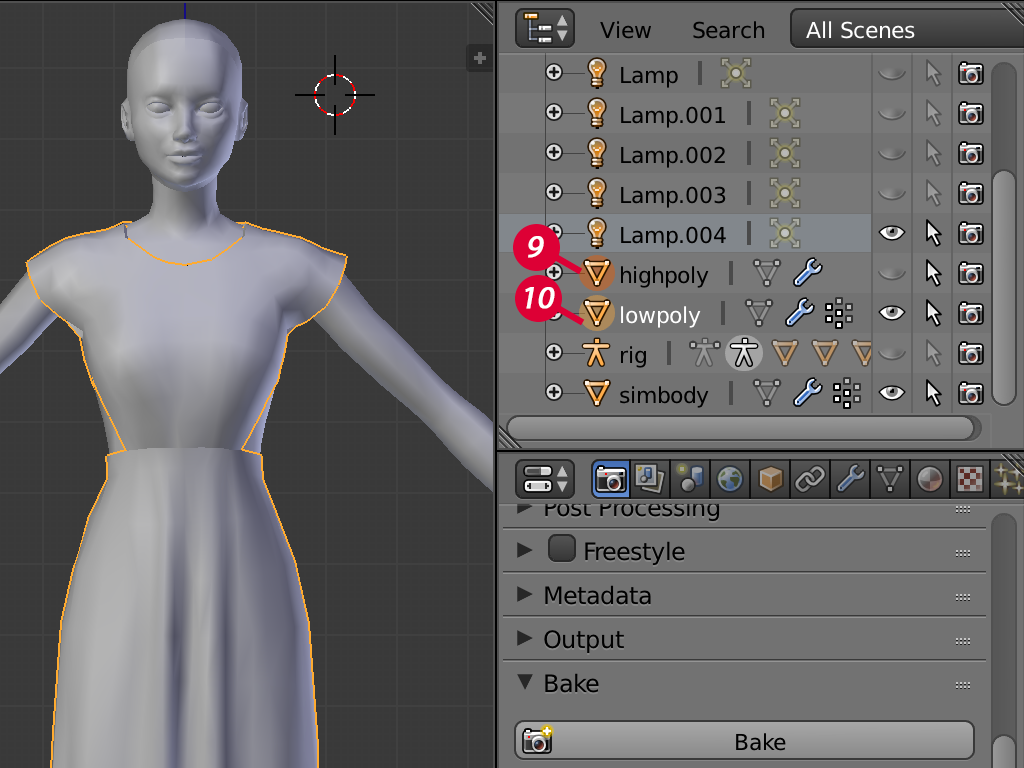
8. Go to Object mode. Make sure the camera icons for both high-poly and low-poly is turned on, which means they will both be baked.
9-10. First select the high-poly, hold Shift key and then select low-poly. The order is important.
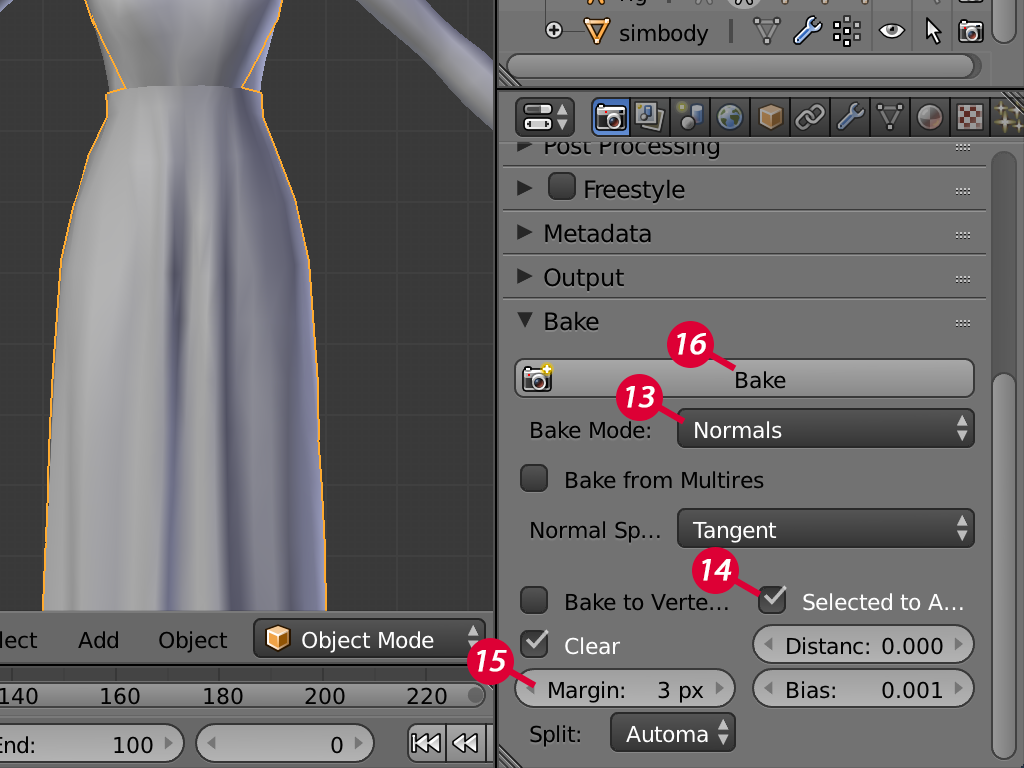
11-12. In Properties panel, click the camera icon and scroll to the bottom to the Bake subsection.

13-14-15-16. In Bake Mode, select Normals. Make sure to activate ‘Selected to Active’ by clicking the checkbox. Set a margin. I often set it to 3px. Leave the rest as default and press Bake button.
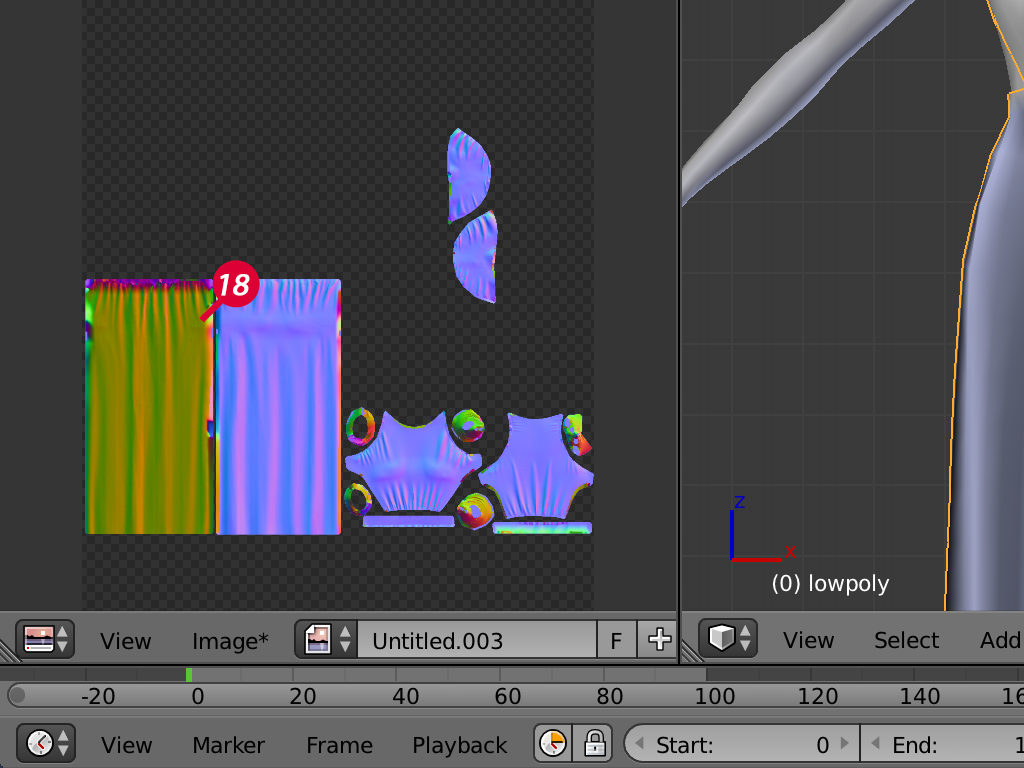
17. You should get a blue/pink image like shown below. Note that in my example some UV areas result in green/red. That’s ok because they’re new faces that I created in the low-poly which don’t exist in the high-poly mesh. I don’t really need a normal map on these faces. I will delete them later in Photoshop.

18. If you’re getting the green/red result on the main UV area like shown below, check if normals of the mesh are all facing outside correctly.
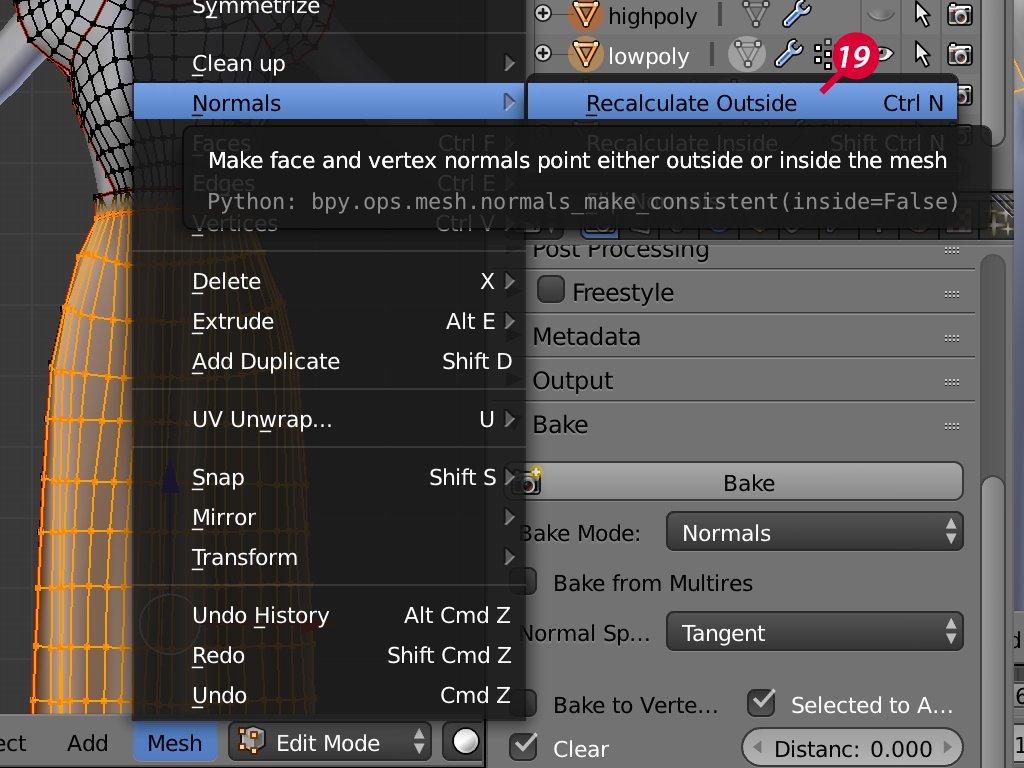
19. You can flip incorrect normals manually, or in Edit mode select the mesh and click Mesh - Normals - Recalculate Outside. Note this command doesn’t work if your mesh has holes or gaps.
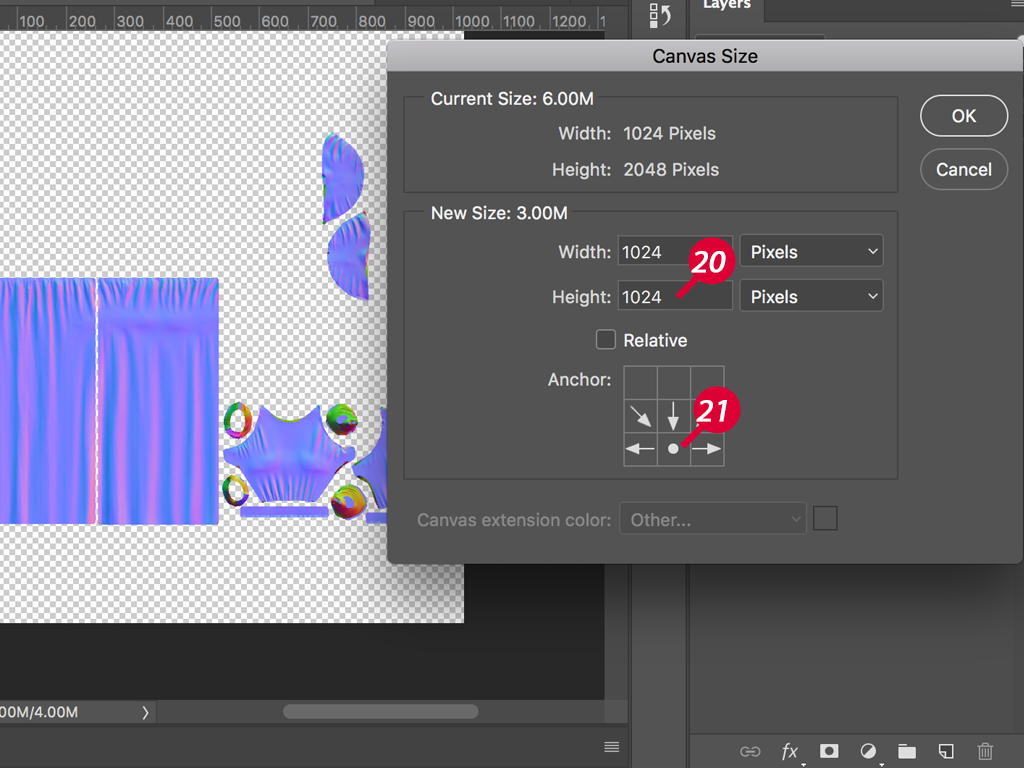
20-21. Export the baked normal map and import into Photoshop. Set canvas size to 1024x1024 with anchor at the bottom. This varies depending on the type of cc you’re making.
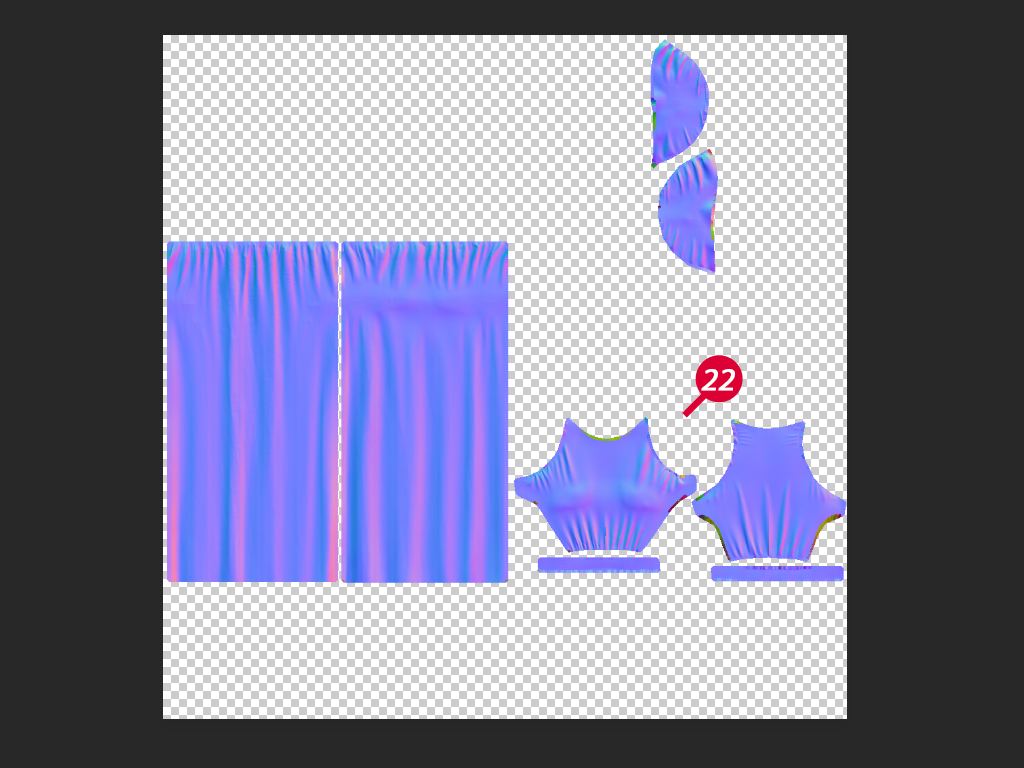
22. Delete unwanted pixels. I deleted the green/red areas.
Optional: do a Surface Blur if you think the baking result isn’t smooth enough.
23-24. Add a new layer under the normal map layer and fill with #8080ff (R128 G128 B255).
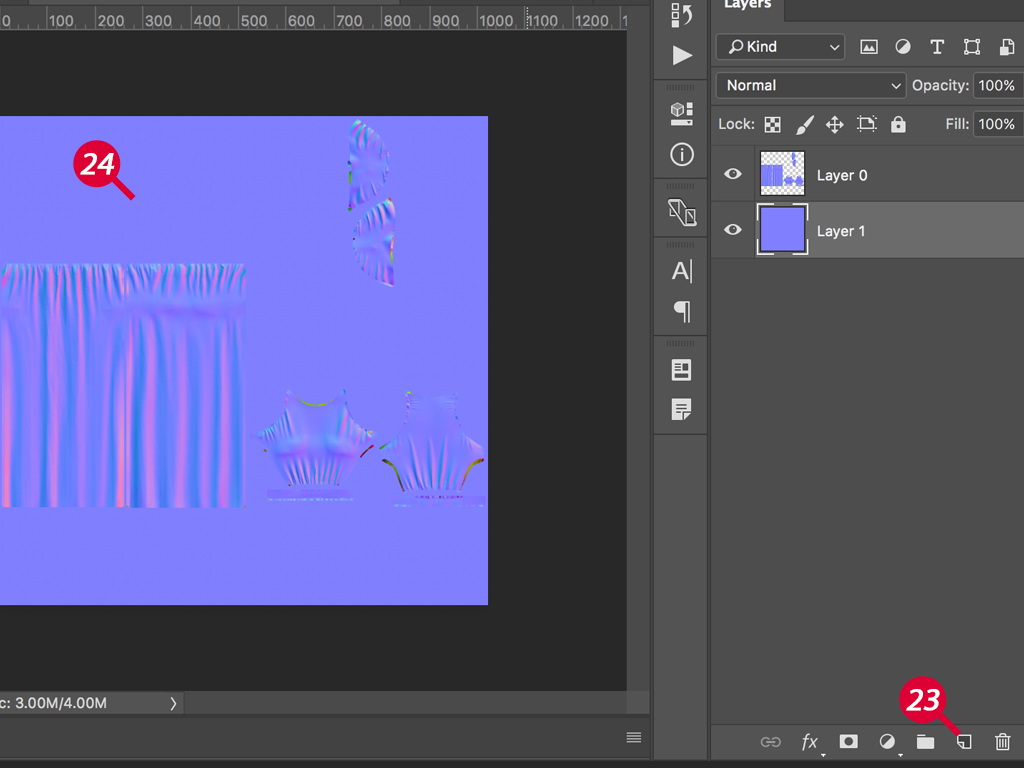
25. Merge two layers.
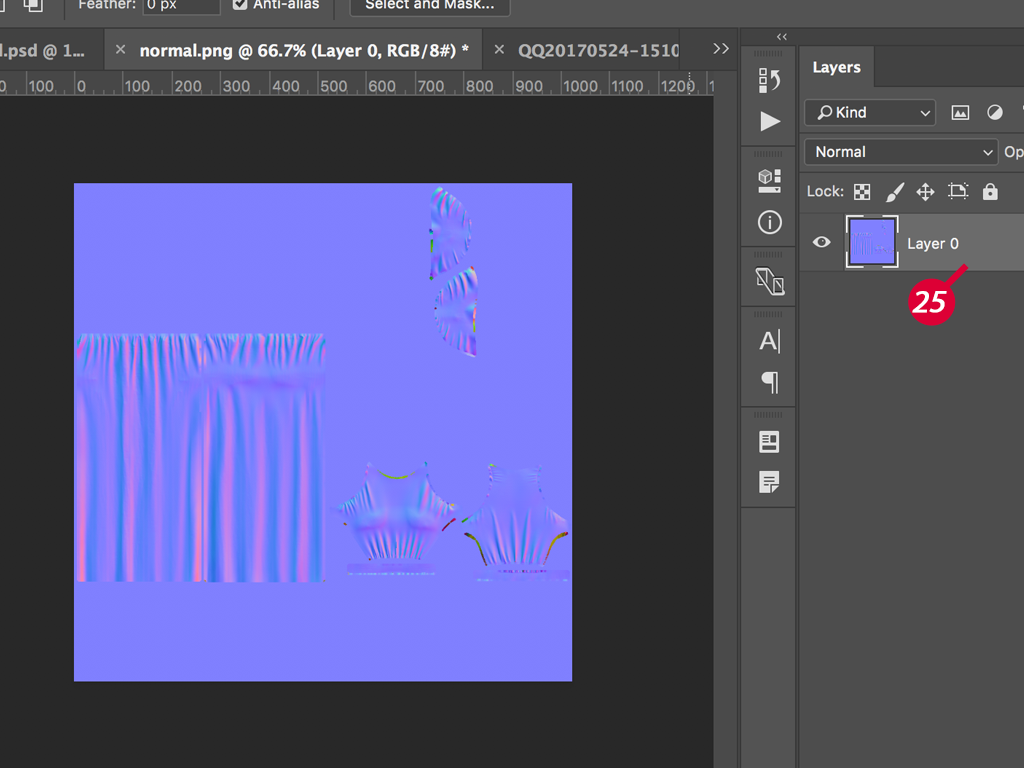
26-27-28-29-30. Open Channels panel. Add a new alpha channel. Click the Red channel, select all on the canvas and copy. Paste the Red channel to the alpha channel.

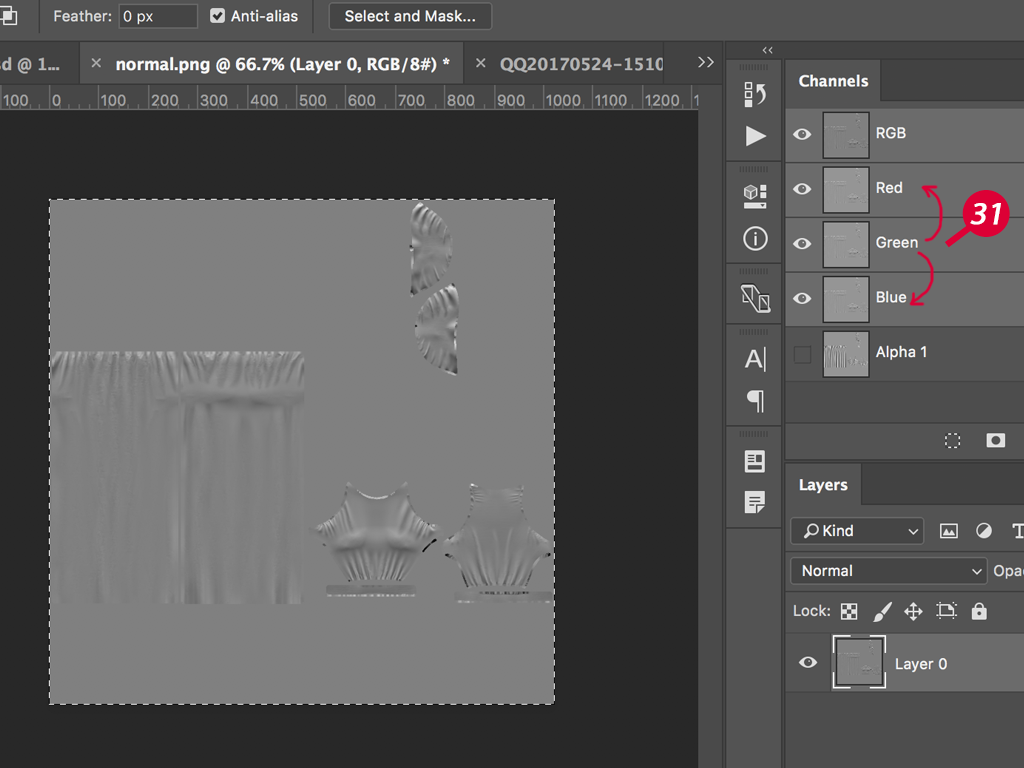
31. Copy and paste the green channel to red and blue channels. Select the RGB channel and you should get a grey image like shown below.
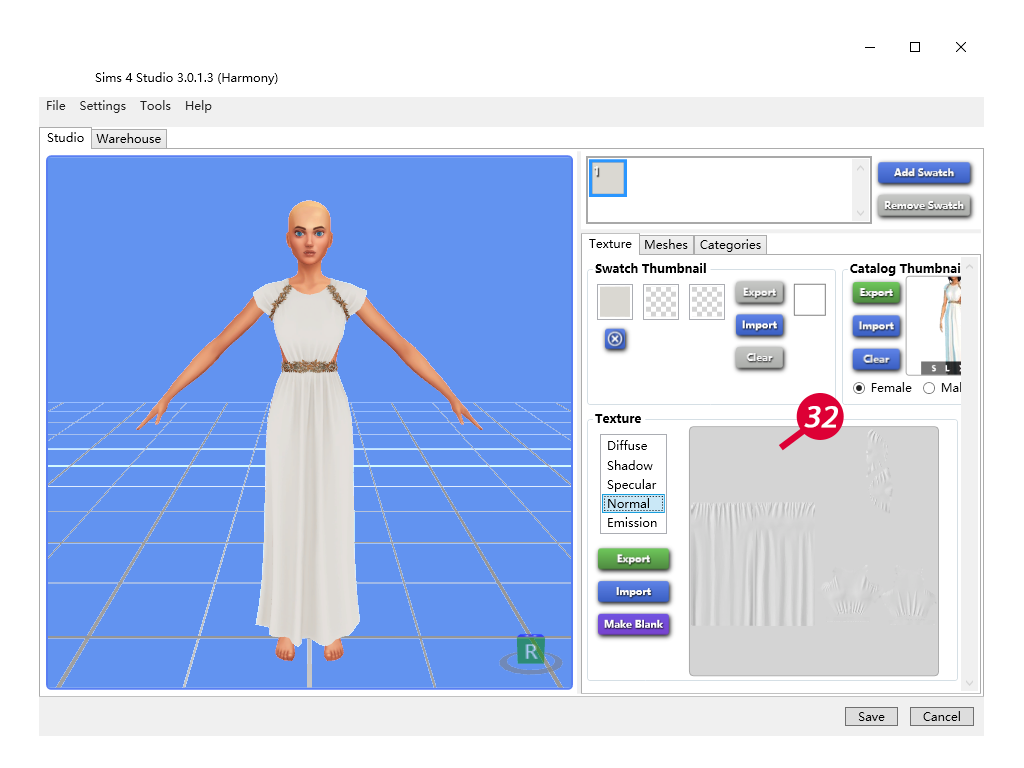
32. Save as .dds, import it to sims4studio and you’re done.
BONUS: you can also bake an Ambient Occlusion image with this method from high-poly to low-poly. Just choose ‘Ambient Occlusion’ instead of ‘Normal’ in Bake mode. Still, make sure ‘Selected to Active’ is enabled. Optional: Add a Subdivision Surface to the high-poly to smooth the result.
What you'll need:
Blender
Sims4studio
Photoshop or other 2d image editing tool
Marvelous Designer (optional)
Zbrush (optional)
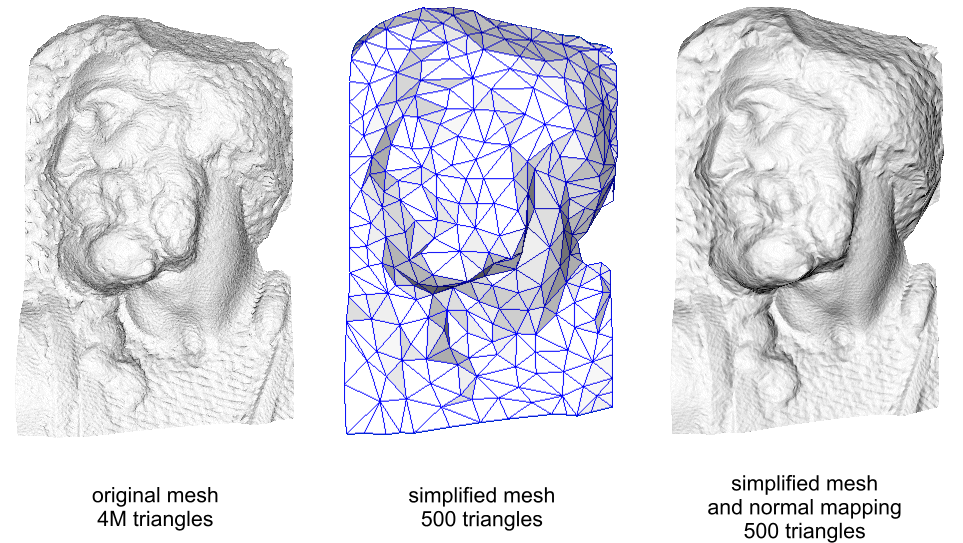
Normal mapping, or Dot3 bump mapping, is a technique used for faking the lighting of bumps and dents – an implementation of bump mapping. It is used to add details without using more polygons. - Wikipedia
“Why not draw the details on the texture map”, you may ask. Because details generated from a normal map behave like real bumps and react to the light, which feels more realistic. While the texture map by itself doesn’t react to the light and looks flat. The difference is quite obvious from this in-game screenshot below.
NOTE: This method requires a high-poly mesh and a low-poly mesh. It won’t work if you only have one mesh.
1-2-3. Prepare a high-poly mesh.
If you’re using Marvelous Designer, which I recommend for this particular tutorial, select the whole mesh and decrease Particle Distance. I usually set it to 5-10. Change mesh type from Triangle to Quad, and export to .obj after simulation.
If you’re editing an EA mesh or modeling from scratch in blender, you can apply a Subdivision Surface modifier and use the Sculpt tool to add some bumps and dents. However, this requires much more work than modeling in Marvelous Designer. I used this method on the Fenty bow slides.
4. Prepare a low-poly mesh. Follow this tutorial to remesh the high-poly mesh in Zbrush. Don’t be afraid to lose the details you just created while reducing polycount. You’ll get them back in the end.
5. Import both high-poly and low-poly to blender. Polish the low-poly mesh. Merge vertices to remove gaps, delete unnecessary vertices, add extra vertices/edges/faces, etc.
For texture baking to work, it’s important to ensure both high and low resolution meshes are correctly prepared beforehand. In essence both meshes need to be; 1) co-located, i.e. both in the same place; 2) have their respective Origin points similarly co-located; 3) their respective “Scale:” and “Dimensions:” data set; and 4) be (approximately) the same size. - Source
NOTE: You DO NOT need to unwrap the high-poly mesh.
7. Create a new image and set width to 1024, height to 2048. Make sure the UV map is on top of this new image by first selecting the whole mesh in edit mode and then selecting the new image.
8. Go to Object mode. Make sure the camera icons for both high-poly and low-poly is turned on, which means they will both be baked.
9-10. First select the high-poly, hold Shift key and then select low-poly. The order is important.
11-12. In Properties panel, click the camera icon and scroll to the bottom to the Bake subsection.
13-14-15-16. In Bake Mode, select Normals. Make sure to activate ‘Selected to Active’ by clicking the checkbox. Set a margin. I often set it to 3px. Leave the rest as default and press Bake button.
17. You should get a blue/pink image like shown below. Note that in my example some UV areas result in green/red. That’s ok because they’re new faces that I created in the low-poly which don’t exist in the high-poly mesh. I don’t really need a normal map on these faces. I will delete them later in Photoshop.
18. If you’re getting the green/red result on the main UV area like shown below, check if normals of the mesh are all facing outside correctly.
19. You can flip incorrect normals manually, or in Edit mode select the mesh and click Mesh - Normals - Recalculate Outside. Note this command doesn’t work if your mesh has holes or gaps.
20-21. Export the baked normal map and import into Photoshop. Set canvas size to 1024x1024 with anchor at the bottom. This varies depending on the type of cc you’re making.
22. Delete unwanted pixels. I deleted the green/red areas.
Optional: do a Surface Blur if you think the baking result isn’t smooth enough.
23-24. Add a new layer under the normal map layer and fill with #8080ff (R128 G128 B255).
25. Merge two layers.
26-27-28-29-30. Open Channels panel. Add a new alpha channel. Click the Red channel, select all on the canvas and copy. Paste the Red channel to the alpha channel.
31. Copy and paste the green channel to red and blue channels. Select the RGB channel and you should get a grey image like shown below.
32. Save as .dds, import it to sims4studio and you’re done.
BONUS: you can also bake an Ambient Occlusion image with this method from high-poly to low-poly. Just choose ‘Ambient Occlusion’ instead of ‘Normal’ in Bake mode. Still, make sure ‘Selected to Active’ is enabled. Optional: Add a Subdivision Surface to the high-poly to smooth the result.


 Nothing cuter than this


