|
|
Post by janjanjanita on Dec 21, 2017 14:45:42 GMT -5
So I just started doing my first Frankenmesh and everything was great until I noticed this section on the dress where you can see clearly a sharp shape, but I don't see that in blender. I'm just learning and I read few tutorial about combining meshes, but nothing really helped me with this, also I really don't know what problem is which makes it hard to figure out the solution. I know there is something weird in that piece but that is the only way I can place it so the edges are smooth from the side, but somehow the texture gets weird looking. Any help is welcome to what I should be doing with this problem. Also really sorry for my bad english.   |
|
|
|
Post by menaceman44 on Dec 21, 2017 15:07:59 GMT -5
You don't have bad English at all.
If you could share your package and blend files for me to take a look I'll be of more help but it looks like you need to update your UV mapping. If you didn't make any edits to the UV when you changed the mesh then the texture might not be lined up correctly anymore.
|
|
|
|
Post by janjanjanita on Dec 21, 2017 15:34:22 GMT -5
packageBlender fileHere they are. And thank you. I will go read about the mapping in the mean time
|
|
|
|
Post by menaceman44 on Dec 21, 2017 16:09:04 GMT -5
I don't have time to properly look at this tonight but from a very quick look just now I can see that you do need to edit your UV to match your mesh changes and there is also still a rather large amount of mesh that needs to be removed. The legs and buttocks should not still be inside the skirt. They need to be removed completely so that you have no overlapping mesh sections.
Your mesh groups are also not correct and you have too many rigs. You can delete all of the rigs apart from the one just called "rig". You can also delete the group called studio_mesh_3.001 as it is a duplicate of studio_mesh_3
I'll hopefully get back to you tomorrow with more detail.
|
|
|
|
Post by janjanjanita on Dec 21, 2017 19:16:15 GMT -5
Thank you I will start with those changes.  |
|
|
|
Post by Zelrish on Dec 22, 2017 3:00:22 GMT -5
Hi there, To add to menaceman44, your studio_mesh_1.001 is also a duplicate from studio_mesh_1 (happened when you appended both original meshes in blender as they used the same groups apparently) Also the sharp edge is visible in blender as well. it is just something you cannot see with the texture on. You simply need to change the view from texture to solid to see it. And to solve it : select the guilty vertices with the active "see through" (so that you select all the vertices on the same spot with a group selection such as "C" or "B" shortcut) And then hit the remove doubles button.  On another note, if you want to create edges (as you lost all edges on the mesh), you need to select the edges where you want to have a sharp edge in edge selection mode. And then go to menu : mesh - edges - edge split. |
|
|
|
Post by janjanjanita on Dec 28, 2017 7:22:28 GMT -5
  I made some changes as you suggested and the mesh looks good, but for some reason the texture wont align anymore and I don't know what causes this. I tried with different ones just to see if my swatch were broken but it does this with every one I tried, even the EA ones. Also thanks to everyone who bothered to help! |
|
|
|
Post by menaceman44 on Dec 28, 2017 7:28:17 GMT -5
Have you got your most recent package and blend files for us to have a look at?
It looks like you need to go and mark which edges you want to be sharp and crisp as everything is being smooth shaded right now. This happens when you use Remove Doubles on the entire mesh.
As for your texture issues, I think there must still be some UV changes needed but I can't check that without the package and blend files.
|
|
|
|
Post by janjanjanita on Dec 28, 2017 8:53:21 GMT -5
|
|
|
|
Post by inabadromance on Dec 28, 2017 8:53:44 GMT -5
Hi! You should only apply "remove doubles" to only the part you're having troubles with. Not to all the mesh, or you'll end up with everything smooth and without the proper edges.
|
|
|
|
Post by menaceman44 on Dec 29, 2017 7:37:48 GMT -5
Okay. I've just taken a look and the texure not lining up is an easy fix.  You need to fill in the gap that I have circled. These sections are touching on your mesh but not on your UV. You will need to drag the two sections together so that they line up and touch along the edges. You might need to stretch the entire bottom section of the skirt to get it to look right. You also need to move the mapping for the underside of the skirt. At the moment it is picking up the texture for the arms. I would place it in the large pink area that you aren't using for anything else and then change the pink colour to black on the texture so that it matches the skirt colour. 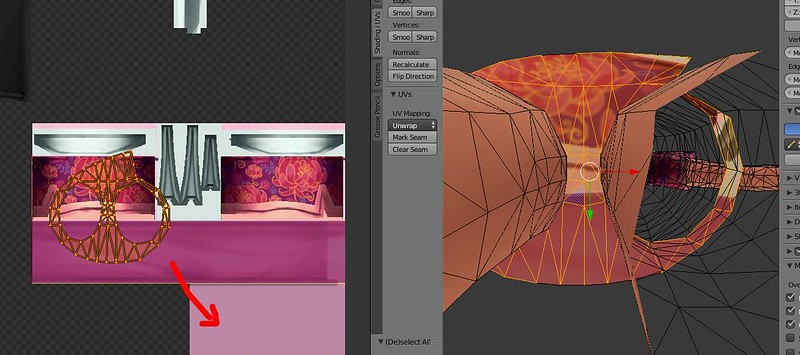 Your new UV should look like this:  You will also need to draw back in the bottom corner of the skirt at the front which you have accidentally erased, and you need to lower the top of the leg mapping ever so slightly to remove the black lines on the top of the legs under the skirt. |
|
|
|
Post by menaceman44 on Dec 29, 2017 7:52:07 GMT -5
Once you get the texture and mapping fixed then we can take a look at the mesh smoothing which needs fixing as well.
|
|
|
|
Post by janjanjanita on Jan 6, 2018 13:35:12 GMT -5
So after reading all of your post I'm pretty sure the tutorial I followed is somewhat wrong. So I decided to look your advice and start again. And all my problems were fixed, but for some reason there is weird seam on both of the legs that I can't get rid of. I found thread here with similar problem and they fixed the problem with (following last step of the tutorial about shortening skirt mesh) removing doubles. I did that to the leg parts but still had the same problem. The seam isn't that visible on S4S. One question I couldn't find any answers is why on some tutorials they tell you to select whole mesh and remove doubles, when some say don't do that.   Also wanted to thank you all so much with the help. S4S fileBlender file |
|
|
|
Post by inabadromance on Jan 6, 2018 14:07:50 GMT -5
Hi! You have overlapping geometry. I'm looking at your blend and seeing that the mesh group is called 2 and its cut number 002. And you only have one mesh group. This tells me that you're missing group 0 and 1. To properly import a mesh, your blend MUST have the SAME amount of mesh groups with their respective numbers as the original.
If the dress you cloned has 3 mesh groups, then yours do to.
To see this, you only need to re export the imported blend and you'll see which groups you're missing out.
I suggest doing the above. Opening your current blend and appending the two groups you're missing (3 and 1). Select mesh group 2 in EDIT MODE and delete the leg geometry that is overlapping the other groups.
|
|
|
|
Post by janjanjanita on Jan 8, 2018 14:38:56 GMT -5
Okey, so finally I got it to work! I want thank you all for the awesome help you gave. I'm so grateful! It really helped when I got to ask you.
|
|


