|
|
Post by justnikki69 on Dec 29, 2018 18:47:15 GMT -5
|
|
|
|
Post by inabadromance on Dec 29, 2018 21:41:24 GMT -5
hi! I'm checking your previous posts and all were posted under the tutorial thread. that usually will be only seen by the one who posted the guide and maybe anyone that interacted in that thread. I think it's more difficult to see in my opinion rather than what you're doing right now that is creating a proper thread in this section. furthermore those who reply or see your posts might not have the knowledge to help you out. some know about coding, some about bugs and some about object creation. so please be patient and not demand fast response, since not everybody is here 24/7, specially around this time of the year. we try our best to help everybody, and we don't ignore anything as long as we have an answer for it. by just looking at the images I can tell that you have many issues going on. instead of trying to guess what those are, please share the blend and package file so someone can take a look. For starters, you have a problem with cut numbers. check this simple guide for more information about this: sims4studio.com/thread/10/tutorial-using-sims-studio-accessory. |
|
|
|
Post by justnikki69 on Dec 30, 2018 14:15:46 GMT -5
I understand people have lives i do to. I patently waited for an answer like I said I had been waiting 2 weeks. I starting to think i did something wrong but just s simple message back like your easied my mind here is blender file |
|
|
|
Post by mauvemorn on Dec 30, 2018 15:05:00 GMT -5
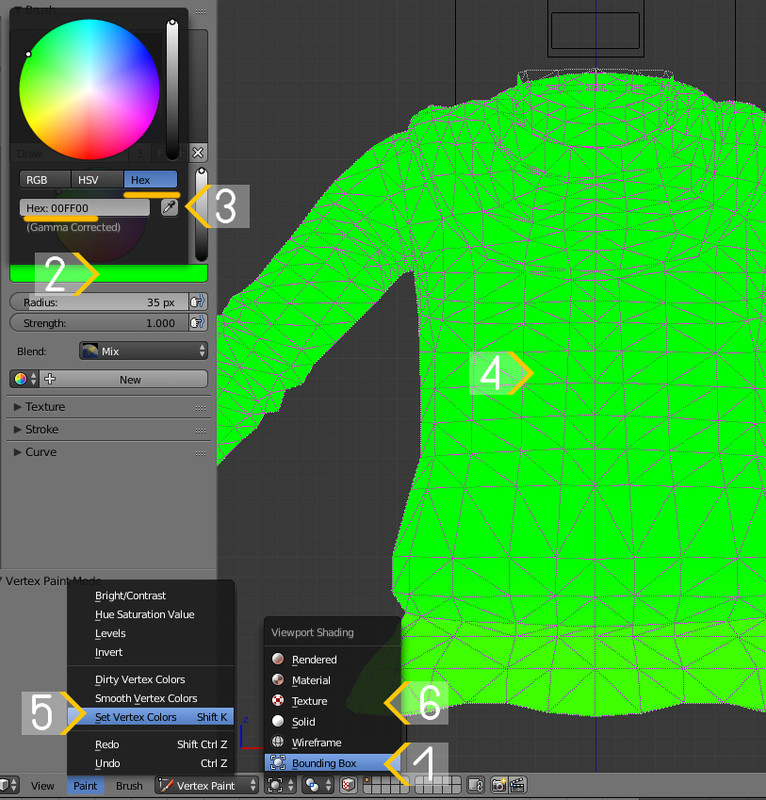
1). Your top does not appear in s4s because it has no type or cut set up. Ea meshes tend to be split into parts that are named s4studio_mesh_1, s4studio_mesh_2, s4studio_mesh_3, etc. Each of them has a different Cut number. This is what helps s4s and the game to recognize what is what. That is why the amount of these s4studio_mesh_ and their numbers are important and should match the ones of the original blend. 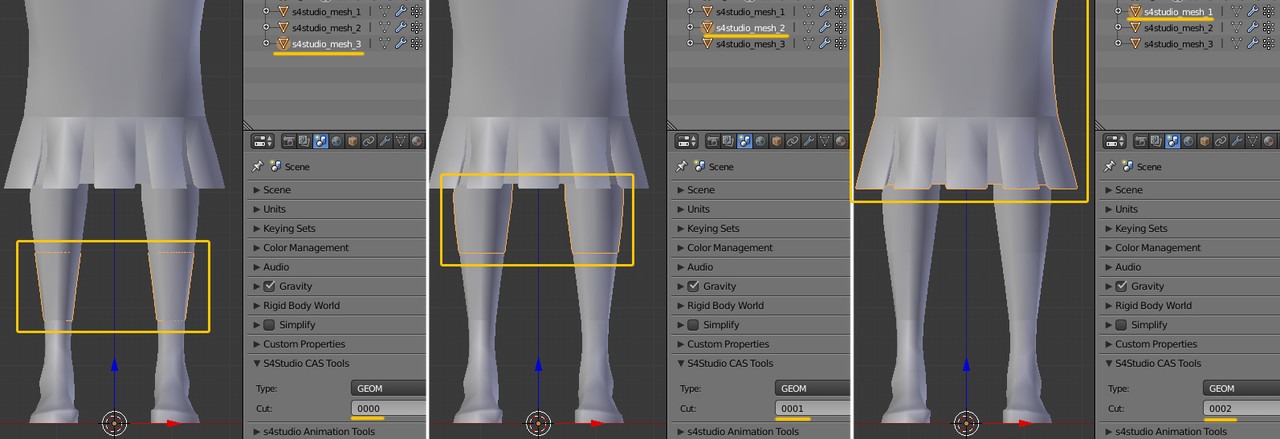 When you start a new package, the first thing you do is export its mesh, open it in blender and look how many s4studio_mesh_ there is. Before importing your edited file, you ensure that your final .blend has the same number of s4studio_mesh_ and all of them have type and cut numbers set up. So if you are replacing, say, a bra .blend with your top .blend, you need to combine "white t shirt" and "white t shirt.001" into one mesh by selecting one, shift-selecting the second one and hitting Ctrl J. Because by default a bra file has only s4studio_mesh_1. 2). I'm not sure what exactly is your issue with Vertex Paint but here is how you do it in Blender 2.78. In Blender 2.70 you do not need to change shading ( no 1 or 6 step). Edit: I looked in a MD thread at your messege. You need to have your MD mesh selected. You vertex paint things to let the game know how much that part of the mesh should be affected when body parameters are changed. The color should be exact, that's why you sample it.
 ( in 12-14 it is explained why black spots happen and how to remove them)
4). how to get a better quality bake results |
|
|
|
Post by justnikki69 on Dec 30, 2018 15:59:23 GMT -5
i dont fully understand.. you mean the mesh i append cut number? my new mesh needs to match the number of the appended mesh? in the this "it says It should have "GEOM" for the type and "0000" as the cut. If it does, you're good to go!" it doesn't tell me to change it to any other number. Is it possible for someone to makybe call me via discord cause i don't understand this by just reading everything JustNikki#6435 |
|
|
|
Post by mauvemorn on Dec 30, 2018 17:04:56 GMT -5
Ok, I'll explain it this way. You may have noticed that when you put boots on your sim that is wearing pants in CAS, sometimes the calf part of them is hidden under trouser legs, other times the pants are "tucked in". You may also have noticed that when you put on a hat on the sim that, say, has a high ponytail, said ponytail disappears. This happens because every EA CAS item is made of one or more meshes ( by default called s4studio_mesh_) that interact with other CAS items. Hair has 3 s4studio_mesh_, one of which is meant for low hats, second - high hats, third - without hats. For pants it is different. They are split into 3 or 4 parts so that when you put on boots, one - three parts ( depending on how high these boots are ) of the pants disappear and make it seem like they are "tucked in" into boots. How does the game know which parts to hide? Due to Cut numbers ( 0000, 0001, 0002, etc ) assigned to each parts. ( It is probably more complicated that but you get the idea ) How to know where to split your mesh into parts and what cut numbers to assign? By using a reference. Where to get a reference? To export the original mesh from the package you're using as a base for your project and append it into your scene.    I assume the author of the tutorial you followed didn't want to overwhelm beginners with a lot of information and decided to give an example of the universal approach - importing .blend files with one s4studio_mesh_ into packages started from cas items that have only one s4studio_mesh_ ( nude, lingerie, underwear, etc ). But you did not combine top with the body into one mesh, top had no type or cut assigned, so that is why it was invisible
|
|
|
|
Post by justnikki69 on Dec 30, 2018 18:16:01 GMT -5
so now your saying the tutorial didn't give all the info and i did combine the top and the nude into one mesh but it made the white t shirt and white t shirt .001 and the white t shirt is the nude body now?? im sorry but i still dont understand i need someone to voice chat with if possible cause this just confused me even more. i understand that part of curtain clothes need to be different for things to work properly but all i have is simple cropped top? i don't understand where to get a cut number from do i need to redo the whole blender over. when i change the cut number nothing happens
|
|
|
|
Post by mauvemorn on Dec 30, 2018 19:24:41 GMT -5
1).There is so much to this whole process of creating cc, that if everyone were to explain every aspect of it, people would get confused and discouraged from learning. A beginner tutorial should not have ALL info, only the basics, and the basics they gave. As I said, what they did was universal. 2). The fact that blend file has "white t shirt" and "white t shirt.001" means they were combined but then separated again. So what you need to do now to resolve everything is: - bake the texture while everything is separated as explained here. 12-14 explains why these black spots appear; - select "white t shirt", shift-select "white t shirt.001", press Ctrl J; - set type to GEOM, and, since you have only one mesh in your scene, cut to 0000;  - switch to Vertex paint, enable Face selection masking for painting, press A to select everything, flood everything with green with Shift K;  - select these vertices, click on the blue handle of move tool and drag upward to cover this hole;  - start a new package from this top, import your blend file.  it works |
|
|
|
Post by inabadromance on Dec 30, 2018 22:50:03 GMT -5
I would like to point out that we DON'T do private tutoring so please avoid repeating that request over and over, it's a bit rude in my opinion. mauvemorn is taking the time to explain in detail what the tutorial already goes through. Users ask a question or share an issue they're having, we reply and try to explain as much as possibly PUBLICLY so others that are facing the same problem learn from it. Doing this "one to one" thing is not only fair for everybody, but useless if only one person is having this "private" tutoring.. when everything is already laid out in the form of guides or tutorials. Also, i requested the package on my first post but you only shared the blend file. Please read and follow instructions asked by the person who replies or it's going to make it more difficult to give you the answers you look for. By looking at the package i can tell which item you cloned and why it isn't matching the cut number as shown in the guide. The poster cloned a nude top (which i don't suggest since it might conflict with other sims watching you walk by, i prefer cloning a base game tank top). Both (nude & tanktop) are one group mesh therefore 1 cut number which is 0000. The BASIC premise on how to import ANYTHING into the game is that your mesh matches AS CLOSELY as the original object in game. This goes for CAS, build / buy as well. When in doubt, export the original object and compare it to yours. If you need more assistance after having read what Mauvemorn said AND the tutorial, then please share the updated blend and package files. Both please. |
|
|
|
Post by justnikki69 on Dec 31, 2018 1:31:56 GMT -5
thank you so much mauvemorn for taking the time out to help me it finally worked. I am so sorry if i came across rude i swear i am a sweet person i was just frustrated
|
|
|
|
Post by justnikki69 on Dec 31, 2018 3:57:37 GMT -5
  the shirt in my game came out looking shiny why is this happening? my package also there is a weird shadow on the belly area. My Blender file |
|
|
|
Post by inabadromance on Dec 31, 2018 5:38:41 GMT -5
that's fine! glad everything's working 😄. both issues you're pointing out are specular and shadow map. both textures need to be edited to fit your mesh, you can find them below the diffuse (where you import your shirt textures). export them, edit and remember to save them back as dds dxt5 with alpha.
|
|
|
|
Post by justnikki69 on Dec 31, 2018 17:54:26 GMT -5
i do not know how edit them. I have the dds files and plug-in on Photoshop but I have never edited a dds photo. could you give me a link to a tutorial is there is one?
|
|
|
|
Post by mauvemorn on Jan 1, 2019 9:39:58 GMT -5
dds is edited the same way any other image format is except for you open it like this:  save it like this:  and transparency is edited on the alpha channel:  You can remove unwanted shadows and noise with these tools:  you can recolor certain parts by selecting an area with lasso/marquee tool, clicking on "create new fill or adjacent layer", choosing solid color, changing blending mode ( i find that hard light ( for dark colors ) and multiple ( for light colors ) work best ). You can also change opacity and edit the mask by Alt-clicking on it  You can google "the sims 4 recolor tutorial" on youtube and there will be many examples of how to do this |
|
|
|
Post by justnikki69 on Feb 9, 2019 0:21:02 GMT -5
thank you i hope you had good holidays but i have another problem not sure what happened...  my blender file my blender file |
|


