|
|
Post by freshpepperino on Apr 13, 2020 16:14:10 GMT -5
yes hello, here making my debut for a floating issue. i have held out to ask about this because there's plenty of existing cases for this issue, but mine seems to be a little different for some reason. it's driving me nuts. i've followed mauvemorn's wonderful copy pasta several times (ref mesh select + target mesh select, weight paint, transfer weights, change dropdown values, clean, dropdown value), trying to get a different result but to no avail. i've got some long ears in an earring slot, and the ears that the weights are based off of work perfectly. mine however with an imported obj placed in the same area, doesn't work so much. it moves. its vertex group for head is painted red, pose mode in blender shows it moves as it should, s4s preview is good, but it's just still laughably off in-game.  not even close... here's my .blend. here's the .package. i'll even throw in the .blend before i do any weight transfers, with the imported .obj target_mesh in the scene, pre-joined meshes. i'm using blender 2.79 if that sheds any light. s4s 3.1.3.2 wishes. any pointers in the right direction would be immensely appreciated.  |
|
|
|
Post by mauvemorn on Apr 13, 2020 18:43:11 GMT -5
Hi. Usually mesh does not float like that when the issue lies in extra meshgroups, it just distorts. Maybe it has something to do with the fact that you cloned cc? Or did you just import you blend file there? Not sure about that, but you can just clone earrings and assign head vertex group to your ears. Also, your mesh should have 2 uv maps and be vertex painted even if it does not have to morph. New package and blend files laranja0doce please share the blend and package files |
|
|
|
Post by freshpepperino on Apr 13, 2020 19:30:28 GMT -5
Hi. Usually mesh does not float like that when the issue lies in extra meshgroups, it just distorts. Maybe it has something to do with the fact that you cloned cc? Or did you just import you blend file there? Not sure about that, but you can just clone earrings and assign head vertex group to your ears. Also, your mesh should have 2 uv maps and be vertex painted even if it does not have to morph. New package and blend files laranja0doce please share the blend and package files hey thanks for that! you're my hero rn  when it comes to how i actually came about this issue, your guess is as good as mine. but i have imported and exported this mesh at nauseum trying to fix this, so i'm sure it's been a one off recipe of strange happenings to get here. it's a learning experience  the texture is already mapped to the hair which is defined in the hair package, so i wasn't too concerned about having uv maps. it's definitely pretty sloppy and not something i plan on sharing to the internet right away because i am still learning and won't release something unless i know it's absolutely perfect. but i guess also in my journey of self-teaching (with all of the awesome resources here in the forums  ), i have kind of been failing to grasp the purpose of having 2 uv maps? that seems like a given reality of cas content but no tutorial or resource seems to explain why. this thread touches at a reason, but isn't that what weight painting is for? |
|
|
|
Post by mauvemorn on Apr 14, 2020 8:32:36 GMT -5
Basically a uv_0 map projects a texture on the surface of a 3d model, a uv_1 map defines how a 3d model will morph during body customisation in CAS. Some info on this matter Imagine a real life globe. To glue the world's map on a sphere without paper folds at the top or the bottom one has to cut it like this  UV mapping works on the same principle. We unwrap a 3d model, as in we create a 2d representation of it, use the result as a guide to create a texture and then apply said texture to the model. uv_1 map works on the same principle but in reverse. Instead of creating a texture based on the 3d model's uvs, we decide how the 3d model's uvs will be unwrapped on the existing textures ( deformer maps ). This is what a deformer map looks like  But since there is a way of transferring a uv_1 map, we do not need to create it from scratch and can just transfer it from the reference maxis mesh.
Deformer maps work similarly to how displacement maps do, I assume 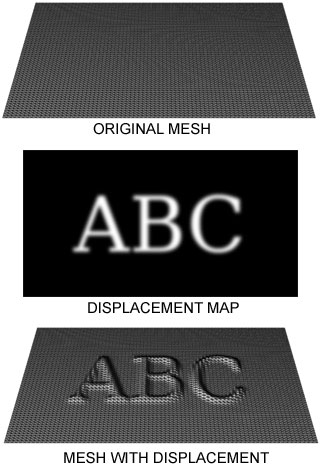 For the exception of breast bones, weight paint is related to rigging. Rigging is a process of creating a bone structure of a 3d model and defining how much influence each of these bones have on it. In our case, developers created a rig ( skeleton ) and animated it. To make our garment move as well, we must assign weights ( again, define how much influence each of these bones have on our garment and where). Since we already have maxis items with weights assigned to them, we can just use them as references and transfer this information to our garments. |
|
|
|
Post by freshpepperino on Apr 14, 2020 11:36:38 GMT -5
Basically a uv_0 map projects a texture on the surface of a 3d model, a uv_1 map defines how a 3d model will morph during body customisation in CAS. Some info on this matter For the exception of breast bones, weight paint is related to rigging. Rigging is a process of creating a bone structure of a 3d model and defining how much influence each of these bones have on it. In our case, developers created a rig ( skeleton ) and animated it. To make our garment move as well, we must assign weights ( again, define how much influence each of these bones have on our garment and where). Since we already have maxis items with weights assigned to them, we can just use them as references and transfer this information to our garments. ahhh that makes perfect sense, awesome! i guess i've sort of implicitly found my way around this by placing all of my textures on top of a maxis mapped template so i didn't have to worry about it looking different when mapped in-game. thanks for the info, i really appreciate that saving that one in the books |
|


 when it comes to how i actually came about this issue, your guess is as good as mine. but i have imported and exported this mesh at nauseum trying to fix this, so i'm sure it's been a one off recipe of strange happenings to get here. it's a learning experience
 ), i have kind of been failing to grasp the purpose of having 2 uv maps? that seems like a given reality of cas content but no tutorial or resource seems to explain why.