|
|
Post by kittykatnip on Mar 21, 2021 16:32:39 GMT -5
Ahhh I know I post a lot on here but this is literally the only outlet I know of where I can get live help  So, I've been doing relatively good with learning how to create meshes and having them work properly in game. This time I decided to add a zbrush step in between MD and Blender and Substance Painter. I mention this because this is the first time this has happened after following the same exact process I've been using for previous pieces that have worked fine. The Zbrush step consisted of me turning it highpoly, brushing on some seams (that are barely visible, but whatever) and then converting it back to low poly and creating a new UV. Basically Weld > Divide x 5 > Brush work > Remesh to ~8k poly while keeping groups > creating new uv > export as obj to import into blender. So this happened while testing the mesh in game, it shows when she's static as well :/ It seems like it's the parts I extruded to fill the 3 pant holes. It showed up normal in the preview of the package file in S4S. What the heck did I do to cause this :') ? EDIT2: Forgot to add blend file |
|
|
|
Post by mauvemorn on Mar 22, 2021 3:12:25 GMT -5
Hi. The link was not added, you need to click on Create link when adding it.
|
|
|
|
Post by kittykatnip on Mar 22, 2021 10:46:47 GMT -5
Hi. The link was not added, you need to click on Create link when adding it. Woopsie, thanks. I've fixed the link. |
|
|
|
Post by mauvemorn on Mar 22, 2021 13:15:19 GMT -5
You should never transfer weights from skirts to pants and vise versa. They are rigged very differently. That said, please always share the blend and package file, what you clone plays a bit role. Anyway, delete the weights, clone yfBottom_PantsSlacksBootcut, re-transfer weights from them, edit the weights, split the mesh the same way they were split, assign corresponding cut numbers, import in the package
Hi. This is a problem with weights. Select right trouser leg either in UV Editor ( with Keep UV and Edit mode mesh selection in sync ( 1 ) ) or in 3d view ( with Limit selection to visible off ( 2 ) ). 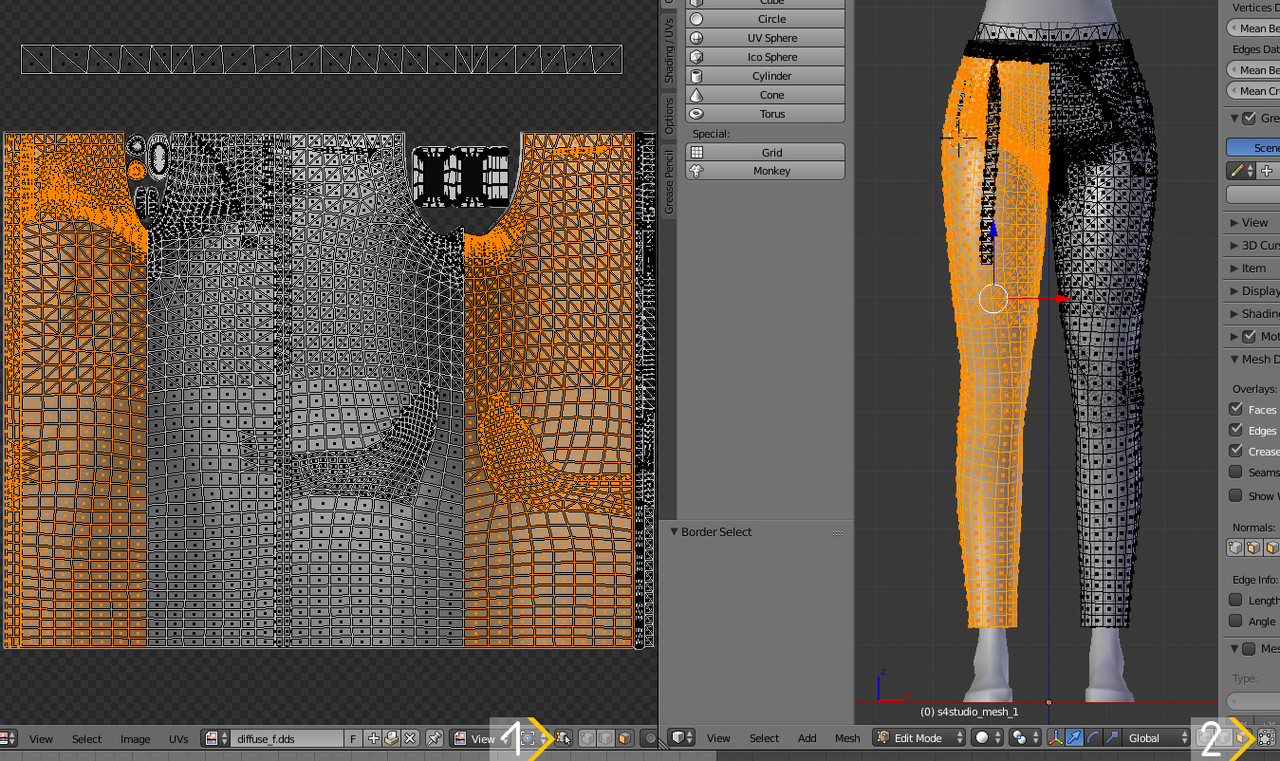 Enable Show Weights ( 1 ), click on + and type in calf ( 2 ), choose b__L_Calf__ ( 3 ), click remove button ( 4 ) to clear selected area from that group. Repeat for b__L_Foot__ and b__L_Thigh__. 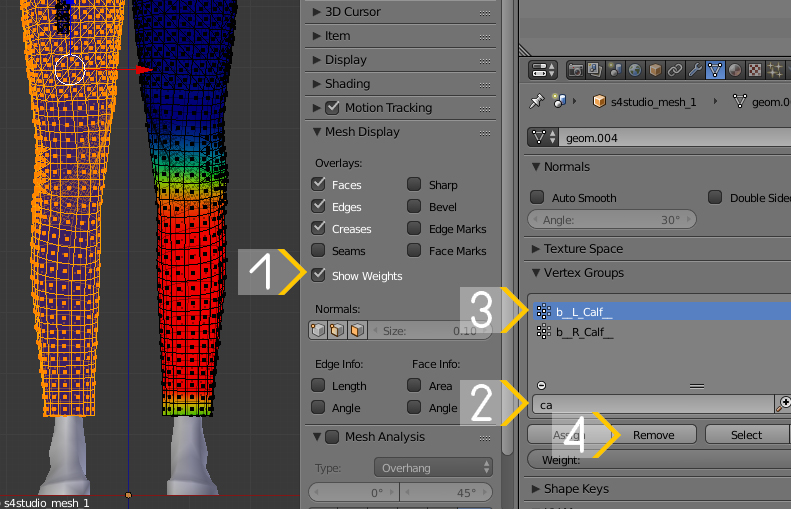 Then press Ctrl I to inverse selection and repeat the same for b__R_Calf__, b__R_Foot__, b__R_Thigh__. Switch to Weight Paint mode and click Normalize all ( 1 ). If the areas where you removed vertex groups had weights from the right groups, they will be normalized automatically. If not, you can enable Face Selection masking for painting ( 2 ) and using Blur brush ( 3 ) just run ( 4 ) through these areas with the right groups selected ( 5 ). It should normalize itself if Auto Normalize is enabled. 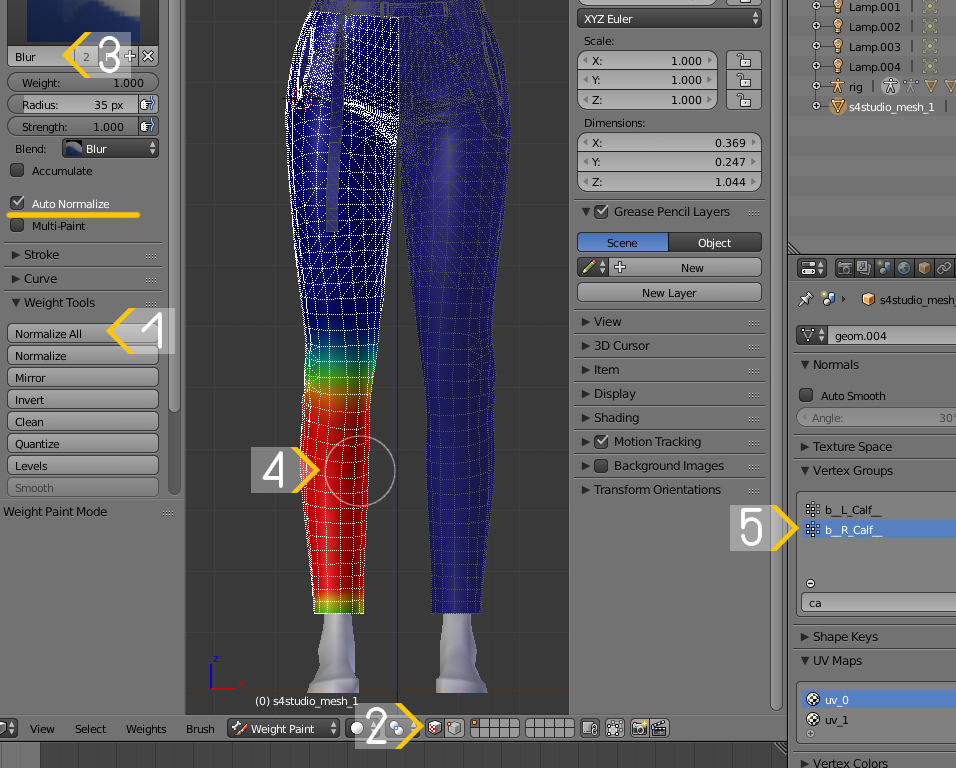 |
|
|
|
Post by kittykatnip on Mar 22, 2021 18:46:17 GMT -5
You should never transfer weights from skirts to pants and vise versa. They are rigged very differently. That said, please always share the blend and package file, what you clone plays a bit role. Anyway, delete the weights, clone yfBottom_PantsSlacksBootcut, re-transfer weights from them, edit the weights, split the mesh the same way they were split, assign corresponding cut numbers, import in the package
Hi. This is a problem with weights. Select right trouser leg either in UV Editor ( with Keep UV and Edit mode mesh selection in sync ( 1 ) ) or in 3d view ( with Limit selection to visible off ( 2 ) ). Enable Show Weights ( 1 ), click on + and type in calf ( 2 ), choose b__L_Calf__ ( 3 ), click remove button ( 4 ) to clear selected area from that group. Repeat for b__L_Foot__ and b__L_Thigh__. Then press Ctrl I to inverse selection and repeat the same for b__R_Calf__, b__R_Foot__, b__R_Thigh__. Switch to Weight Paint mode and click Normalize all ( 1 ). If the areas where you removed vertex groups had weights from the right groups, they will be normalized automatically. If not, you can enable Face Selection masking for painting ( 2 ) and using Blur brush ( 3 ) just run ( 4 ) through these areas with the right groups selected ( 5 ). It should normalize itself if Auto Normalize is enabled. Thanks for the reply! I redid the weights and data transfer with the mesh you mentioned. However there's something I'm not understanding with the cuts. I was following this post to understand how cuts work. But the guide doesn't specify how to separate the parts. The only way I know how to separate a mesh was to select the part of the mesh associated with that cut and tap "P" and select "Selection" I gave each piece the associate number by following my EA reference mesh, but it's not showing up right in S4S. I'll share all the necessary files. Blend FileS4S Package File |
|
|
|
Post by Fwecka (Lolabellesims) on Mar 23, 2021 0:00:47 GMT -5
Is this the item you cloned?  These pants have four mesh groups and your mesh has three. You need to cut your mesh in the exact same places as the EA mesh you cloned. Append the EA mesh into Blender (File > Append > the cloned mesh blend > object > all of the files named "Sims4Studio_mesh." Shift-click to choose all at the same time). Make your cuts in the exact same places your cloned mesh is cut. I just make a loop cut or use the knife tool then I do what you do--I highlight the faces I want to be separated and press "P". There might be a better way of doing it but that's how I do it. Make sure each mesh group has the same cut number as the cloned EA item. You can read more about cut numbers here: sims4studio.com/thread/9047/documentation-slot-rays |
|
|
|
Post by mauvemorn on Mar 23, 2021 3:35:12 GMT -5
Your mesh has the right number of cuts. However, you should have edited the weights before splitting them.
You need to import the blend file in yfBottom_PantsSlacksBootcut package, not the nude lower body. The nude comes with one meshgroup.
Never clone nude body parts at all because they come with a buff that makes sims embarrassed
|
|


