|
|
Post by pandamontok on Jan 31, 2022 17:23:35 GMT -5
I'm in weight paint. The result of weight transfer sometimes not as expected. When I pose the rig, there are certain details need to be addressed, one of the example usually around the shoulder and upperarm. When I rotate the shoulder, the mesh may have a bit of not good looking deformation.
So what's the difference in functionality between b__L_ShoulderTwist__ and b__L_UpperArm__? They are at the same spot. Why have two bones at the same spot?
|
|
|
|
Post by mauvemorn on Feb 1, 2022 15:15:01 GMT -5
For the mesh to move smoothly, the transition between areas of influence of bones must be gradual.
When you assign a vertex to only one bone, it’s value is set to 1 and the paint looks red.
When you want two bones to affect the same vertex equally, their values should be 0.5 each so that their sum equals 1. The paint is green.
Three bones? 0.2 + 0.3 + 0.5 = 1.
Four is the maximum number of bones a vertex can be affected by in ts4.
My point is, the sum of all values should always be 1. Not more or less than that.
Now, open any nude upper body and select b__L_UpperArm__ Is. The paint will be in the upper arm area and not red anywhere. Then select b__L_ShoulderTwist__. Again the paint is not red, it does not affect the area to the max. It is yellow in a different place than the previous group.
Now, select any other bone bone on the torso. You will see that they are not red because they are not the only ones affecting the area. The transition between bones is gradual.
If it’s still not clear, watch any tutorial that explains rigging (not for ts4 but in general)
|
|
|
|
Post by pandamontok on Feb 2, 2022 17:42:46 GMT -5
But why two bones at the same spot. Why not just use one bone and combine the weight paint area?
|
|
|
|
Post by pixipui on Feb 2, 2022 18:04:11 GMT -5
But why two bones at the same spot. Why not just use one bone and combine the weight paint area? When a 3D animator animates an arm, it doesn't stay the same size all the way around, it loses mass. So the Twist joint brings the shape back to the arm. Otherwise it looks very odd! This won't effect you unless you are animating x 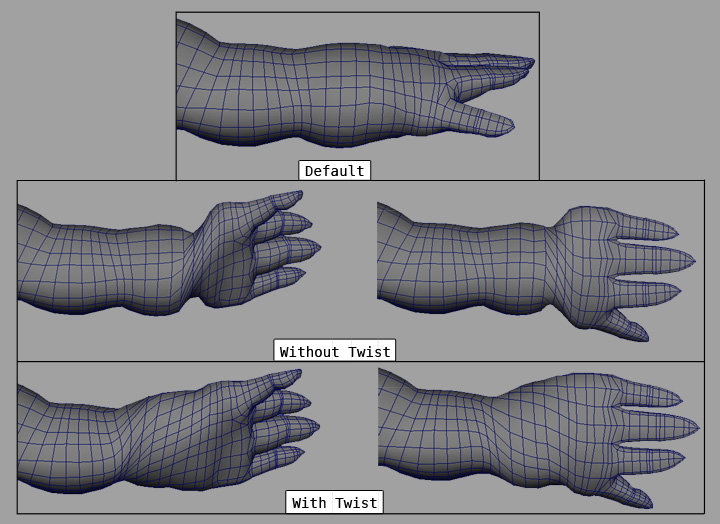 |
|
|
|
Post by mauvemorn on Feb 2, 2022 18:15:46 GMT -5
Technically it is for people who make CAS items as well but our focus is in how these bones affect the mesh, not why the rig is build the way it is.
If you need a visualization of why the bone is needed, just move/rotate it. If it will still not make sense, remove the upper arm vertex group, normalize weights and move the shoulder bone (or vice versa). But ultimately, as pixipui said, you do not need to concern yourself with why the rig is build this way, it changes nothing for you.
|
|
|
|
Post by pandamontok on Feb 2, 2022 19:24:17 GMT -5
The reason I want to understand it, is because when editing the weight paint, I'm confused to which bone I need to paint. Another example is the skirt. There are even 3 bones on the same spot. For example: b__L_Skirt__, b__L_Thigh__, b__L_ThighTwist__. All have weights.
If I could understand the why, I may able to decide which bone I need to work on.
I mean like when I rotate b__L_Thigh to the front, and I want to affect the shape of the surface of the skirt. I can do it through three of them.
So, why I don't just delete all the weight paint on the rest two, and work on b__L_ThighTwist for example. Saving the trouble of keeping the weight paint balance between each bones, because they are influencing each other. The skirt mesh looks pretty much the same.
But certainly the dev, has certain purpose of using three bones and place weights on them. Of which still a mystery to me.
|
|
|
|
Post by mauvemorn on Feb 2, 2022 21:59:30 GMT -5
To avoid glitches in the armpit area you need to simply make sleeves tight there.
to edit the weights, you need to change the position of arms to make this distortion happen, then select each vertex group from that area individually and look at what they affect.
No arm vertex group should be affecting the chest and no chest ones should be affecting the sleeves. If after removing the chest vertex group from the sleeves you do not know what to add there instead, click on Normalize all. This will even out the values of the remaining vertex groups.
If the result is unsatisfactory, select the shoulder vertex group and try increasing its influence where the distortion happens. If it gets worse, undo and try decreasing instead.
Skirts of different length and shape are rigged differently. Some of them have no skirt bones, others have no thigh bones, third have all three. It all depends on what gave the developers the best result.
The difference is visible during different animations, simply moving the legs won’t give you a good idea of what’s going on.
For that reason i advice you to just use a reference that is close to yours in length and shape instead of trying to manually edit them. If the result of the weight transfer is still not good, smooth the weights in that area
|
|


