|
|
Post by ryuketsu on Apr 19, 2022 19:03:24 GMT -5
I wanted to modify an existing CC for personal use, so I exported the mesh of the CC in question and edited in Blender 2.7. However, after finishing it and trying to import it back, there are no changes in the model inside Sims 4 Studio for any of the Level of Details. No change in-game either, it's as if I still use the unmodified CC.
S4Studio doesn't report any error, doesn't crash or open a dialog, nothing. It simply doesn't import the mesh. What can I do in this case?
|
|
|
|
Post by mauvemorn on Apr 19, 2022 19:07:35 GMT -5
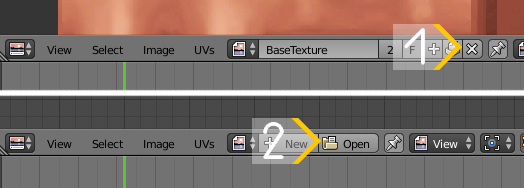
Hi. Share the blend file please Do you have this field?  |
|
|
|
Post by ryuketsu on Apr 20, 2022 11:17:20 GMT -5
The field is here for me. I selected GEOM but same thing. Only the old mesh is appearing
|
|
|
|
Post by mauvemorn on Apr 21, 2022 13:39:01 GMT -5
clone any maxis hat, export the blend, open. You will see that s4studio_mesh_1 meshgroup has type set to GEOM and cut set to 0000. To replace the original, yours must have identical type and cut number
|
|
|
|
Post by ryuketsu on Apr 22, 2022 0:04:01 GMT -5
clone any maxis hat, export the blend, open. You will see that s4studio_mesh_1 meshgroup has type set to GEOM and cut set to 0000. To replace the original, yours must have identical type and cut number Thanks, I managed to import the mesh. But now it is floating instead of being attached to the head. I've been trying to find a possible cause and I haven't been able to. I also transferred weights according to another tutorial but now I don't know what else to do to prevent the horns from floating detached from the head |
|
|
|
Post by mauvemorn on Apr 22, 2022 10:25:35 GMT -5
The item is meant to be assigned to the head bone to move as intended, must have a uv_1 and be vertex painted with 007f00 to morph. Its uvs in uv_0 must be placed in the area meant for whatever accessory this is meant to be. You also should not touch the body parts under the rig - clone any hat, export the blend, open it; - delete the hat; - File - Append, find your blend, choose Object, then s4studio_mesh_1, Append it in the scene;  - expand rig, toggle the eye icon next to "head". If the head will disappear in 3d view, this is the real head. If not, "head_2" is the real head; - make the real head selectable by clicking on the cursor icon;  - select the horns, rename UVmap to uv_0; - create a new one, name it uv_1; - add Data transfer modifier, choose the real head as Source object, set the rest like in the pic, apply;  - create a new vertex group, paste b__Head__ into the name. In edit mode select everything with A and assign the mesh to the head bone; - vertex paint the mesh with 007f00;  - set this image as a background and move the uvs in uv_0 in the space meant for whatever type of accessory this is meant to be; - import in the hat package, edit region map like this, recategorize if needed |
|
|
|
Post by ryuketsu on Apr 22, 2022 22:49:55 GMT -5
Thanks for the walkthrough! It is working now! Went back a few times to get the position right but other than that, it is attached to the head. A problem I had previously was with how I was trying to edit the mesh itself without the game assets being imported by S4Studio, believing it not to be necessary and only a way to get a base for creating new ones but now I realize I was mistaken. It was because I don't run Windows or Mac on my machine and instead asked for some friends to do it for me while I was guiding them but they didn't have the game installed. In the end I installed Windows on a separate drive only for this. Still wish S4Studio had a version more Wine friendly since the game itself does run fine through Wine but I suppose it can't be helped.
|
|