Just to add something, what
looneybin17 says is correct. You can set the opacity level lower to make it transparent if you use .png or set the alpha a lighter gray if you're using .dds. But keep in mind that this only works if the object has already set up a transparency shader in it.
The easiest and best way to make a transparent or translucent object is to clone one that already has a transparency shader set on. This shaders often come in different groups. So for example the object will have a group with the shader "Phong" (which is assigned to a given cut number) and then another group (with another cut number) that's named, let's say, "Phong Alpha" (which allows transparency). If you want your item to have transparency you will need to split the mesh in blender and assign that mesh group the correct cut number of the transparent group.
I don't know if I sould clear right now (i'm a bit sleepy) but you can try cloning any transparent item and see what I mean. Or maybe you have experimented with these before.
----
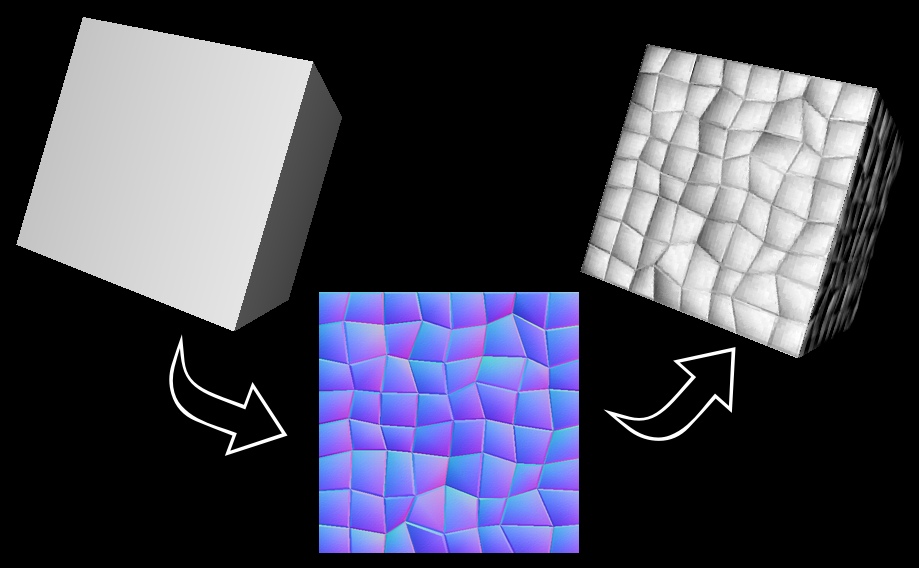
And another thing to keep in mind. The bump map or the specular doesn't take any part on the transparency. So you mustn't mess with those to achieve that effect. The bump map works to define details in the mesh's texture and to give the ilussion of a 3d geometry on it. Sometimes you can't make a big poly count item to actually model those details, so the bump map gives the effect of that within a good decent poly count.
Take this as an example, this person baked the normal map (basically the same as the bump, but not in grayscale), so it has a lot of details, that are not actually in the mesh, but it gives the ilusion as it they were in the geometry. The normal map just contain a bunch of "Normals" (that's why the name, I know shocking) information on where the surface would go.
And the specular only controls the shine information. You can actually give shine to the glass/transparent parts, but it won't take part in the effect of making it transparent or displaying like that in game.


 ), but I struggle a lot with the spec and bump maps and mostly textures. Textures are a big thing since I would like to give some of the objects some depth. I have started to bake shadows onto my objects but I find that some parts, not all, of the baked image is too dark so I need to adjust just those parts and so far I have only been about 50% content with the results. Also, I have always worked with .pngs, but I am completely lost on understanding the rbg(?) needed for spec maps and bumps so I figured if I don't understand that one simple (I imagine it is simple) concept, I should not work with .pngs too much on these projects and have begun working with .dds files now.