|
|
Post by samanthagump on Mar 3, 2017 9:54:08 GMT -5
Hello! So here is the problem: 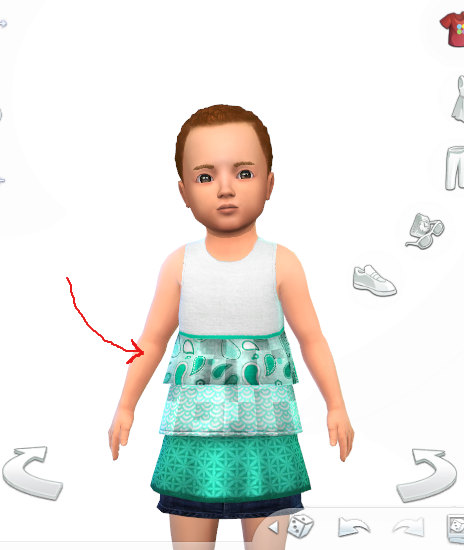 These 2 checkered areas were all extruded from the original mesh. They have the correct bone assignments, I have removed double vertices, normalized faces, and tried anything I could think of to fix this, but alas, I am stumped. Here is how the mesh looks in blender: 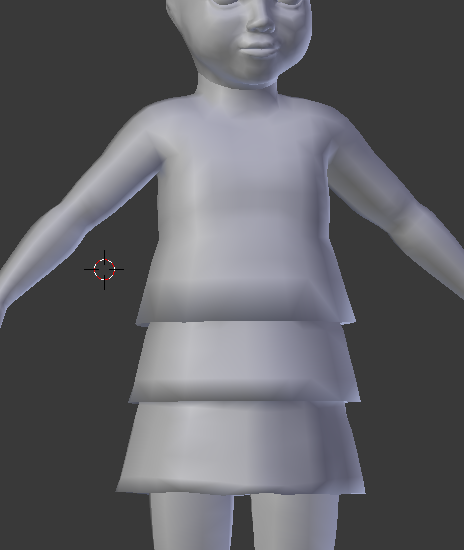 I've noticed that the highlighting of the checkers (I'll call them that) on the shirt change when I move the mouse around over them in CAS. Toddlers only have 1 slider, and this all works fine with that, but it still makes me wonder if this is a UV1 issue? I have tried dissolving edges too, but that flattens it out. Any help is most appreciated! Thank you! Samantha |
|
|
|
Post by inabadromance on Mar 3, 2017 10:38:40 GMT -5
hi! Are we talking about the seam on the texture pattern? You have to edit the UV as well. Take a look at it and see if there's a row of vertices that doesn't match. Also, for the edges i would recommend doing a split edge on them to avoid that shadow. |
|
|
|
Post by samanthagump on Mar 3, 2017 11:22:05 GMT -5
Thank you for a quick reply! The UV map should be fine, I get very picky matching it up just right. The shadows are the problem, I just couldn't come up with that word, hehe. I tried the edge splitting, and got no results. I did just the top and bottom rows, I tried specific edges I saw were being problematic in game, and the same problem is still there. Any other ideas?
|
|
|
|
Post by inabadromance on Mar 3, 2017 11:44:21 GMT -5
If the issue is the dark shadowing i see on your blender pic then following the steps of the tutorial i linked should fix them right away and you should see the outcome in blender already. If you're not seeing it, then you're not applying the edge split correctly. Would you like me to take a look at the .blend file? remember to have your settings in blender like this: In object mode, right click the mesh and on the side bar click "Shading: smooth". Go to edit mode and disable "limited selection" 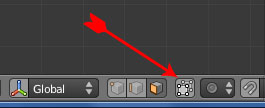 |
|
|
|
Post by samanthagump on Mar 3, 2017 12:39:41 GMT -5
Hi again, I did the top ruffle how you suggested, made sure limited selection was off, and did smoothing via the object tab.. still no luck. =( Here is a link to a folder with both the .blend, and .package, since the problem is only really visible in game. Thank you for taking time out of your day to help me, I really do appreciate it! www.mediafire.com/?ulvhvecvju3iv |
|
|
|
Post by inabadromance on Mar 3, 2017 12:58:45 GMT -5
You are selecting the wrong row of edges. You should be only selecting the edges of each part of the mesh as it is shown in the tutorial and apply split ONLY on those edges and not more than that.  |
|
|
|
Post by samanthagump on Mar 3, 2017 13:41:32 GMT -5
I split them like you showed, imported mesh, ran game, and it still looks the same. I went back and did the smoothing option on the mesh and tried again, still no change. Sorry to be such a pain. Did you import the mesh and try it and it worked for you?
|
|
|
|
Post by samanthagump on Mar 3, 2017 18:39:33 GMT -5
Ok, so long story short, after both mathcope and Feyona dug around in the mesh, math discovered the issue was an oddly painted Vertex paint, so that was easy enough to fix, but it still didn't resolve the issue in game. After some more digging, it was a messed up UV1. I used this tut and was finally able to fix it. Thank you soooo much everyone who helped! |
|
|
|
Post by inabadromance on Mar 3, 2017 18:54:16 GMT -5
Where those squares on your first image always there? because i never noticed them! am i going crazy now? XD. I'm happy that you managed to solve it. I re checked the file and the vertex paint and uv_1 were indeed messed up a little. Still you should follow the split edge tut for fixing the shadows.  |
|


