|
|
Post by Kaizoku-Gal on Nov 22, 2017 0:56:34 GMT -5
Kaizoku-Gal , shortly after the patch came out we tried fixing the hair by blanking the normal, but that solution left the hairs fixed that way looking abnormally shiny. Your solution to swap in a blank normal appears to be a far superior fix and one worth doing. This will be added in as a batch-fix if all goes well. Thanks! I've been testing more things and I've found out that those broken hairstyles that already had a normal map can keep the original instead of replacing it with a blank one (that was a quite drastic solution). You have to export the normal map that comes with the hairstyle, save, make it blank and import back the normal. |
|
|
|
Post by Kaizoku-Gal on Nov 20, 2017 13:36:59 GMT -5
Ooh! I will have to try this!! I'll let you know how it goes, because I have a lot of hairs that broke like this!! This sounds really hopeful -- I too will give it a try and see what results I get. I've got a lot of alpha hair CC, and about half of it seems to be affected. Thanks for the tip -- here's hoping! Edit:Great news -- thank you very much Kaizoku-Gal -- your fix seems to have done the trick! :-) Actually, as far as I can tell, the Normal Map is the core issue. So far, I have just fixed the Normals and not even done a thing with the Speculars, and it seems to restore the hair to the proper look and color. The hairs that I have seen which have this issue have no Normal Map (at least technically). It seems that there are a lot of hair packages out there which have a DST Normal Map file in the package, but it simply isn't 'hooked up.' The Group/Instance/Type info is not entered in the CAS Part data. So that DST file is never being referenced. Others have no Normal Map of any sort -- the end result in-game is the same. (I'm thinking perhaps there was a creator tool at some point which 'forgot' to hook these up -- either that or a number of creators were all following the same flawed work flow.) The 'Use Blank' option of S4S doesn't help in this regard. It seems the game now needs a mid-grey Normal Map to render hairs as we're used to. Adding in a RGB 128-128-128 map with 50% transparency seems to work nicely. (Arrived at that due to Kaizoku Gal's post and by examining the DST files in working hair packages.) I'm kind of hoping that this can be confirmed and perhaps it could form the basis for a batch fix. Adding Normals by hand is do-able, but that's a lot of files to fix, for some of us. I'm glad it helped  |
|
|
|
Post by Kaizoku-Gal on Nov 17, 2017 12:59:51 GMT -5
I've got good news guys! I've found a way to fix the hairstyles that are appearing darker after the Pets patch (at least it has worked on all my hairstyles that had this issue). There were to kind of problems:
- Most of the hairstyles that had this problem didn't have specular and normal map. In this case adding a plain white specular and a plain grey normal has fixed them. This was the case with some of Newsea, Aveira and other creators.
- There were 2 hairstyles by Butterflysims that came with specular and normal but still had the issue. What I've done in this case is making the specular and normal blank and saving the packcage, then I've gone into the game (I'm not sure if this step is necessary), closed it and then added a new specular and normal.
I hope this helps! |
|
|
|
Post by Kaizoku-Gal on Oct 17, 2017 18:09:28 GMT -5
Try File -> User preferences -> Restore to Default Theme or click on Themes tab, then click Presets and choose another theme. 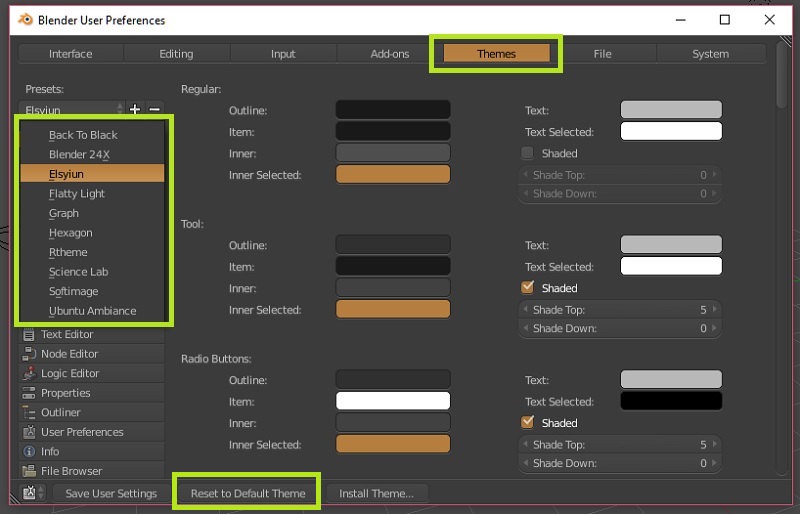 The thing is the whole window is affected, not just the interface. If it were the theme's fault it shouldn't affect the mesh itself right? I've also compared the parameters from both versions and they're exactly the same, so wathever is causing this must be elsewhere. |
|
|
|
Post by Kaizoku-Gal on Oct 16, 2017 23:59:58 GMT -5
Try going to file - load factory settings I have this same problem and loading the factory settings does nothing. I have two versions of blender installed in my computer, 2.70 (portable) & 2.78 and while 2.78 interface looks right 2.70 is washed out like in MysticLulabelle's picture. I used to only have installed a complete version of 2.70 and the interface looked right back then, the problem came after I installed 2.78. 2.70 was automatically updated and overwriten by 2.78 when I installed the latter, so I downloaded a portable 2.70 to be able to work with both. It was then when the washed out interface problem appeared. I've tried several other portable versions, but they have the same issue and I can't find information about it anywhere. Any ideas of what could be causing it? |
|
|
|
Post by Kaizoku-Gal on Sept 17, 2017 17:46:15 GMT -5
S4S's preview screen will not reflect transparency/weight/uv_1 the way it's going to appear in game. So relying in that isn't going to help you through the process of your recreation regarding those matter. I've noticed that the breasts area on group 0000 have a transparent texture. But the mesh isn't going to have transparency since it doesn't have a glass shader like the other group. The only parts that can have transparency should be only on cut 0002. As for the UV, i was referring to the edges of the UV being on the edge where the texture end. This will cause the uv to grab adjacent texture calling this "bleeding" out. You have to have texture outside the edge of the UV that is the same as the inside to avoid this. Oh ok. I didn't understand you right about the UV thing. I'll correct that then. Thanks! As for the transparent texture, if you mean the grey fabric tha covers the breasts, it isn't transparent. That's why I put it in cut 0000. Only the lace and the fabric that covers the belly have transparency. However I've discovered that moving that part of the mesh to cut 0001 fixes the lighting on the grey fabric, but now the weird lightning has moved to the black fabric arround the breast. It's like cut 0001 projects some kind of glow on cut 0000. The good news are that at least is less noticeable on that part of the texture than it was on the grey fabric. I guess that putting everything but the body on cut 0001 will make the weird lightning dissapear, but then I'll have to fix a lot of transparency issues. |
|
|
|
Post by Kaizoku-Gal on Sept 16, 2017 23:12:37 GMT -5
The edges of the UV and the edges where the texture ends are too close. You have to leave extra texture around the UV to avoid bleeding. I suggest at least a 5 pixel wide border. EDIT: I'm also seeing overlapping geometry on the breasts part. In vertex mode (with limit selection deselected and the camera view to the lowest amount - both marked in screenshot), keep ALT pressed and right click an edge. This will select all the border. If you do this twice you'll see that two different borders get selected meaning there's twice.. probably making that light issue you're having. Delete one from both sides. Remember to keep back up of previous versions of your blend. There are 2 borders because one is from the frontface and other from the backface. If I delete one border or the whole backface the issue is still there. The texture isn't the problem either. I've made a plain color difusse and the result is the same. It's is really weird... I guess I'll leave it like that. EDIT: I've discovered what's causing them but not why and how to fix it. The 2nd cut projects that weird lightning on the other cut. If I delete the lace part from the bra the weird lightning is gone as you can see in the image below. |
|
|
|
Post by Kaizoku-Gal on Sept 16, 2017 13:30:49 GMT -5
The shadows could be related to the shadow, bump, or specular texture and where the UV is mapped. Share the .package you are working with and we can help you further. and updated .blend |
|
|
|
Post by Kaizoku-Gal on Sept 16, 2017 0:47:45 GMT -5
Fixed :D Thank you so much everyone!
It still has some minor clipping on extreme body shapes, but nothing too noticeable. I'll keep fiddling with it and see if I'm able to reduce it more.
As for the weird lightning/shadows edge split does nothing. Is there any othere thing that could be causing them?
|
|
|
|
Post by Kaizoku-Gal on Sept 15, 2017 18:52:25 GMT -5
Hi! Please share the updated blend in case you're still having issues after re doing the weights. And this is how it looks:  At least it doesn't float anymore  |
|
|
|
Post by Kaizoku-Gal on Sept 15, 2017 18:18:40 GMT -5
When you transfer weights to the mesh that has been previously weighted you need to delete ALL vertex groups before doing weight transfer again. Another thing is that you need to use a mesh with the same amounts of bones as in EA's mesh that you cloned .package from. This may cause weird spikes. That's what I did. I transfered the weights from the same EA mesh I cloned. I'll try again just in case I made some misstake in the process. |
|
|
|
Post by Kaizoku-Gal on Sept 14, 2017 1:11:00 GMT -5
What do you mean by subdividing? Sorry, this is the first time I do this and there's a lot of things that I don't know yet. Weight transfer gives me a lot of problems. I'm also trying to convert a moustache and it gets distorted no matter the transfer method I use ot he mesh I use as reference. As for edge split I already tried that but the result is the same :( When you weight transfer, take the EA mesh and then go to modifiers and add a subdivide surface modifier which will smoothen that mesh, then do your weight transfer. It should make the weights more smooth. Ok, I've tried that and the clipping has been reduced a bit but now it does this   |
|
|
|
Post by Kaizoku-Gal on Sept 12, 2017 20:17:03 GMT -5
What do you mean by subdividing? Sorry, this is the first time I do this and there's a lot of things that I don't know yet. Weight transfer gives me a lot of problems. I'm also trying to convert a moustache and it gets distorted no matter the transfer method I use ot he mesh I use as reference. As for edge split I already tried that but the result is the same :(
|
|
|
|
Post by Kaizoku-Gal on Sept 9, 2017 11:56:16 GMT -5
Hi! Can someone help me with this? I'm trying to convert a cloth mesh from another game and I'm having problems with how it deforms with morphs and some small shadow issue.
I've followed several tutorials here to create a uv_1 map and transfer the weights from a similar vanilla mesh, but it doesn't work right. Some parts of the body clip through the clothes and I don't know what I'm doing wrong.
|
|


