How to Create Alpha/Realistic Hair From Scratch
Dec 6, 2017 23:17:56 GMT -5
jwofles, gisheld, and 16 more like this
Post by annabluu on Dec 6, 2017 23:17:56 GMT -5
Hey! Me again 
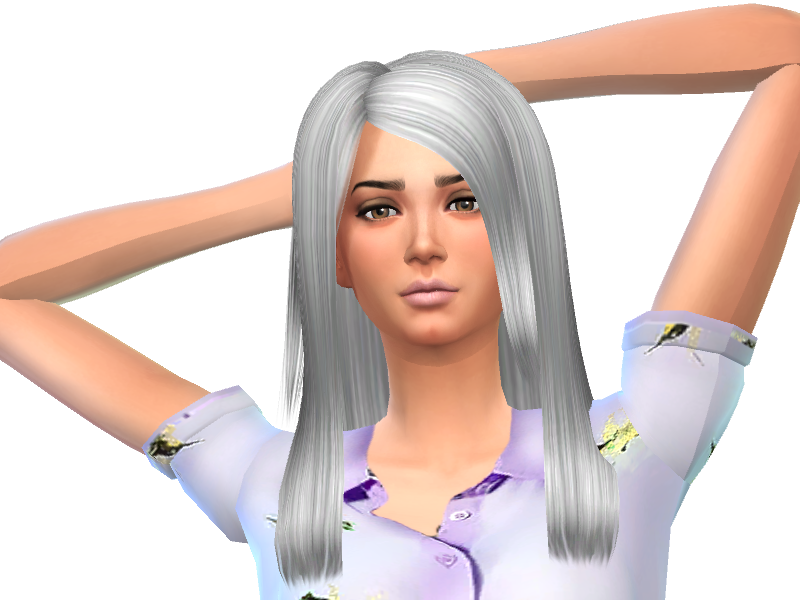
In this tutorial, I will show you how to create alpha hair! Just so we're on the same page, alpha hair is the kind of hair that looks realistic and has individual hair strands. Totally opposite from clay or maxis match hair. Before we start, just know that most hair creators use a bunch of planes in their hair meshes. I used about 7-8 to save time and because I'm never going to share this mesh with the community. Plus, most hairs have two or three layers. I only have one, again, to save time. If you have any questions about anything, do not hesitate to ask!
What you will need
Sims 4 Studio (I'm using Harmony)
Blender 2.70
Photoshop (For alpha stuff u know)
3DS Max
Milkshape
The main program in this tutorial is 3DS. It's not exactly "free," but you can get the student trial version, which can last a few years.
Step 1.
Open 3DS Max and import a model. I'm just using one I grabbed from s4s. I gave mine a little makeover and added a scalp area.
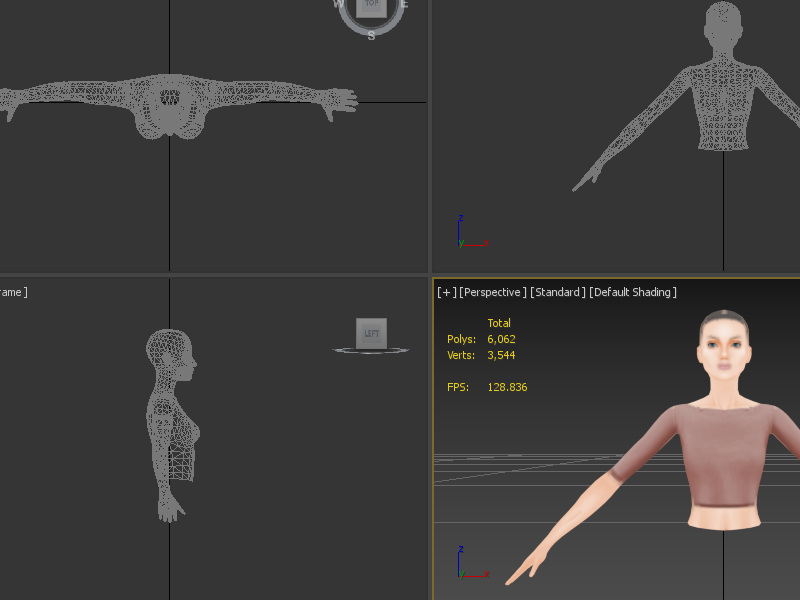
Now we're going to start making the hair
On the right side panel, open up create and then click plane. Change the width and length segments to however many. Then you can click and drag it to create the plane.
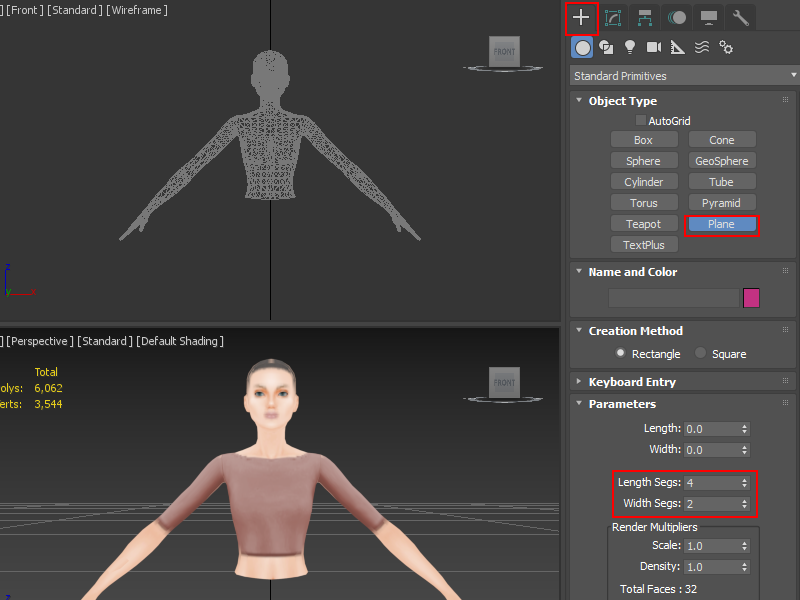
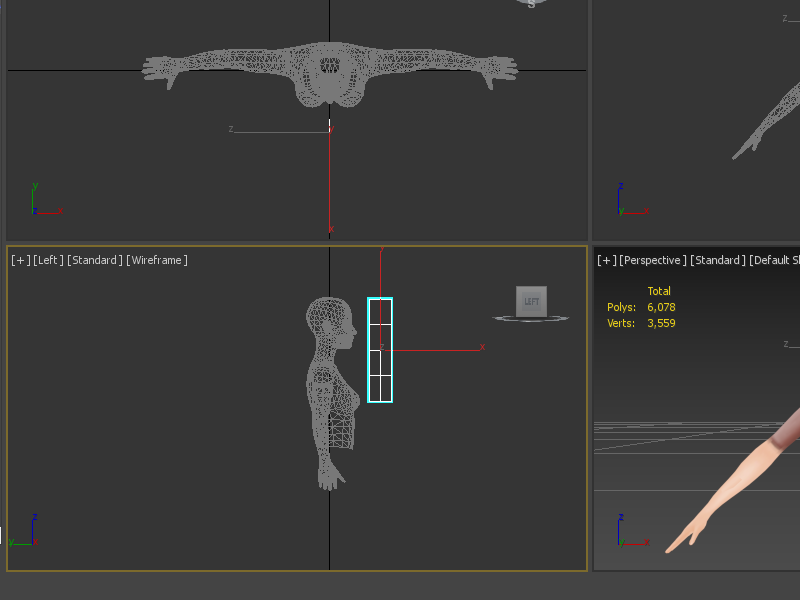
If you have four windows pulled up like I do, hover over the 3D viewer window and press alt+w to widen it. Or if you're in Maya mode, press spacebar.
You can change the color of the plane for less confusion. I'm gonna make mine green you can do this by going to modify, right next to the create tab and changing the object's color.
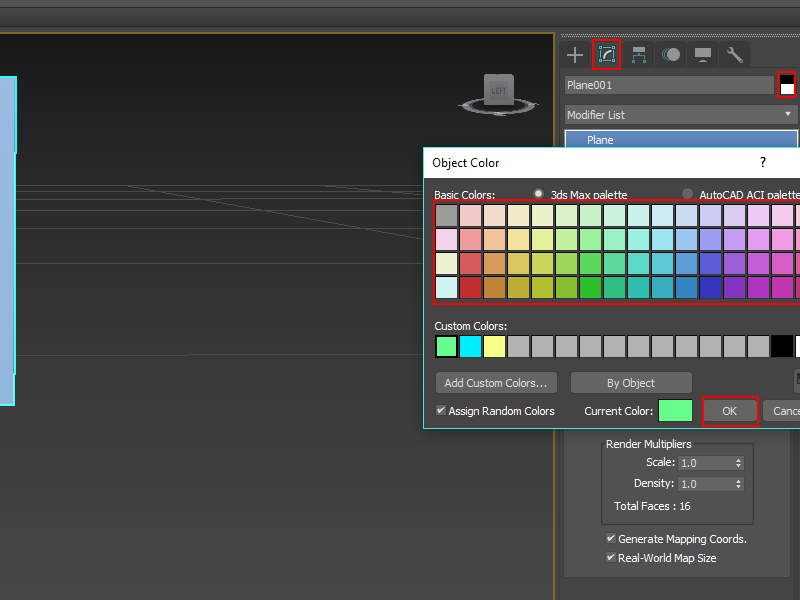
It's important to have certain colors for certain things so you know what every plane resembles. For example, if you had one plane and it was blue and were trying to create another plane that was the same color, you wouldn't know if it was clipping into the other plane. So changing the color every once in a while is good. Having planes clipping into each other is bad.
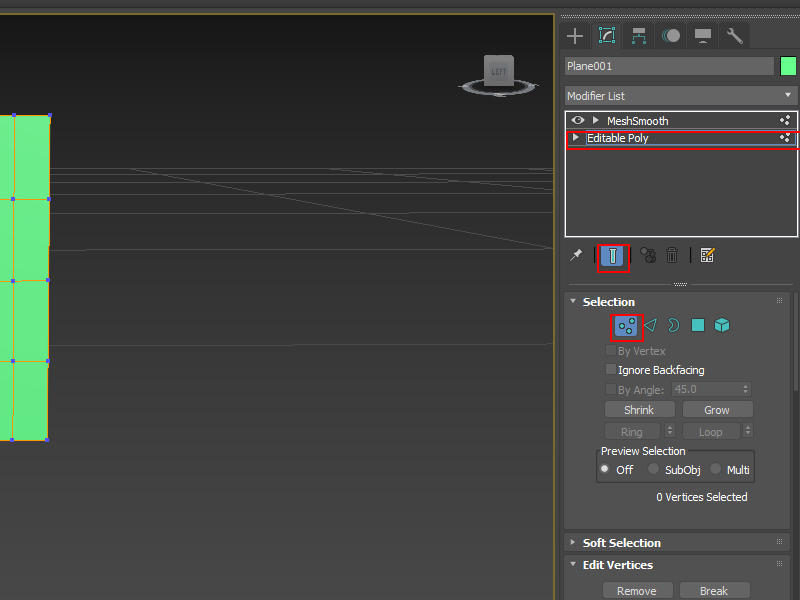
Next, in the modifiers list, right click on Plane and make it an editable poly.
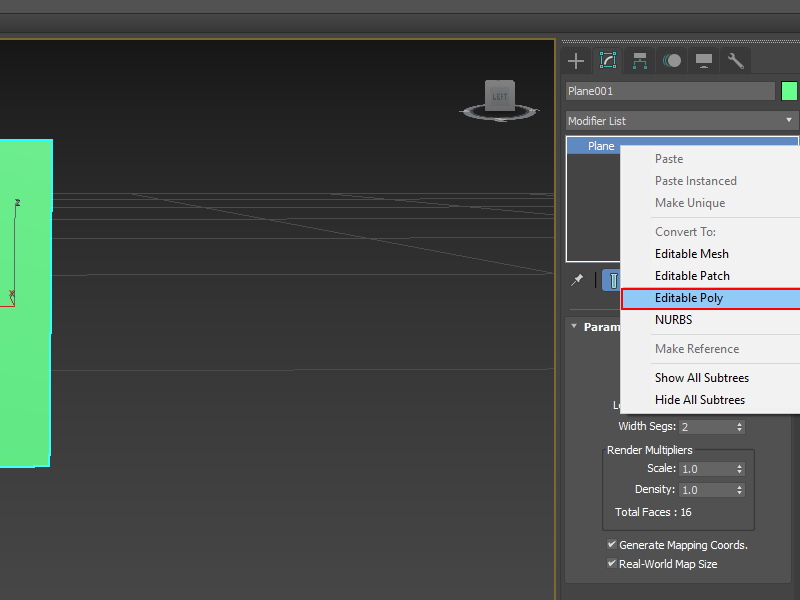
Then click on the Modifier List drop down and either type or find MeshSmooth. This is like subdivision surface in blender. It just doesn't pinch the ends.
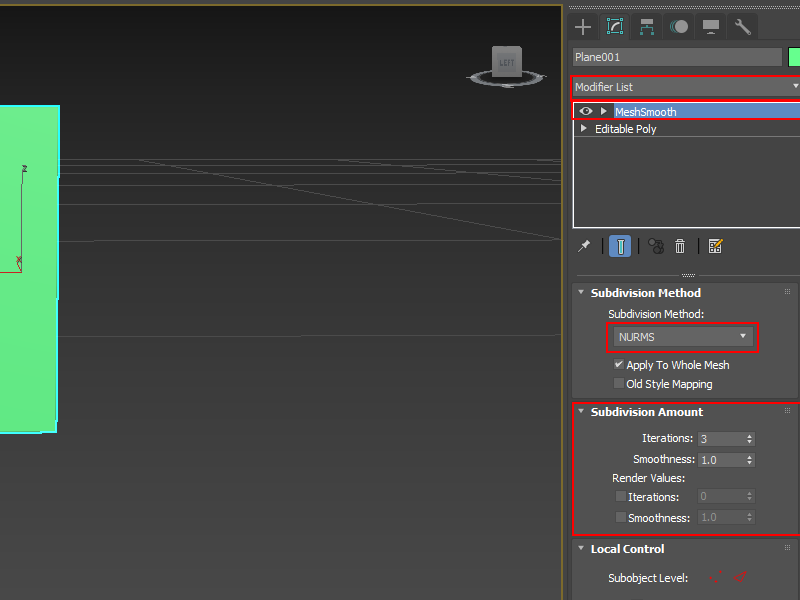
Then go back to editable poly and make the selection by vertex and turn show end result on.
Step 2.
Now we can start making some hair
Just to clear some stuff up, planes should always start from the back and go forwards to avoid most transparency issues. In the end, you may have transparency issues anyway, but starting from the back is the cleanest way to go. And it also makes the hair, in general, look better.
So, select all of the plane and rotate it -90 degrees. Now the colorful side should be facing the model.
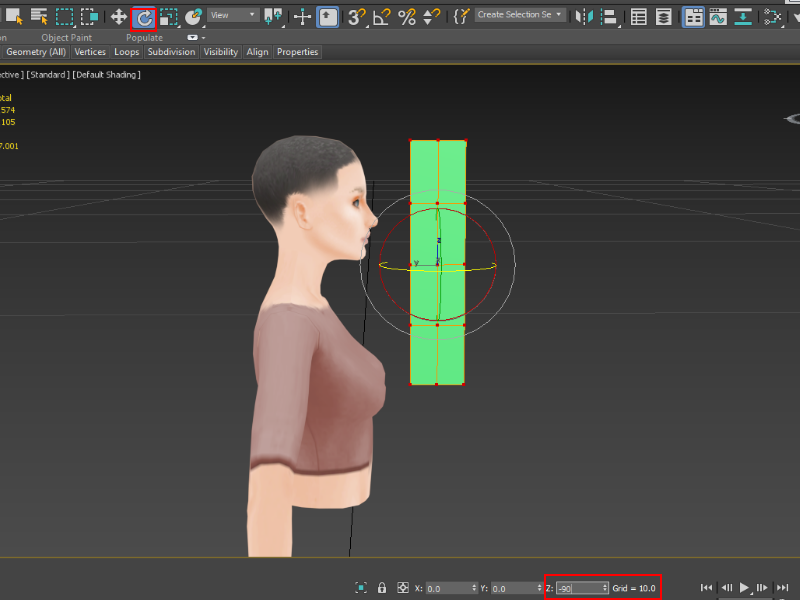
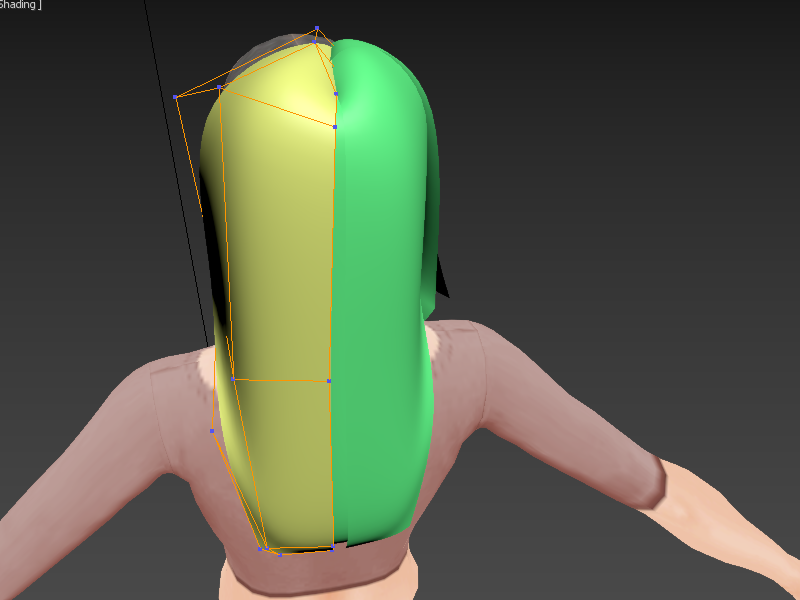
Now move it to the back of the head and manipulate the vertices so it looks like it's hanging from the head. The closer the plane is to the scalp, the better. Make sure it doesn't clip into the body and make sure it's not too super close to the body either because no matter how many weights you may add, it can still clip in game.
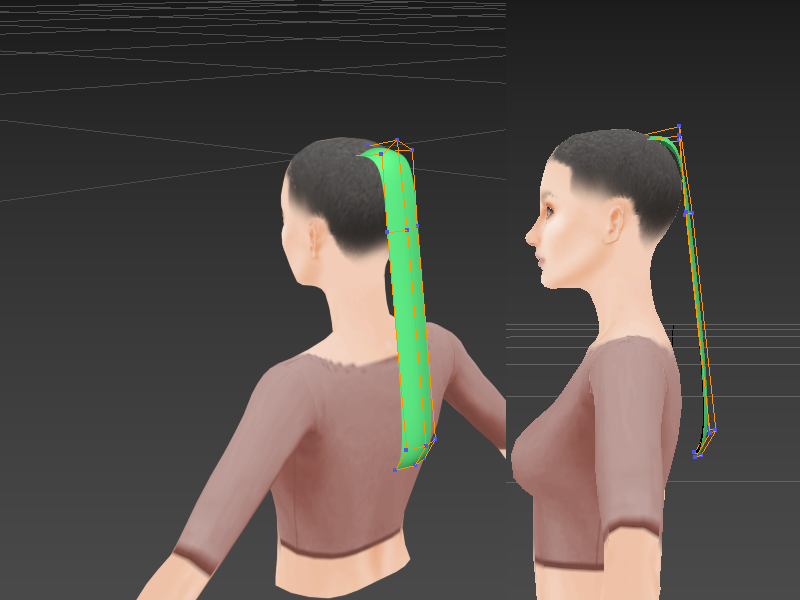
Make the hair look like it has movement in it. Right here, I'm having an issue because, in the middle of the plane, it looks like it just shoots down to the other vertices. To fix this, I'm going to add another set of vertices. Select two vertices that you want to put the new set inside. Hover over loops and click insert loop.
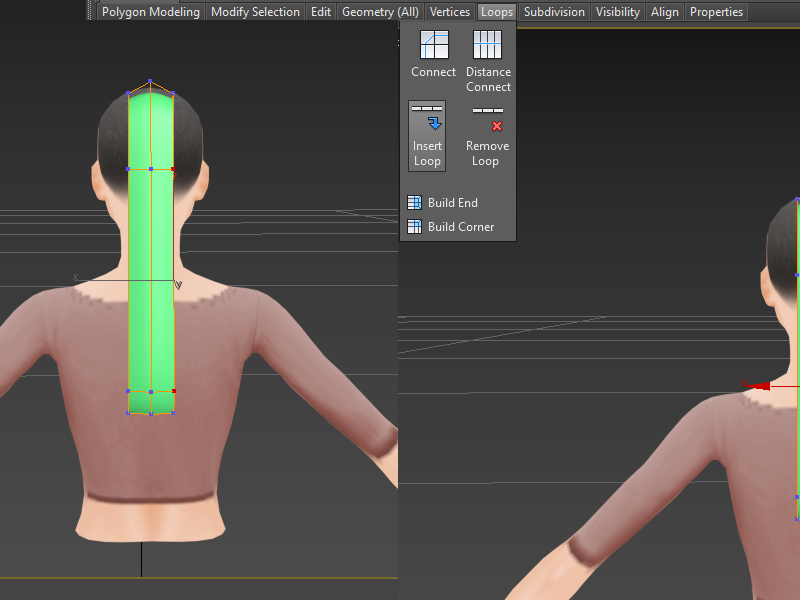
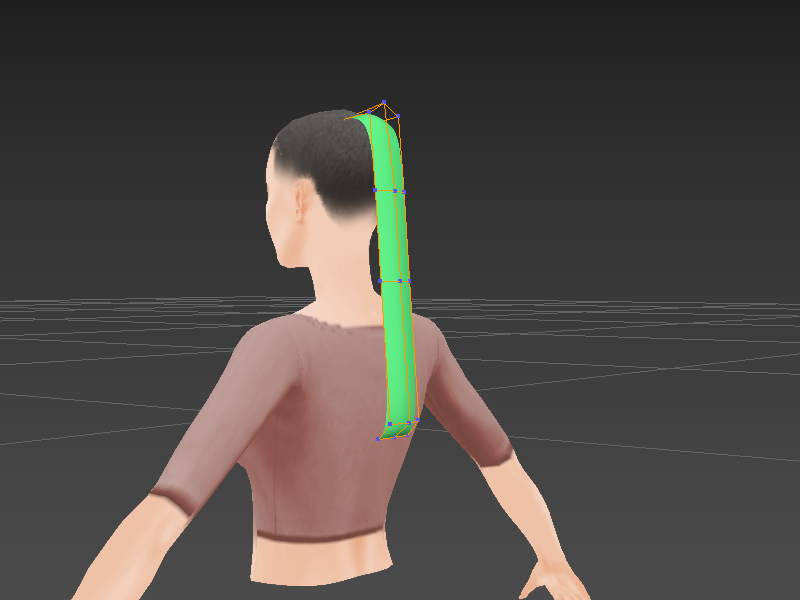
now it looks better
Step 3.
I'm now done with this plane. So now I'm going to create another. Select all of the plane and press ctrl+v, then click copy and ok.
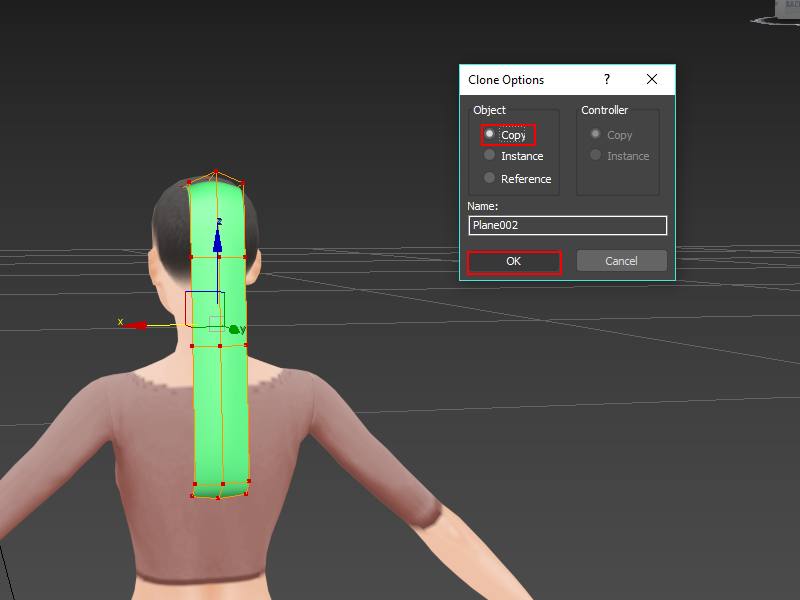
Now you can rotate it around and change the color. Keep in mind to keep it close to the other plane and head so there aren't many gaps. It needs to look natural.
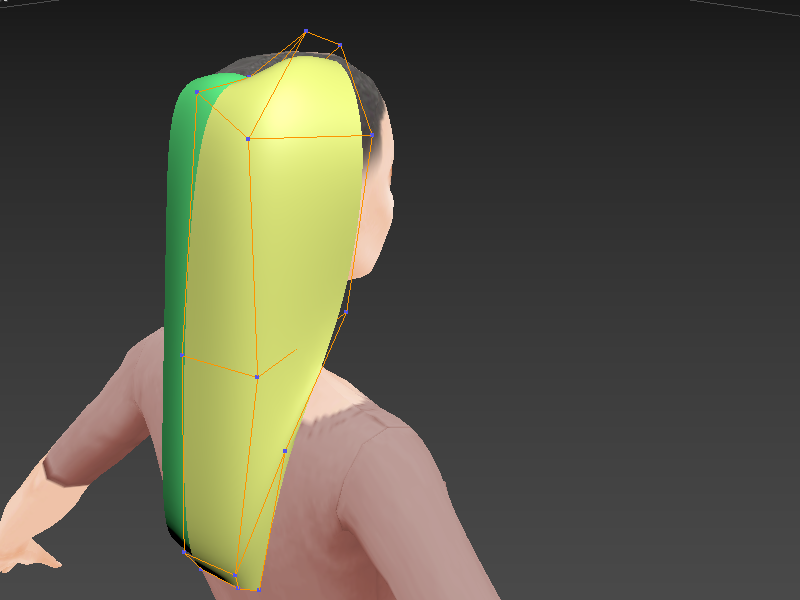
Then you can continue copying and changing planes.
Once you're done with whichever side, you can copy the planes and invert them to be on the other side of the head. Then you can manipulate them some more.
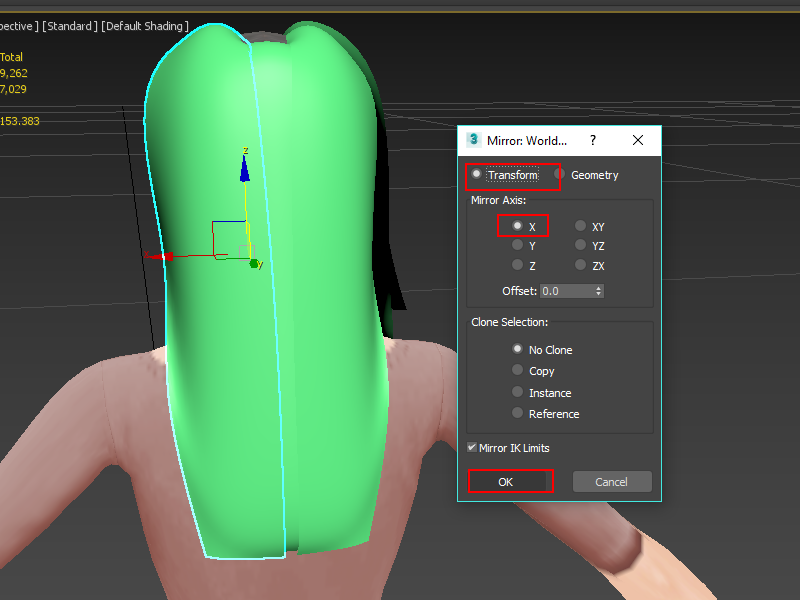
Step 4.
Now it's time to go into photoshop and create a hair texture.
Add a layer under the hair and make it the same color as the hair. Flatten the image and save as png. Then go back and make the background black and hair white.
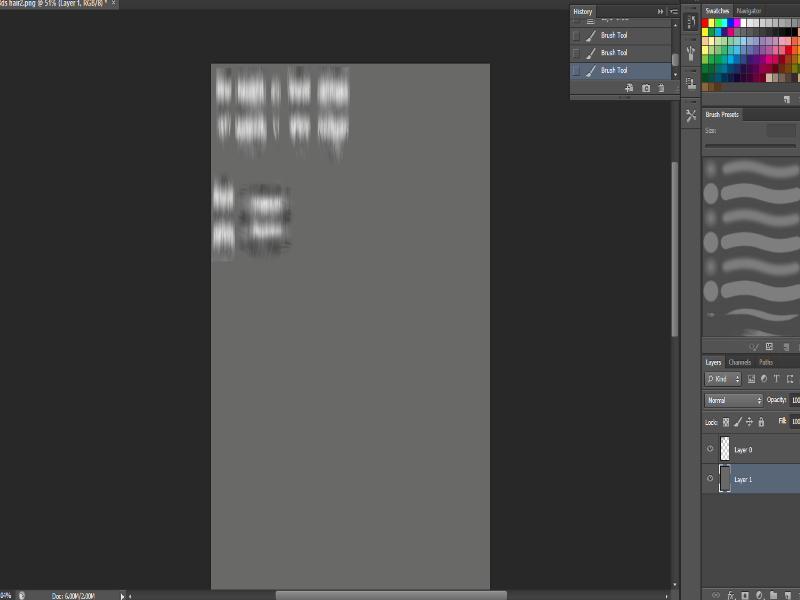
Then copy the image and create a new channel layer. Then paste it. Then copy it again and create a new image and paste it into the channel.
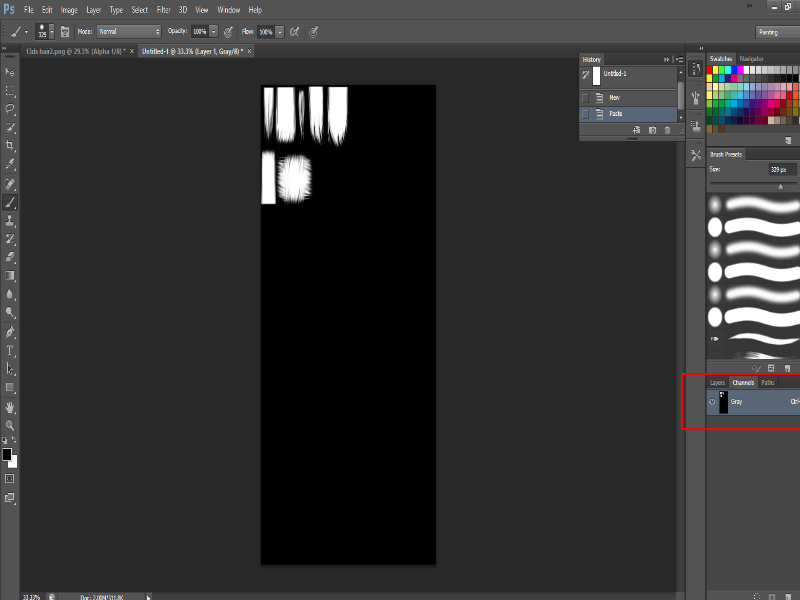
Then save it as a photoshop psd.
Step 5.
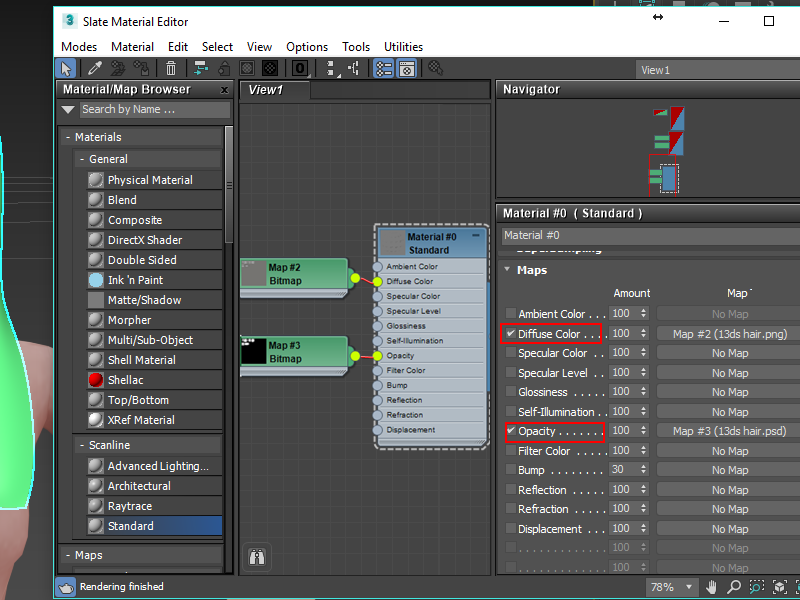
Now open 3DS back up and create a new material. Under the maps tab, check diffuse and opacity. On the diffuse map, put in the png we made. In the opacity map, use the alpha map we made.
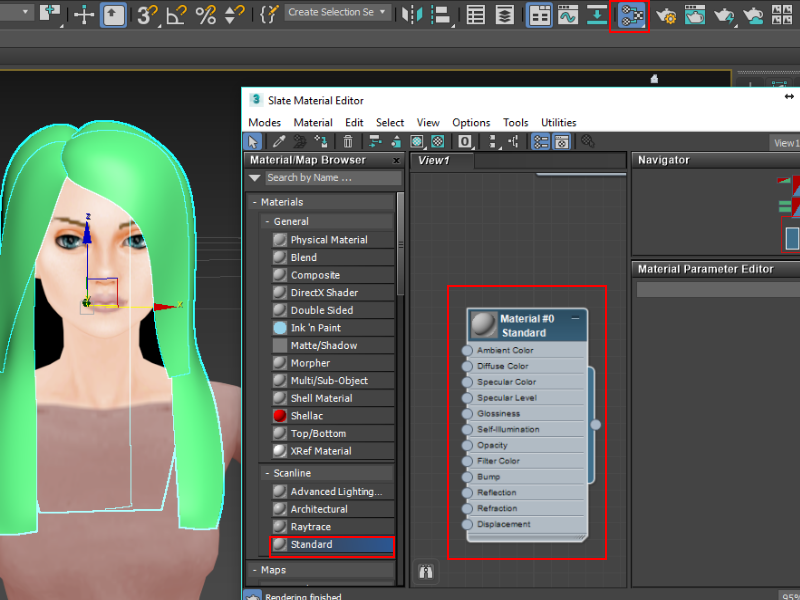
Select all of the planes and then right-click the material and click assign material to selection.
Then in the 3D viewer, click Standard>Materials>Shaded materials with maps. you can enable or disable transparency. I'm going to disable it because I may have transparency issues and will not be able to see the actual plane.
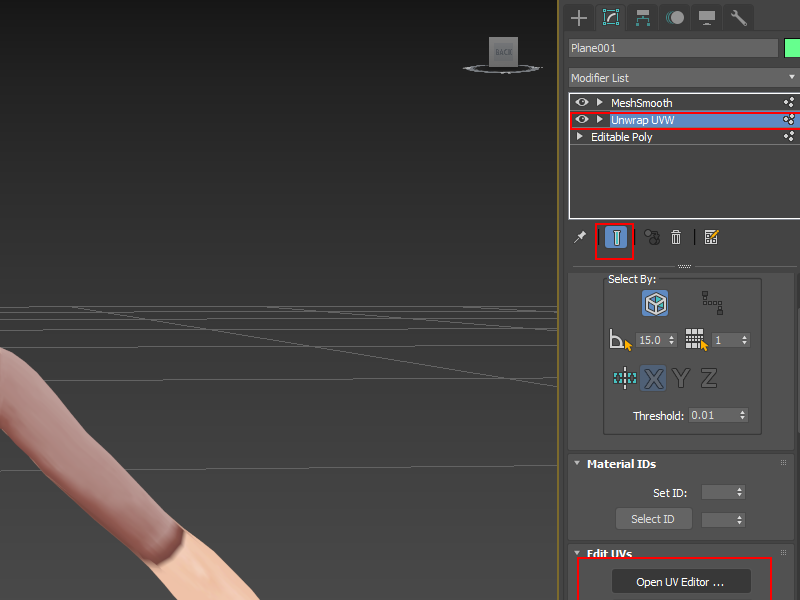
Now select a plane and find in the modifier list Unwrap UV. Make sure you turn on show end result and put unwrap UV between the meshsmooth and editable poly modifiers. Then open UV editor.
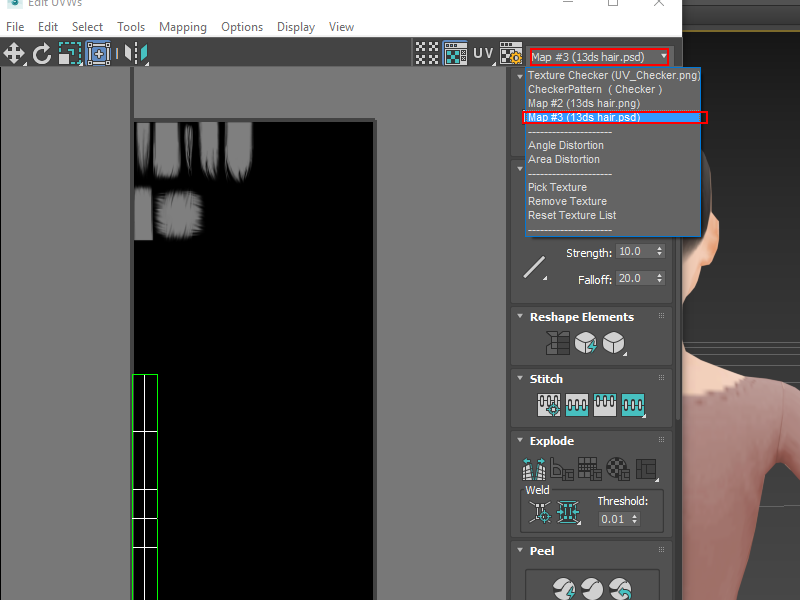
then open one of the maps and place your uv on whichever hair piece you prefer.
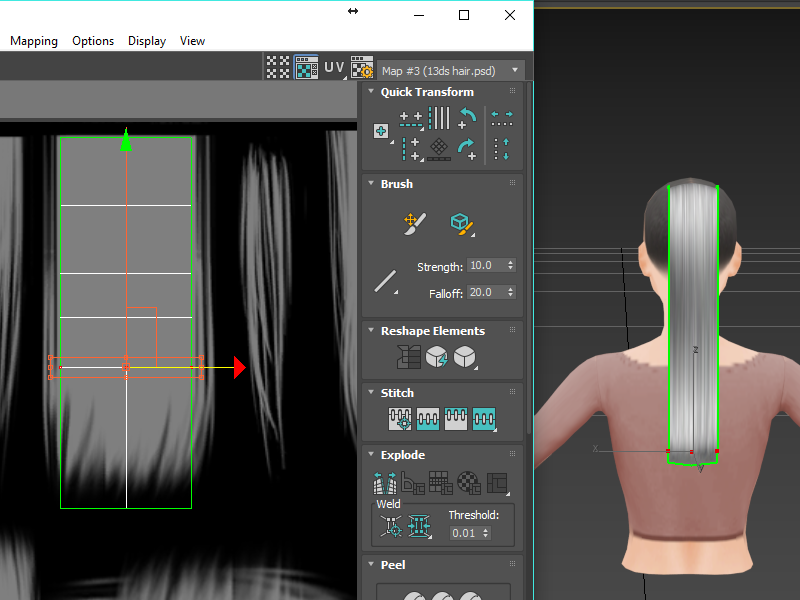
You can also move the vertices on the map so it changes where the texture is on the hair. Then just do the same thing on every other plane.
Step 6.
Now select a plane and add a multires modifier. This is going to decimate the plane. Click generate then put in 10-50 percent. But make sure you still have a high enough poly mesh to do a smooth weight transfer. 5k-7k polys is good.
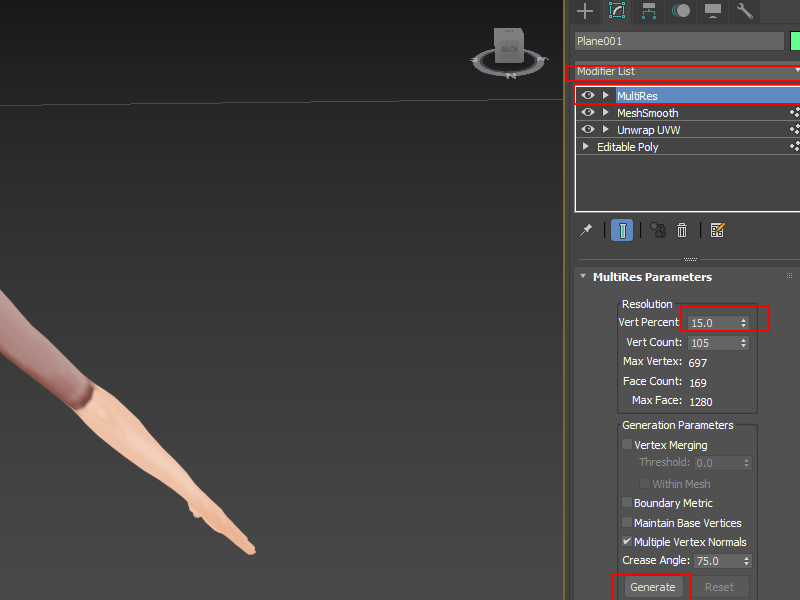
do this for all other planes as well.
Step 7.
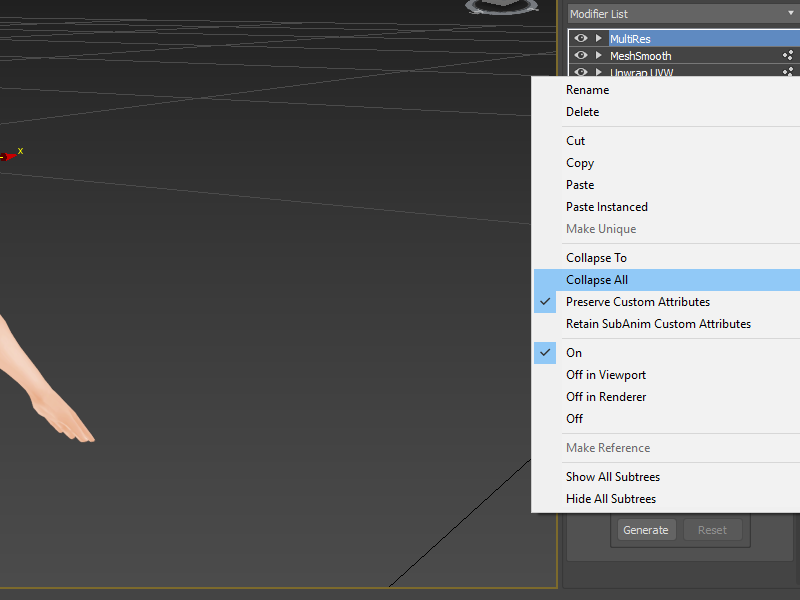
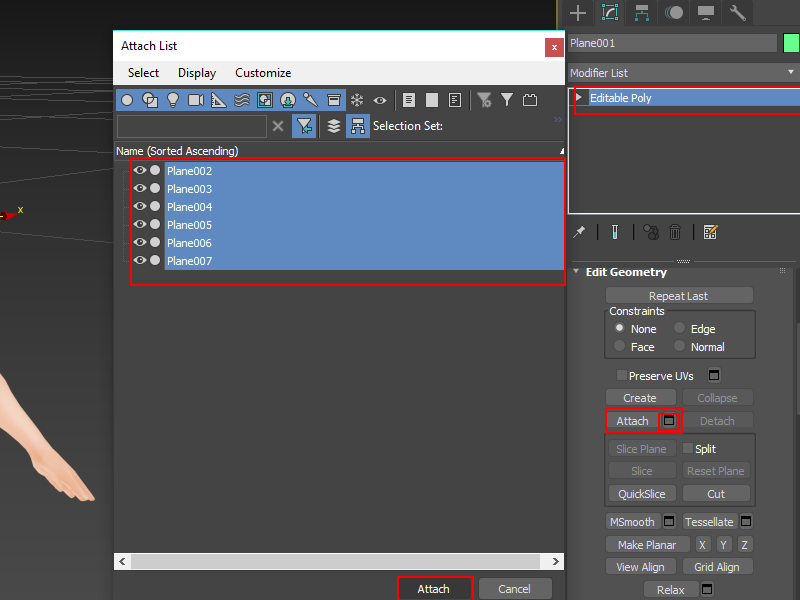
Now select any plane, right click on any modifier, and click collapse all. If you notice any transparency issues when you turn transparency on, follow this tutorial on how to fix that. After collapsing your modifiers, scroll down and click attach. Then attach it with every other plane.
Step 8.
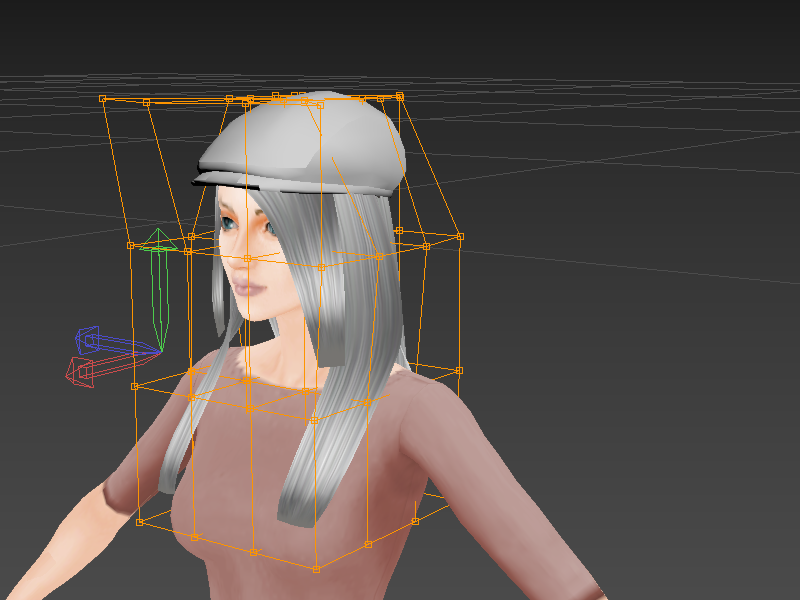
Now would be a good time to save it. So here you need to create the hat chops. Import your hat meshes into 3DS and add an FFD 4x4x4 modifier to the hair. Then you can shape the hair to fit into the hat. Then collapse it and save as an obj.
Step 9.
Now it's time to pop it into blender. For each mesh, go into edit mode and flip the normals. Press S on your keyboard and then type in .999 and then save it as an obj and add backfaces to the name of the mesh. Or name it whatever.
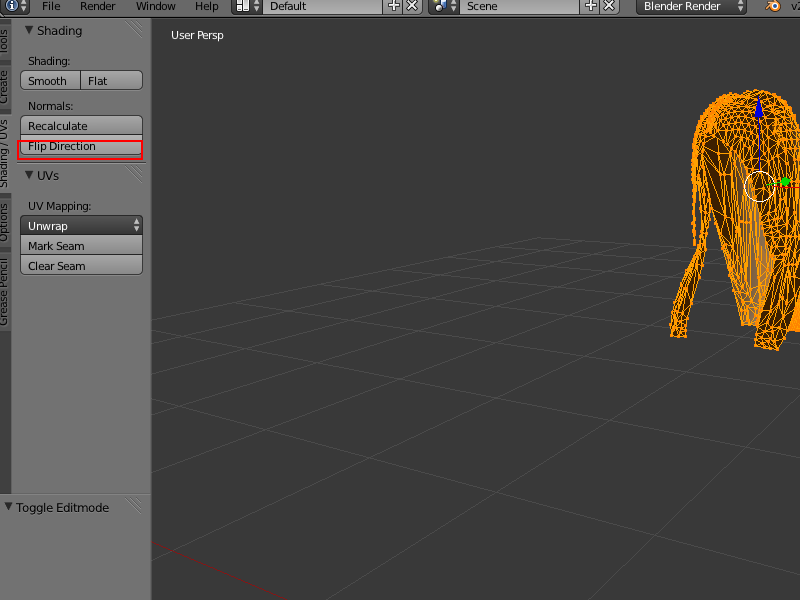
Then open milkshape and import the obj with the inverted normals and then the normal mesh, in that order. This is very important so you won't have ridiculous transparency issues in game. Then select both meshes and click regroup. Do this for every hat chop too.
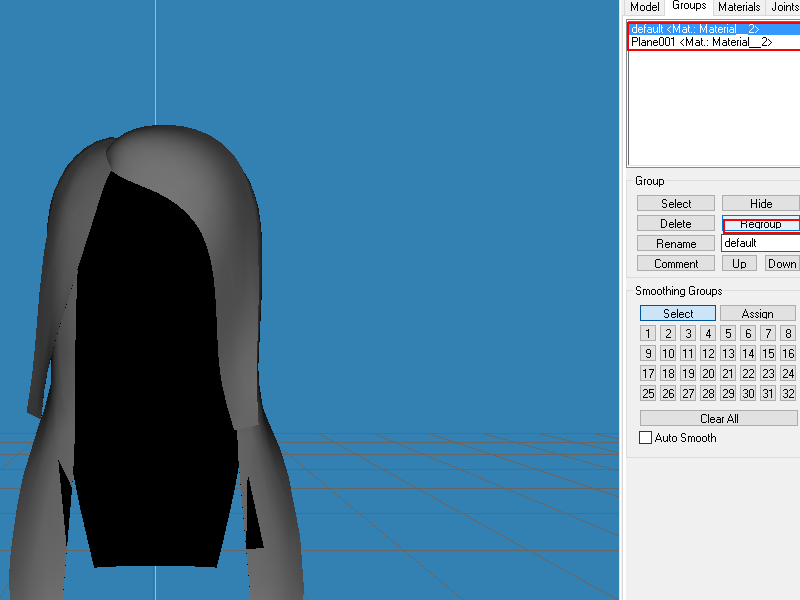
Step 10.
Put it back into blender and then add cut numbers to your meshes. The main mesh has a cut number of 0002, the first hat chop has a cut number of 0000, and the last hat chop is 0001. Then add an armature modifier on all of them and make the object your rig.
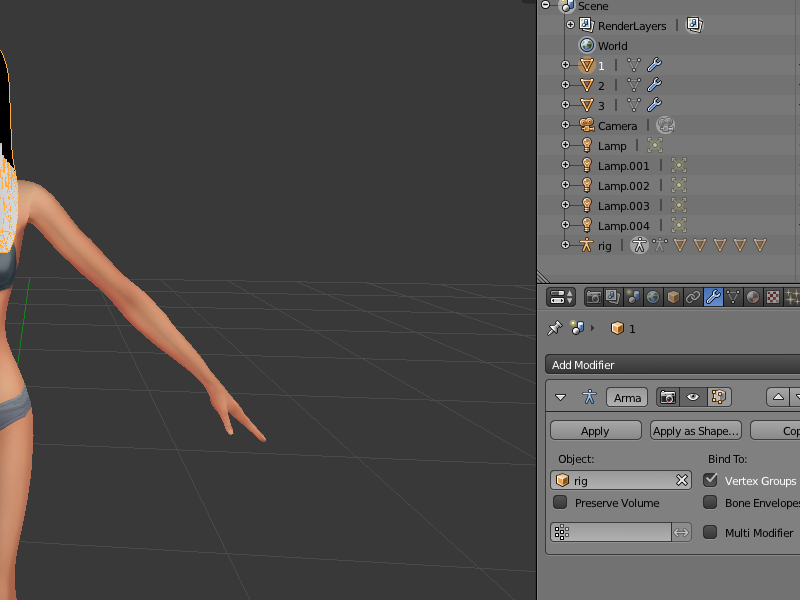
Now time to do UV stuff! woo. Go into every mesh and change the UV name from UVmap to uv_0. then add another UV map and name it uv_1. Please refer to this tutorial on how to unwrap uv_1. I have also discovered that some hairs do not need a uv_1. Infact, sometimes when you add a uv_1 it can mess up how the hair moves. You'll know if you need a uv_1 or not.
Step 11.
Here you should probably do some vertex painting. Paint everywhere green. If the planes are near the scalp you would paint it blue.
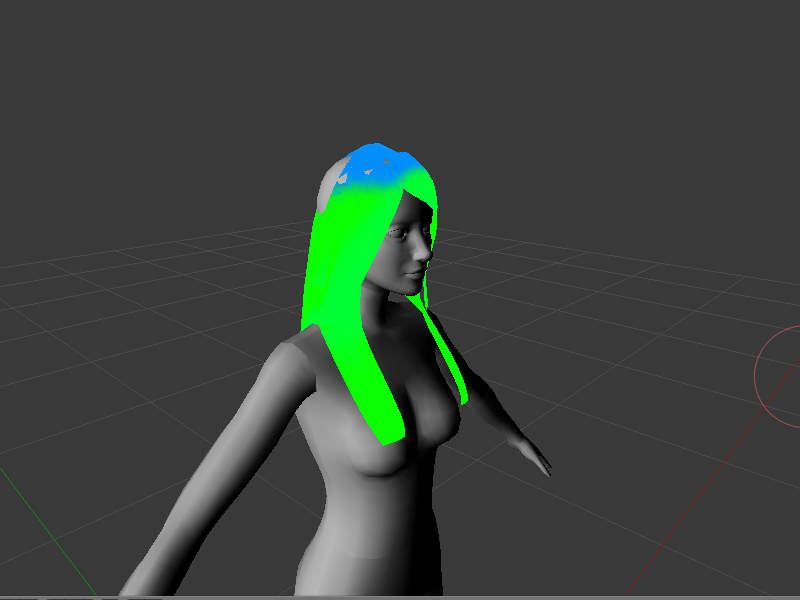
Now we're going to do the weight transfer. Append a hair reference mesh.
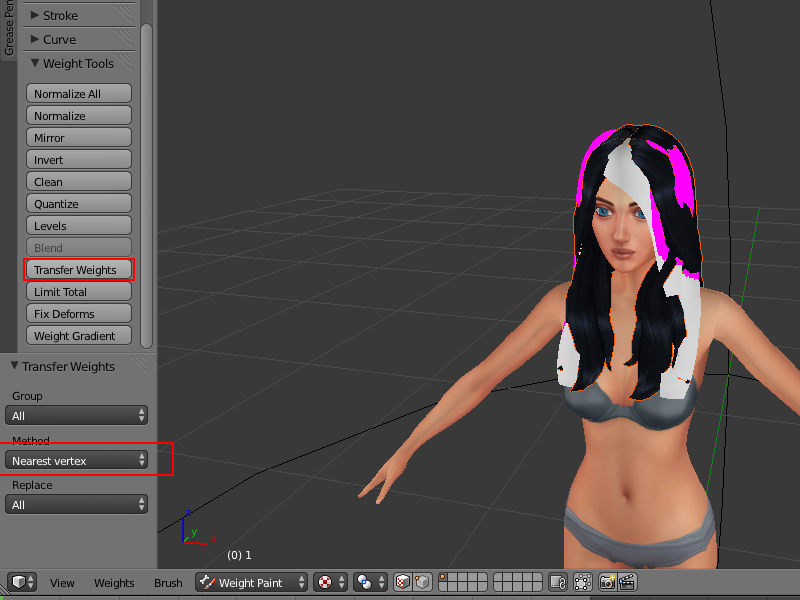
Select the hair ref and then your mesh, then go to weight paint and transfer weights to the nearest vertex.
Step 12.
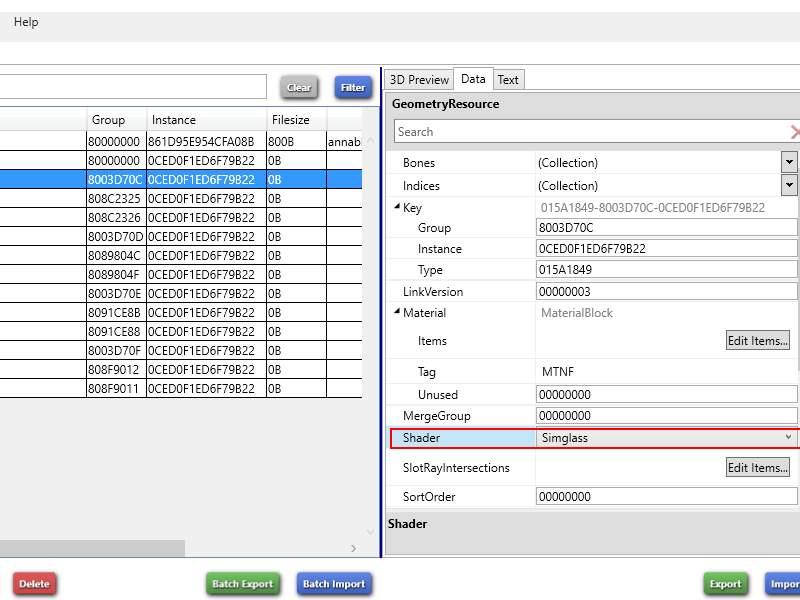
Now save and open s4s. Go to CAS create 3D mesh and select any hair that has three groups. Import your meshes and then make all of the geometry's shaders simglass.
Add a texture and then you should be done. Put in game and then see how you like it.


In this tutorial, I will show you how to create alpha hair! Just so we're on the same page, alpha hair is the kind of hair that looks realistic and has individual hair strands. Totally opposite from clay or maxis match hair. Before we start, just know that most hair creators use a bunch of planes in their hair meshes. I used about 7-8 to save time and because I'm never going to share this mesh with the community. Plus, most hairs have two or three layers. I only have one, again, to save time. If you have any questions about anything, do not hesitate to ask!

What you will need
Sims 4 Studio (I'm using Harmony)
Blender 2.70
Photoshop (For alpha stuff u know)
3DS Max
Milkshape
The main program in this tutorial is 3DS. It's not exactly "free," but you can get the student trial version, which can last a few years.
Step 1.
Open 3DS Max and import a model. I'm just using one I grabbed from s4s. I gave mine a little makeover and added a scalp area.

Now we're going to start making the hair

On the right side panel, open up create and then click plane. Change the width and length segments to however many. Then you can click and drag it to create the plane.


If you have four windows pulled up like I do, hover over the 3D viewer window and press alt+w to widen it. Or if you're in Maya mode, press spacebar.
You can change the color of the plane for less confusion. I'm gonna make mine green
 you can do this by going to modify, right next to the create tab and changing the object's color.
It's important to have certain colors for certain things so you know what every plane resembles. For example, if you had one plane and it was blue and were trying to create another plane that was the same color, you wouldn't know if it was clipping into the other plane. So changing the color every once in a while is good. Having planes clipping into each other is bad.
Next, in the modifiers list, right click on Plane and make it an editable poly.

Then click on the Modifier List drop down and either type or find MeshSmooth. This is like subdivision surface in blender. It just doesn't pinch the ends.

Then go back to editable poly and make the selection by vertex and turn show end result on.

Step 2.
Now we can start making some hair

Just to clear some stuff up, planes should always start from the back and go forwards to avoid most transparency issues. In the end, you may have transparency issues anyway, but starting from the back is the cleanest way to go. And it also makes the hair, in general, look better.
So, select all of the plane and rotate it -90 degrees. Now the colorful side should be facing the model.

Now move it to the back of the head and manipulate the vertices so it looks like it's hanging from the head. The closer the plane is to the scalp, the better. Make sure it doesn't clip into the body and make sure it's not too super close to the body either because no matter how many weights you may add, it can still clip in game.

Make the hair look like it has movement in it. Right here, I'm having an issue because, in the middle of the plane, it looks like it just shoots down to the other vertices. To fix this, I'm going to add another set of vertices. Select two vertices that you want to put the new set inside. Hover over loops and click insert loop.


now it looks better

Step 3.
I'm now done with this plane. So now I'm going to create another. Select all of the plane and press ctrl+v, then click copy and ok.

Now you can rotate it around and change the color. Keep in mind to keep it close to the other plane and head so there aren't many gaps. It needs to look natural.

Then you can continue copying and changing planes.
Once you're done with whichever side, you can copy the planes and invert them to be on the other side of the head. Then you can manipulate them some more.


Step 4.
Now it's time to go into photoshop and create a hair texture.
Add a layer under the hair and make it the same color as the hair. Flatten the image and save as png. Then go back and make the background black and hair white.

Then copy the image and create a new channel layer. Then paste it. Then copy it again and create a new image and paste it into the channel.

Then save it as a photoshop psd.
Step 5.
Now open 3DS back up and create a new material. Under the maps tab, check diffuse and opacity. On the diffuse map, put in the png we made. In the opacity map, use the alpha map we made.

Select all of the planes and then right-click the material and click assign material to selection.
Then in the 3D viewer, click Standard>Materials>Shaded materials with maps. you can enable or disable transparency. I'm going to disable it because I may have transparency issues and will not be able to see the actual plane.

Now select a plane and find in the modifier list Unwrap UV. Make sure you turn on show end result and put unwrap UV between the meshsmooth and editable poly modifiers. Then open UV editor.

then open one of the maps and place your uv on whichever hair piece you prefer.


You can also move the vertices on the map so it changes where the texture is on the hair. Then just do the same thing on every other plane.
Step 6.
Now select a plane and add a multires modifier. This is going to decimate the plane. Click generate then put in 10-50 percent. But make sure you still have a high enough poly mesh to do a smooth weight transfer. 5k-7k polys is good.

do this for all other planes as well.
Step 7.
Now select any plane, right click on any modifier, and click collapse all. If you notice any transparency issues when you turn transparency on, follow this tutorial on how to fix that. After collapsing your modifiers, scroll down and click attach. Then attach it with every other plane.


Step 8.
Now would be a good time to save it.
 So here you need to create the hat chops. Import your hat meshes into 3DS and add an FFD 4x4x4 modifier to the hair. Then you can shape the hair to fit into the hat. Then collapse it and save as an obj.
Step 9.
Now it's time to pop it into blender. For each mesh, go into edit mode and flip the normals. Press S on your keyboard and then type in .999 and then save it as an obj and add backfaces to the name of the mesh. Or name it whatever.

Then open milkshape and import the obj with the inverted normals and then the normal mesh, in that order. This is very important so you won't have ridiculous transparency issues in game. Then select both meshes and click regroup. Do this for every hat chop too.

Step 10.
Put it back into blender and then add cut numbers to your meshes. The main mesh has a cut number of 0002, the first hat chop has a cut number of 0000, and the last hat chop is 0001. Then add an armature modifier on all of them and make the object your rig.

Now time to do UV stuff! woo. Go into every mesh and change the UV name from UVmap to uv_0. then add another UV map and name it uv_1. Please refer to this tutorial on how to unwrap uv_1. I have also discovered that some hairs do not need a uv_1. Infact, sometimes when you add a uv_1 it can mess up how the hair moves. You'll know if you need a uv_1 or not.
Step 11.
Here you should probably do some vertex painting. Paint everywhere green. If the planes are near the scalp you would paint it blue.

Now we're going to do the weight transfer. Append a hair reference mesh.
Select the hair ref and then your mesh, then go to weight paint and transfer weights to the nearest vertex.

Step 12.
Now save and open s4s. Go to CAS create 3D mesh and select any hair that has three groups. Import your meshes and then make all of the geometry's shaders simglass.

Add a texture and then you should be done. Put in game and then see how you like it.

