|
|
Post by orangemittens on Feb 28, 2015 15:20:19 GMT -5
The first UV map is responsible for telling the game how to apply your image to the mesh. The second UV is responsible for telling the game how to manipulate your mesh when the player puts your mesh on a Sim and moves the muscle and weight sliders. They look so different because the purpose of them is so different. I'm pleased to read you found the tutorial helpful...thank you for letting me know  |
|
|
|
Post by tehhi on Mar 5, 2015 5:38:42 GMT -5
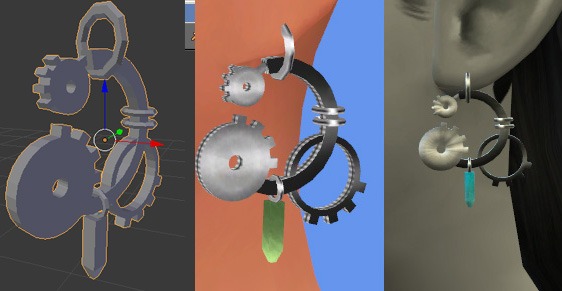
why my earring looks normal in Blender and in Studio, but looks so smoothed in game? created from scratch, no mix with EA's mesh, and I used this tutorial |
|
|
|
Post by orangemittens on Mar 5, 2015 7:20:42 GMT -5
If you post it I can look at it for you.
|
|
|
|
Post by tehhi on Mar 5, 2015 13:21:33 GMT -5
I sent it to your private message
|
|
|
|
Post by orangemittens on Mar 8, 2015 8:19:11 GMT -5
tehhi, this is the same issue that your other earrings had...the mesh is not vertex painted correctly. Your earring mesh is vertex painted white:  and it needs to be green ( hex # 007F00). |
|
|
|
Post by tehhi on Mar 8, 2015 16:20:22 GMT -5
thank you! I just thought I don't need to use Vertex Paint if I don't have any EA's parts of mesh.
upd. I made my earrings green - they are smoothed anyway...
|
|
|
|
Post by 13whitemice on Mar 12, 2015 6:50:08 GMT -5
Hi! About this words in the LOD1-3 step:
"verify that this LOD has the same number of mesh groups as LOD 0"
And if it's not? I'm talking about the necklaces... I tryed 3 different and all of them have mesh1 and 2 in lod0 and only 1 in lod1-3...Is it still imposible to make your own necklace from another necklace? should I use something like earring as the base?
|
|
|
|
Post by orangemittens on Mar 12, 2015 10:17:25 GMT -5
If it doesn't have the same number of groups you cannot just decimate the LOD 0 and use it to replace the lower lods directly. Instead you need to make sure what you're using to replace the lower lods has the same number of mesh groups as the lower lod has and that they have the correct cut numbers. In cases where there is a mismatch it is often the case that the high lod has an extra mesh group consisting of a small box. This small box is cut 0. If you use this to directly replace a lower lod that has only one mesh group you will replace the lower lod cut 0 with a small box instead of with your mesh. What you need to do in these cases is first delete the small box group from LOD 0, rename the cut of your main mesh group from 1 to 0, and then use that to replace the lower lods.
|
|
|
|
Post by lexy on Mar 13, 2015 21:24:24 GMT -5
Hi hi!! Okay, so I'm trying out this tutorial and on step 5, I think, its not allowing me to make the edge selection and none of the boxes are turning orange! help!
|
|
|
|
Post by lexy on Mar 13, 2015 21:43:14 GMT -5
FOUND A SOLUTION
|
|
|
|
Post by orangemittens on Mar 14, 2015 16:51:12 GMT -5
Excellent...I'm glad it's working for you now  |
|
|
|
Post by claudz93 on Mar 26, 2015 3:23:43 GMT -5
Hi, thanks for the tutorial! Sorry if this is a silly question, but after step III-14 - unwrapping my mesh, my mesh map doesn't have two circles in it like yours, it looks different. Any idea what I'm doing wrong?  |
|
|
|
Post by claudz93 on Mar 26, 2015 4:51:45 GMT -5
Oh wait never mind, that WAS a silly question! Somehow the bottom ring wasn't actually made of anything. Fixed it!
|
|
|
|
Post by orangemittens on Mar 26, 2015 7:32:40 GMT -5
Excellent, I glad it's working for you now  |
|
|
|
Post by kittehkat94 on Apr 7, 2015 7:54:00 GMT -5
Hi Orangemittens or whoever can help me  I've been working through Start to Finish New Accessory Mesh for Beginners I-V, but every time I get up to Part III: Unwrapping the Mesh & Mapping UV 0, specifically, unwrapping the mesh, I've noticed that my map doesn't look like the one in the guide. I'm a little confused as to whether or not I've done something wrong. If anyone is able to help me, that would be absolutely great. Thank you in advance. Attachments:
|
|