Create Custom Reflection Cube Maps;
Mar 16, 2019 12:19:53 GMT -5
jwofles, Feyona, and 6 more like this
Post by littledica99 on Mar 16, 2019 12:19:53 GMT -5
TUTORIAL: creating custom reflection cube maps
This tutorial will teach you how to create a custom cube map, which is used in the game to draw a reflections on objects.
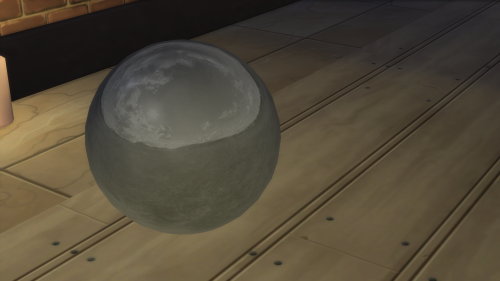
1. Understanding the cube map:
Unlike The Sims 3, which used to generate a reflection cube map in-game, The Sims 4 goes the The Sims 2 route and uses fixed ones. This is how a The Sims 4 cube map looks like:

This is the cube map used in all of the game’s assets. It may look weird, and that’s because the color layers of this maps contain the blur level information of the map.
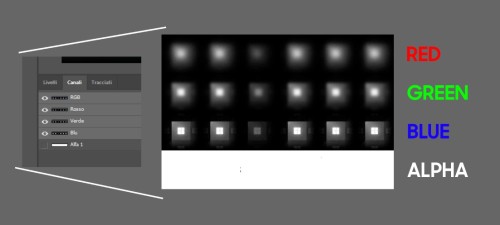
When you create a specular map, which is the texture that tells the game where an object is shiny, it will apply these different effects depending on the color drawn on. The alpha channel of cube maps doesn’t matter, as far as i know.
2. Create a The Sims 4 Compatible cube map:
To create a cube map for The Sims 4, you need the DDS Plug-In for Photoshop which you can find here, and of course Photoshop.
Assuming you already have an HDRI, let’s head to matheowis.github.io/HDRI-to-CubeMap/ or whatever other site you know that converts HDRIs to Cube Maps. Load in your HDRI and save it in the following format:
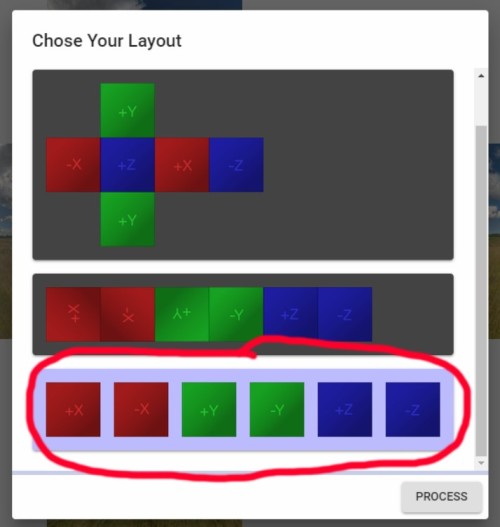
This format will create 6 different images of your HDRI, each named according to their position in the map, which can be either positive or negative values of X, Y and Z. The X, Y and Z are the names of the different sides of the sides of the imaginary cube in which the cube map is contained, which are front and back (X), top and bottom (Y) and right and left (Z).
Once the download is complete, pop all of them in a 768 x 128 new Photoshop document (original EA cubemap sizing, i haven’t tried a bigger size but as long as it’s multipled by the same amount both for height and width it should work).
Distribute them, helping yourself with the names each image has, like so:

Using this HDRI, i came up with this result:


Now, you might see it’s colored, but the colors are not considered since only one layer of color at a time is used by the reflection, as i explained in point 1. You might wanna try and blur out the RBG layers following EA’s blur directions in order to get a cube map that matches up other people’s specular maps. But the choice is up to you.
3. Importing the map into The Sims 4:
To save this kind of map in Photoshop, you will need to have the 6 different sides in separated layers, as that’s the way the NVIDIA Plugin works.
Click on Save as… and select DDS, then a window will open. Choose the following options and click save (if your layers are not 6 separated sides, the saving process fill fail):
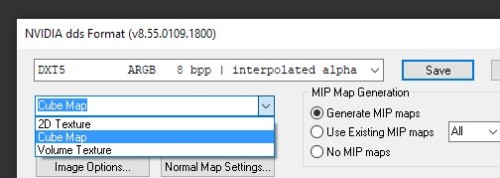
Once saved, open the object you want to apply this to (or cas item i guess) in Sims4Studio. Click on any image resource and duplicate it, making sure you assign a new instance number to it. Leave the type and group to what they were originally. Now that you have this new image resource, load in your cube map. Use the Group, Instance and Type numbers to assign it to your object by going on the Model and ModelLOD resources, click on Edit Items on the Material tab and copy the Group, Instance and Type numbers onto the “CubeEnvMap” value. If there’s no such value, create it:


Test your object in game and it should show the new reflection you’ve created:)
FREE GOODIES: ALL THE GAME'S CUBE MAPS (INCLUDING EXPANSION PACKS) DOWNLOAD
Taken from my tumblr;
This tutorial will teach you how to create a custom cube map, which is used in the game to draw a reflections on objects.

1. Understanding the cube map:
Unlike The Sims 3, which used to generate a reflection cube map in-game, The Sims 4 goes the The Sims 2 route and uses fixed ones. This is how a The Sims 4 cube map looks like:

This is the cube map used in all of the game’s assets. It may look weird, and that’s because the color layers of this maps contain the blur level information of the map.

When you create a specular map, which is the texture that tells the game where an object is shiny, it will apply these different effects depending on the color drawn on. The alpha channel of cube maps doesn’t matter, as far as i know.
2. Create a The Sims 4 Compatible cube map:
To create a cube map for The Sims 4, you need the DDS Plug-In for Photoshop which you can find here, and of course Photoshop.
Assuming you already have an HDRI, let’s head to matheowis.github.io/HDRI-to-CubeMap/ or whatever other site you know that converts HDRIs to Cube Maps. Load in your HDRI and save it in the following format:

This format will create 6 different images of your HDRI, each named according to their position in the map, which can be either positive or negative values of X, Y and Z. The X, Y and Z are the names of the different sides of the sides of the imaginary cube in which the cube map is contained, which are front and back (X), top and bottom (Y) and right and left (Z).
Once the download is complete, pop all of them in a 768 x 128 new Photoshop document (original EA cubemap sizing, i haven’t tried a bigger size but as long as it’s multipled by the same amount both for height and width it should work).
Distribute them, helping yourself with the names each image has, like so:

Using this HDRI, i came up with this result:


Now, you might see it’s colored, but the colors are not considered since only one layer of color at a time is used by the reflection, as i explained in point 1. You might wanna try and blur out the RBG layers following EA’s blur directions in order to get a cube map that matches up other people’s specular maps. But the choice is up to you.
3. Importing the map into The Sims 4:
To save this kind of map in Photoshop, you will need to have the 6 different sides in separated layers, as that’s the way the NVIDIA Plugin works.
Click on Save as… and select DDS, then a window will open. Choose the following options and click save (if your layers are not 6 separated sides, the saving process fill fail):

Once saved, open the object you want to apply this to (or cas item i guess) in Sims4Studio. Click on any image resource and duplicate it, making sure you assign a new instance number to it. Leave the type and group to what they were originally. Now that you have this new image resource, load in your cube map. Use the Group, Instance and Type numbers to assign it to your object by going on the Model and ModelLOD resources, click on Edit Items on the Material tab and copy the Group, Instance and Type numbers onto the “CubeEnvMap” value. If there’s no such value, create it:


Test your object in game and it should show the new reflection you’ve created:)
FREE GOODIES: ALL THE GAME'S CUBE MAPS (INCLUDING EXPANSION PACKS) DOWNLOAD
Taken from my tumblr;


