Tutorial: Basic Guide to RLES-Specular Map editing
Jun 3, 2015 22:29:22 GMT -5
orangemittens, brujah, and 20 more like this
Post by untraditionalnerd on Jun 3, 2015 22:29:22 GMT -5
Introduction
This tutorial will show you how to make a CAS Specular image (.rles). This image is what controls the shininess of a CAS item. The original tutorial by Untraditionalnerd lost its images when Photobucket went pay. I have updated it with a new tutorial and images. As I do not have Photoshop, the illustrated tutorial only shows how to do this with Paint.net. I've left the original Photoshop part of the tutorial in place without illustrations in case people find it useful.
When editing the RLES you can choose if you want to edit it by using the greyscale on the RGB channel or work on color channels. The first part of this tutorial shows how to do this using color channels. The second part tells how to do this using grayscale.
This tutorial assumes you have a basic understanding of how to make a recolor and how to use your 2D editor. It is a basic tutorial that shows simple projects. Those interested in learning more advanced techniques should check out Samantha's Specular Tutorial. If you're brand new to making a custom Specular, do this tutorial first and follow up with hers.
What you will need:
Sim 4 Studio 2.5.0.4 +
Any 2D editor
Both methods can be done using Photoshop, Paint.net, Paintshop Pro, or GIMP.
Instructions
1. Choose Create CAS Standalone or Create 3D Mesh under the CAS button (you can choose either) and then click the CAS button.

2. Select the item you want to clone and click the Next button. I have selected this tee-shirt and I will create a specular that makes the logo part shiny.

3. When the item appears in the Model Viewer export the diffuse image as usual. Then choose the Specular line in the Texture box and click the Export button. Please note, you only need to click the export button one time, Studio will export both images at once.

Open the two specular images in your 2D editor. The first is the Overlay. This one will determine the level of shininess. It is a RGB + alpha image. If it is transparent like this one, the item has no shininess in the game. If there are colored areas, the item does have shine in the game.

The next is the Mask. This one determines where the shininess will show up and to what degree. If the image shows the entire garment image in solid white (like the one below), any colored areas on the Overlay will show as shininess on the garment in the game. You can adjust the white areas by darkening them to gray or black. If they are gray, the shininess given by the Overlay will be less noticeable. If they are black, the colored areas on the overlay will not have an effect.

To learn more about this and see some examples of different specular set-ups and their effect in the game, please see my documentation on the CAS specular. In this part of this tutorial, I will show how to edit the Overlay.
4. Because the Mask of this item shows the entire garment image in solid white, anything I put on the Overlay will show as shiny areas on the shirt. As I only want to make the logo part shiny, I want to be sure only the part that lies over the logo shows as a colored area on the Overlay. The easiest way to do that is to use the Diffuse image as a guide. Open the Diffuse image. Note, to use it as a one-to-one guide for the Specular, you will need to resize it to 512 x 1024 so it is the same size as the .rles.
5. After resizing the Diffuse, select the logo part and copy it:

6. Go to the Overlay image and paste the logo in a new layer. If you're using Paint.net, it will paste into the correct location automatically if you are all the way zoomed out from the image.

7. Bucket fill the logo with a solid light gray.

8. Click Adjustments in the upper tool bar and select Curves. When the Curves popup appears change the type field to RGB. Since I want to make the logo very shiny, I am going to change the gray to green. To do so, unclick green so that it will not be selected. Then put your mouse in the upper right corner where the small dot is and drag it down a bit. As you do so, you will see the grey circle turn green. Once it is green, click OK to dismiss the popup. To learn more about what the various colors on a Specular Overlay do, please see my documentation (link above).

9. Next, you can modify the opacity if you want. A solid color here will have a stronger effect than one that is almost see-through. As green coloring makes things very shiny, I am going to tone down the effect a bit by lowering the opacity. To do that, click on the layer that the green circle lies in to bring up the Layer Properties panel. Slide the opacity to the left to lower it. You will see the green circle become more transparent the futher to the left you slide the bar.

10. Once the Overlay looks how you want it, save it as a 32-bit .png.

11. Return to Studio and import the image. Remember to be sure you have the Specular line selected before clicking the Import button. Please note, you only need to select one of the images when importing even if you made changes to both. Studio will automatically import both images in this step.
12. Once the image is imported, Save the package and test it in the game.

Here is the tee-shirt in the game before and after the addition of a new Specular image.

This is the end of the first part of the tutorial. Read on for a second method.
USING THE DIFFUSE WITHOUT RGB COLOR:
Editing the rles of the whole dress by using the diffuse map - this portion of the tutorial shows how to do the project with Photoshop. You can also do this same technique using paint.net or GIMP.
This part of the tutorial will show you how to edit the specular map by using the diffuse map as base. it's really easy and fast.
Step 1: Clone the item and extract its diffuse map.
Step 2: Open the file and desaturate it. If you are going to use the EA RLES file as base you will have to scale the diffuse map. Scale it to 512x1024 px.
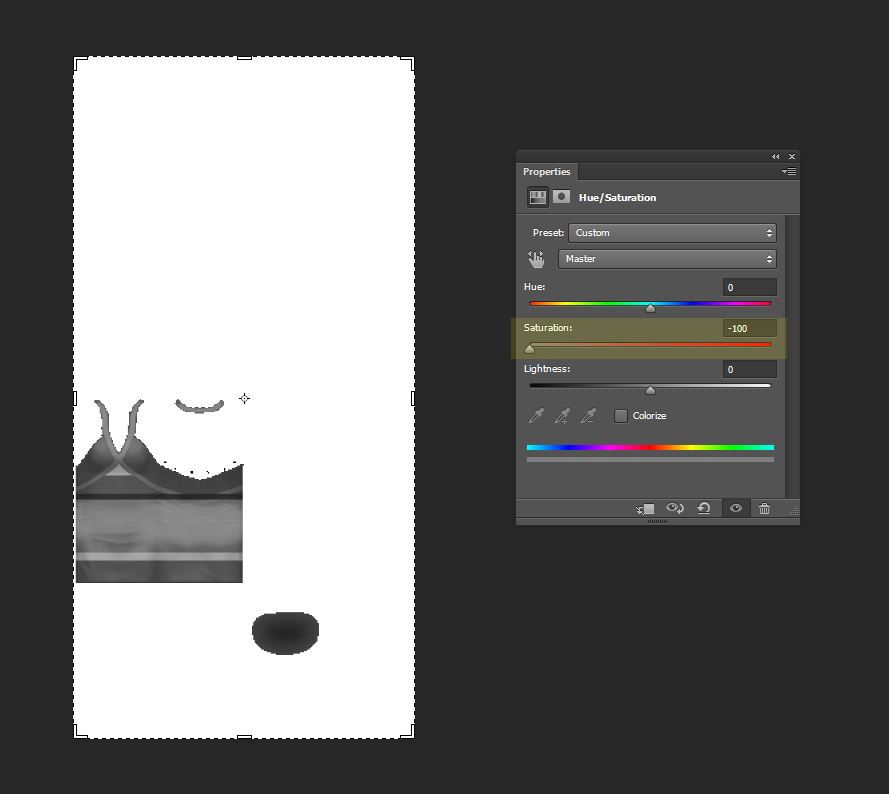
Step 3: Export the specular image as shown above.
Step 4: Open the Specular Overlay file. Paste the grey scale diffuse map over.
Step 5: Select the white area and delete it.
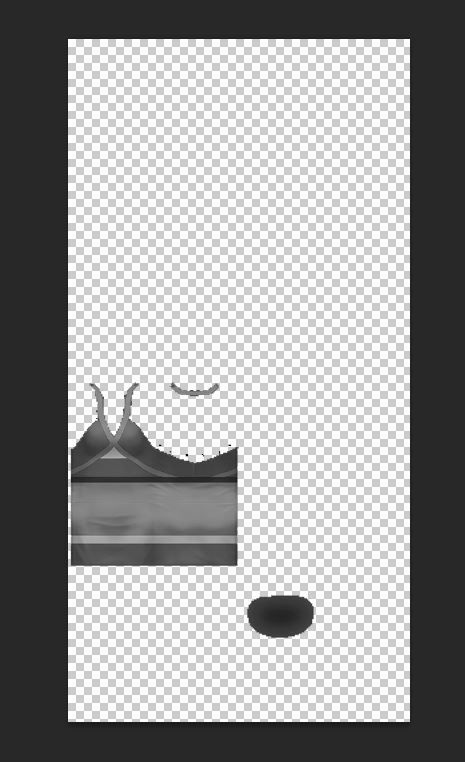
Step 6: Change its opacity. You may have to adjust it to obtain the result that you like. In this case, we don't edit the mask because we are using an EA base. If not you could use the alpha layer of your Diffuse DDS. Open the mask and paste over the alpha file.
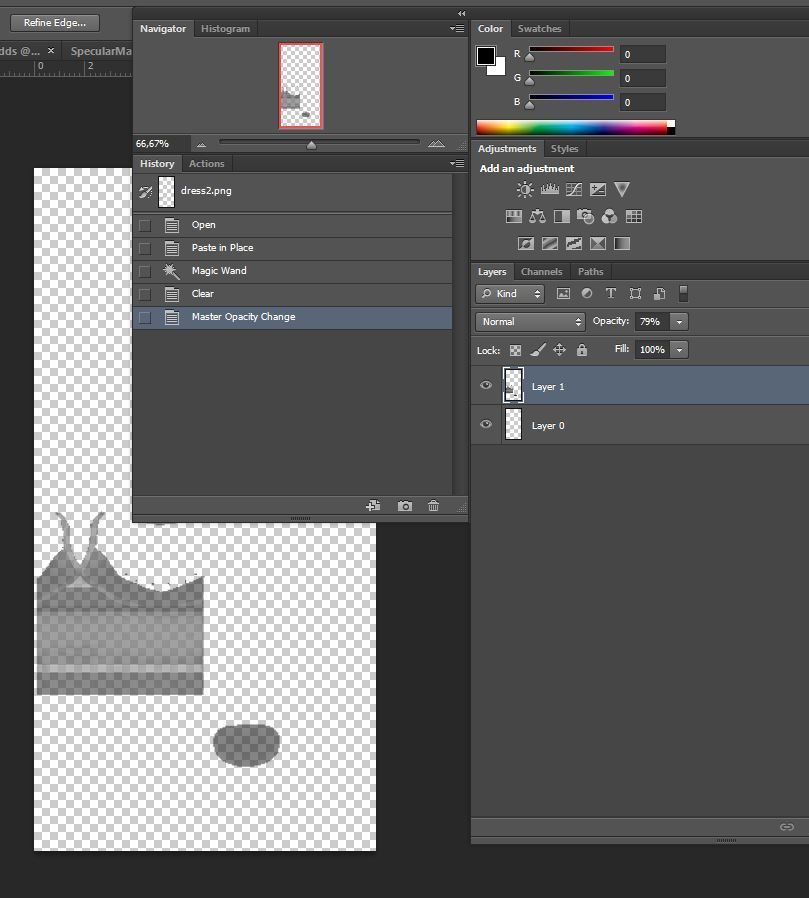
Step 7: Save. Same name and the file has to be PNG.
Step 8: Import the specular into your package as shown above.
Step 9: Save
Congratulation you just created a working RLES for the whole dress in just 9 steps
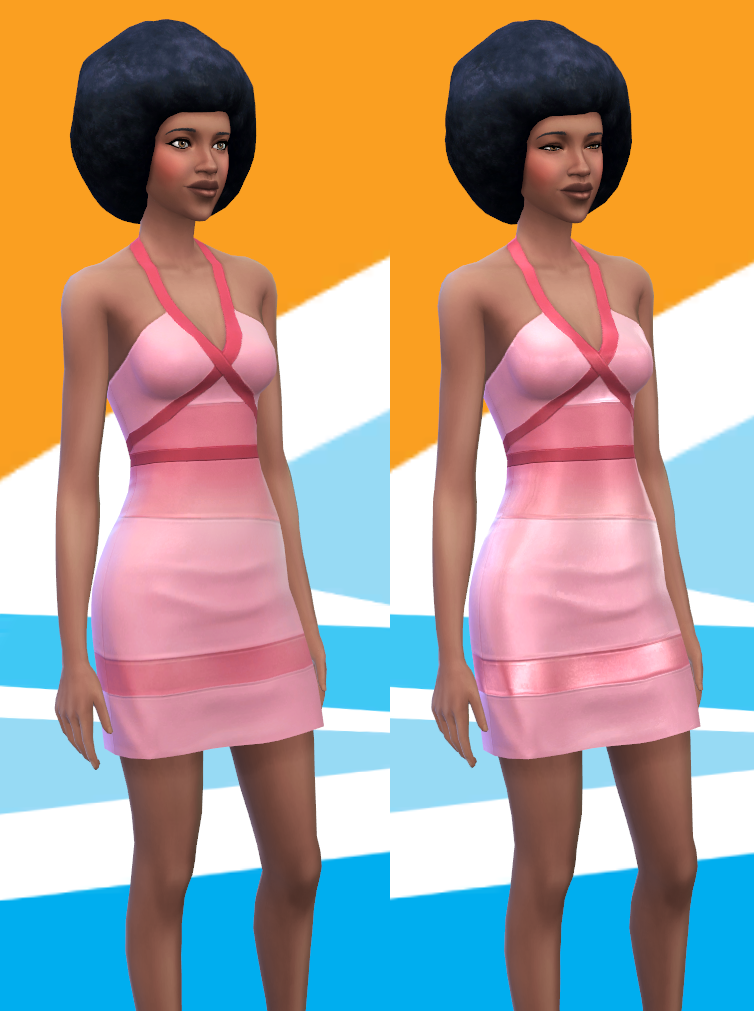
This is a tutorial that is meant to go over just the basics. If you have questions that I haven't covered here please post in the thread.
Happy Editing
This tutorial will show you how to make a CAS Specular image (.rles). This image is what controls the shininess of a CAS item. The original tutorial by Untraditionalnerd lost its images when Photobucket went pay. I have updated it with a new tutorial and images. As I do not have Photoshop, the illustrated tutorial only shows how to do this with Paint.net. I've left the original Photoshop part of the tutorial in place without illustrations in case people find it useful.
When editing the RLES you can choose if you want to edit it by using the greyscale on the RGB channel or work on color channels. The first part of this tutorial shows how to do this using color channels. The second part tells how to do this using grayscale.
This tutorial assumes you have a basic understanding of how to make a recolor and how to use your 2D editor. It is a basic tutorial that shows simple projects. Those interested in learning more advanced techniques should check out Samantha's Specular Tutorial. If you're brand new to making a custom Specular, do this tutorial first and follow up with hers.
What you will need:
Sim 4 Studio 2.5.0.4 +
Any 2D editor
Both methods can be done using Photoshop, Paint.net, Paintshop Pro, or GIMP.
Instructions
1. Choose Create CAS Standalone or Create 3D Mesh under the CAS button (you can choose either) and then click the CAS button.
2. Select the item you want to clone and click the Next button. I have selected this tee-shirt and I will create a specular that makes the logo part shiny.
3. When the item appears in the Model Viewer export the diffuse image as usual. Then choose the Specular line in the Texture box and click the Export button. Please note, you only need to click the export button one time, Studio will export both images at once.
Open the two specular images in your 2D editor. The first is the Overlay. This one will determine the level of shininess. It is a RGB + alpha image. If it is transparent like this one, the item has no shininess in the game. If there are colored areas, the item does have shine in the game.
The next is the Mask. This one determines where the shininess will show up and to what degree. If the image shows the entire garment image in solid white (like the one below), any colored areas on the Overlay will show as shininess on the garment in the game. You can adjust the white areas by darkening them to gray or black. If they are gray, the shininess given by the Overlay will be less noticeable. If they are black, the colored areas on the overlay will not have an effect.
To learn more about this and see some examples of different specular set-ups and their effect in the game, please see my documentation on the CAS specular. In this part of this tutorial, I will show how to edit the Overlay.
4. Because the Mask of this item shows the entire garment image in solid white, anything I put on the Overlay will show as shiny areas on the shirt. As I only want to make the logo part shiny, I want to be sure only the part that lies over the logo shows as a colored area on the Overlay. The easiest way to do that is to use the Diffuse image as a guide. Open the Diffuse image. Note, to use it as a one-to-one guide for the Specular, you will need to resize it to 512 x 1024 so it is the same size as the .rles.
5. After resizing the Diffuse, select the logo part and copy it:
6. Go to the Overlay image and paste the logo in a new layer. If you're using Paint.net, it will paste into the correct location automatically if you are all the way zoomed out from the image.
7. Bucket fill the logo with a solid light gray.
8. Click Adjustments in the upper tool bar and select Curves. When the Curves popup appears change the type field to RGB. Since I want to make the logo very shiny, I am going to change the gray to green. To do so, unclick green so that it will not be selected. Then put your mouse in the upper right corner where the small dot is and drag it down a bit. As you do so, you will see the grey circle turn green. Once it is green, click OK to dismiss the popup. To learn more about what the various colors on a Specular Overlay do, please see my documentation (link above).
9. Next, you can modify the opacity if you want. A solid color here will have a stronger effect than one that is almost see-through. As green coloring makes things very shiny, I am going to tone down the effect a bit by lowering the opacity. To do that, click on the layer that the green circle lies in to bring up the Layer Properties panel. Slide the opacity to the left to lower it. You will see the green circle become more transparent the futher to the left you slide the bar.
10. Once the Overlay looks how you want it, save it as a 32-bit .png.
11. Return to Studio and import the image. Remember to be sure you have the Specular line selected before clicking the Import button. Please note, you only need to select one of the images when importing even if you made changes to both. Studio will automatically import both images in this step.
12. Once the image is imported, Save the package and test it in the game.
Here is the tee-shirt in the game before and after the addition of a new Specular image.
This is the end of the first part of the tutorial. Read on for a second method.
USING THE DIFFUSE WITHOUT RGB COLOR:
Editing the rles of the whole dress by using the diffuse map - this portion of the tutorial shows how to do the project with Photoshop. You can also do this same technique using paint.net or GIMP.
This part of the tutorial will show you how to edit the specular map by using the diffuse map as base. it's really easy and fast.
Step 1: Clone the item and extract its diffuse map.
Step 2: Open the file and desaturate it. If you are going to use the EA RLES file as base you will have to scale the diffuse map. Scale it to 512x1024 px.

Step 3: Export the specular image as shown above.
Step 4: Open the Specular Overlay file. Paste the grey scale diffuse map over.
Step 5: Select the white area and delete it.

Step 6: Change its opacity. You may have to adjust it to obtain the result that you like. In this case, we don't edit the mask because we are using an EA base. If not you could use the alpha layer of your Diffuse DDS. Open the mask and paste over the alpha file.

Step 7: Save. Same name and the file has to be PNG.
Step 8: Import the specular into your package as shown above.
Step 9: Save
Congratulation you just created a working RLES for the whole dress in just 9 steps


This is a tutorial that is meant to go over just the basics. If you have questions that I haven't covered here please post in the thread.
Happy Editing


