|
|
Post by nilryth on Jan 13, 2020 13:05:18 GMT -5
Merged an alt pair of shoes with a full body model from GTW. Managed to get results I'm happy with but now there's floating bits of mesh around the legs whenever the character walks. When standing stationary there's no issue and I didn't see it in S4S. What can I do to get rid of them?  Also should say that in a tutorial I used, it suggested that instead of deleting unwanted parts of the trouser mesh (they were causing a UV error in S4S) to scale them down a bunch and hide them within the model. The pieces of mesh sticking out aren't as big as the hidden parts though and those are located higher up in the mid torso. Is there a way to just get rid of those pieces completely without the UV error if that's the cause? Edit - I tried to merge those loose pieces to the main mesh but that didn't get rid of it, there might actually be more bits of mesh now and it's hard to tell cause of the angle of the vid I took. Please respond in simple terms as I'm a dumbass that guesses their way through Blender (Used 2.70) most of the time. Video showing the issue in motion, blender file and package file in here - drive.google.com/drive/folders/1axBuyyZ2beovlyyIp8yH2ov71aCK50ag |
|
|
|
Post by mauvemorn on Jan 13, 2020 16:22:12 GMT -5
Hi. The blend file you import in the package must have the same number of meshgroups as the one that is being replaced. It should be split in the same exact way. Each meshgroup should have the same vertex groups as the ones that are being replaced. You replaced a blend with 10 meshgroups with the one with 5 meshgroups. If you do not want to do all of that, just clone the swimsuit, export its blend, combine all of your suit's meshgroup into one, delete all vertex groups, re-transfer weights from the swimsuit, change cut number to 0000, import in the package started from the swimsuit. New blend and package |
|
|
|
Post by nilryth on Jan 13, 2020 18:29:16 GMT -5
Hi. The blend file you import in the package must have the same number of meshgroups as the one that is being replaced. It should be split in the same exact way. Each meshgroup should have the same vertex groups as the ones that are being replaced. You replaced a blend with 10 meshgroups with the one with 5 meshgroups. If you do not want to do all of that, just clone the swimsuit, export its blend, combine all of your suit's meshgroup into one, delete all vertex groups, re-transfer weights from the swimsuit, change cut number to 0000, import in the package started from the swimsuit. New blend and package Thank you but your package file warps the sleeves, adds lines across the fingers and breaks the boots when tested out in game, what fixes that? I also have no idea what mesh and vertex groups are so is there a more clear tutorial that you can link me to? ![]()   |
|
|
|
Post by sigma1202 on Jan 13, 2020 18:41:36 GMT -5
Hi. The blend file you import in the package must have the same number of meshgroups as the one that is being replaced. It should be split in the same exact way. Each meshgroup should have the same vertex groups as the ones that are being replaced. You replaced a blend with 10 meshgroups with the one with 5 meshgroups. If you do not want to do all of that, just clone the swimsuit, export its blend, combine all of your suit's meshgroup into one, delete all vertex groups, re-transfer weights from the swimsuit, change cut number to 0000, import in the package started from the swimsuit. New blend and package Thank you but your package file warps the sleeves and adds lines across the fingers when tested in game, what fixes that? ![]() There's an issue with the shadow map, you can fix this by making it blank or trying to open it up in an image editing software and smooth out the edges |
|
|
|
Post by mauvemorn on Jan 13, 2020 20:03:56 GMT -5
I used the same textures you did without editing and for that reason didn't bother checking in-game. It seems that the sims 4 studio does not like when I export shadow maps as png instead of dds, i tried cloning an item and just exporting and re-importing a shadow map as png and it gave the same dark lines...ok Completely forgot about feet, though. They should be either excluded or you should clone an item that already has them excluded. I cloned ymBody_EF10Noctis and re-transferred weight from it. It already has feet excluded. I have not watched any beginner friendly tutorial in years, so cannot really help with that. Back then they were not very informative. You can look up frankenmeshing on youtube, just choose more-or-less recent ones. As for vertex groups To make a mesh move, we do not animate each and every vertex it is made of individually, we animate a rig ( think of it as a skeleton). Rig is made of bones each of which affects certain areas of the mesh. They can be called weights, bones, vertex groups, depending on the program or a person. Vertex group is a... group of vertices that are given certain property, in this case the property is to be affected by a bone/to be a bone ( depends on how you look at it ). Anyway, you can find them here (2) 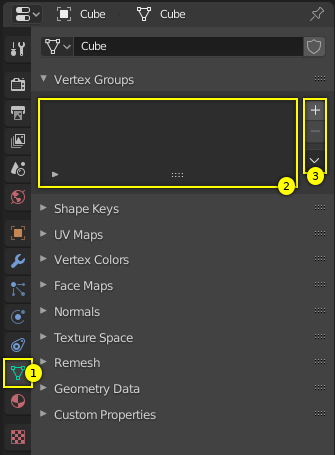 New package and blend |
|


