|
|
Post by yi4183 on Sept 17, 2021 14:23:25 GMT -5
I'm trying to create a female top cc for the first time. I was able to get through all the process as said here: (https://youtu.be/_aJZtYbywvQ) But towards the end when I tried do "bake" (53:58 in the video), the texture showed up as solid white with no texture at all just flat (even though my cc is black). I did exactly the same as what's said but mine shows up like this in the map: zupimages.net/viewer.php?id=21/37/03hf.jpgtexture that is supposed to show: zupimages.net/viewer.php?id=21/37/qkvp.jpgI would be so happy if anyone can help me get through this problem.. |
|
|
|
Post by mauvemorn on Sept 17, 2021 15:32:49 GMT -5
Hi. We would need to see what’s going on in your blend, but in short, your are baking an ambient occlusion, not materials to texture. Imagine blender creating a glowing white sphere around your object that lights it from all angles. That is ambient light. When there is a sleeve, the light that is coming from above the sleeve will meets an obstacle(the sleeve), the area below the sleeve on the torso receives less light than the chest, for example, that is not obscured by anything. What this person does wrong is delete the body. You should also be adding the floor because clothing does not float in the void, it exists on the body, it has the body casting shadows on it, it has the light bouncing from the ground, etc.
Basically, if you want to bake the black material with a specular map and all, you bake that as Combined, preferably in Cycles.
If you want to add some complexity to your existing textures, do not delete the body and add the floor plane.
If this will not work, share the blend file please, you might have too much light in the scene
|
|
|
|
Post by yi4183 on Sept 17, 2021 16:11:41 GMT -5
I've tried it but still couldn't figure out what to do..
|
|
|
|
Post by Fwecka (Lolabellesims) on Sept 17, 2021 22:42:38 GMT -5
It's been a few hours since your post so I'll go ahead and answer, though Mauvemorn is the one who knows the most about these things. Everything I've learned has been from her. First, your polycount is way too high. Use the decimate modifier to lower it. Decimate ruins the topology but in this case, MD has already ruined your topology so you have nothing to lose. And speaking of MD, model in quads and keep your particle distance high. Don't worry about body parts clipping through if you know you'll delete those body parts later (any body parts covered by your mesh). An ambient occlusion map is a shadow map. You're baking shadows onto your mesh so it doesn't look flat. Ambient light is light that exists everywhere in your scene; it doesn't come from a source such as a lamp so delete all of the lamps in your scene. Occlusion is just when something is blocking something else. Sort of like if you put your hand under a lamp the top of your hand would be lit up but the bottom would be in shadow because the bottom of your hand has been blocked from the light. Blender calculates the light that exists and what's blocking the light and then bakes those shadows onto a texture. This occlusion part is why Mauvemorn says to put a "floor" under your sim. This helps Blender to better calculate how light interacts with your mesh. I had some trouble at first baking shadows onto your map and it was because you have materials assigned to your mesh. There might be a better way of fixing this but I just ended up deleting the black material. You don't need to have a material assigned to your mesh; you'll make your diffuse in Photoshop and import it to Studio. I unchecked Normalize, as well. Got a pretty decent bake. Export your baked ambient occlusion map via the UV editor. Image > Save as Image or the shortcut F3. Open your ambient occlusion map in Photoshop, and do what you need to do to add color/texture.  |
|
|
|
Post by mauvemorn on Sept 18, 2021 5:29:30 GMT -5
Sorry for the late reply, it was nighttime where I live. I was not able to recreate your exact issue right away after opening the blend, the garment would bake flat black. Changing the color of the diffuse in the material would not affect that. However, it baked as intended after I deleted the material. The issue did not happen when i created a new one. So, my guess is, Blender has problems with MD's materials, do not export them in the future. There are a few more moments: 1). All areas of the body covered by clothing must be deleted. Try to do it as thoroughly as you can so that nothing pokes out or takes up valuable uv space All CAS items share the same UV space. Each has its designated area. To avoid overlapping, make sure to place UV islands not only in their designated areas but also in the vacant space. 1). Select the body, switch to Edit mode ( TAB ), disable Limit selection to visible; 2). Select everything covered by the garment, press Delete and choose Faces. If the garment has skirt-like bottom, make sure to leave at least one row of faces. Otherwise these deleted areas will be visible during walking; 3). Enable Sync, select everything with A; 4). Click on Browse and choose any texture; 5). Shift-select the garment, select everything, choose THE SAME texture, check View - Draw other objects. 6). G to move, S to scale, R to rotate. Following the first two with X/Y will constraint transformation to horizontal/vertical axis. Following any with a number will move/rotate the selection by that number of pixels/degrees. By default UV space is square ( 1:1 ), but TS4 textures are not ( 2:1 ). UV islands that were generated in the square space will become stretched vertically when rectangular textures are applied. To bring them back to their original size, select everything in UV Editor, press S Y 0.5 Place the garment's UV islands in the right spot. Make sure to scale them uniformly unless some need extra definition ( buttons, zipper, other small details ) or are hidden ( geometry created to cover holes, back side of clothing, etc ).  2). Do not scale uv islands independently unless they will be using a completely different texture ( buttons, zippers, etc). If you were to use polka dot texture with your current garment, the dots on the front pattern would be smaller than the dots on the back pattern. 3). Before you bake textures, make sure to always disable rendering for the overlapping body parts under the rig or any other mesh that would overlap with yours ( unless it's the body that you will be importing in s4s ofc) 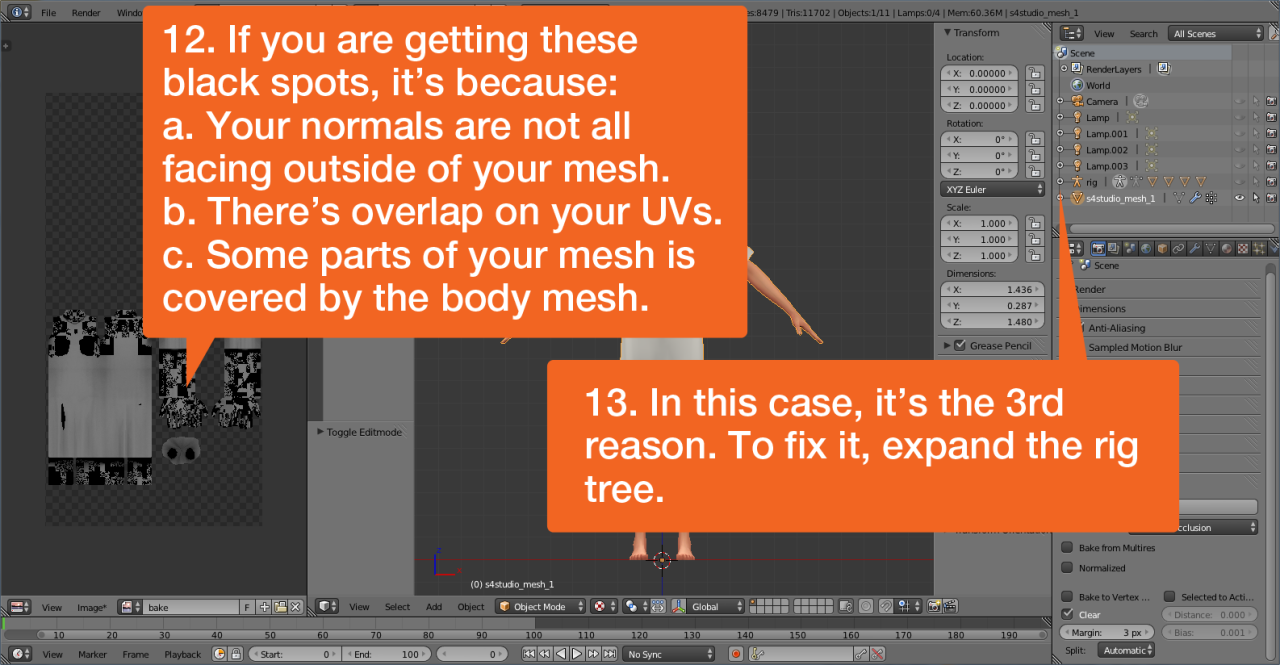  |
|
|
|
Post by yi4183 on Sept 18, 2021 7:26:17 GMT -5
Thank you so much both you guys!!  I'm a beginner to all these so I'm still struggling through the steps unfortunately, but what I have now looks so much better than before! I'm pretty satisfied with anything at this point honestly.. :') Is there a way for me to look into the finished files that you made with my cc? I thought I deleted the body pretty thoroughly but I'm still seeing these little cracks on the body when I try to export in S4 Studio..:( image |
|
|
|
Post by mauvemorn on Sept 18, 2021 9:34:07 GMT -5
That is not what I meant when talking about deleting the body more thoroughly. Did you decimate the mesh? If yes, that is what ruined it. You must only decimate the garment, not the body. The garment must also have doubles removed before you'll do that. Here's the blend, please pay attention to the following: - what areas of the body are removed; - where the garment uvs are. You want to avoid the bottom right corner because people put everything there and you end up with CAS full of items that cannot be used together; - the fact that the garment uvs and textures overlap with the body uvs slightly. That area of the body is covered by the garment, so instead of making uvs of the garment smaller, it makes sense to adjust those of the body a bit; - closed holes. From certain angles you'd see a hole between the garment and the body. To deal with it the holes are usually closed. There are two ways of doing it: simply extrude and collapse or extrude and snap to the body. I showed the last one at the bottom and the first one everywhere else; - you'll open the blend to the World tab, i increased the samples and Energy so that it is a bit brighter and less noisy; - the fact that i did not use Decimate. It will look awful, the borders of the garment become ruined, so I strongly advise you to change the topology in MD; - that there was a plane in the scene( the floor ), the closer it is to the garment, the darker the shadows. - the bake result looks weird because of topology. |
|
|
|
Post by yi4183 on Sept 18, 2021 17:57:53 GMT -5
Wow, thank you so much for such thorough instructions!!
I might be able to do much better job on my next cc keeping in mind all of those:)
But could you help me with one more thing?
How do I change just the color of the baked map without ruining the texture using photoshop?
I searched everywhere but couldn't seem to find it.
Also, is there a way to change the texture like leather clothing? (but keeping the baked texture)
|
|
|
|
Post by gibi on Sept 18, 2021 19:34:07 GMT -5
Do you mean, keep the shadows, etc., from your bake map, but in colors other than gray?
One way to make it colored is to do Adjustments > Color Balance and then move the sliders to add color to the gray. You can either do that as an adjustment layer, if you don't want to apply it to the entire map, or to the entire map from the main Image menu.
Another way is to make a new layer and fill it with a color, and then set the new layer blending option to Multiply.
This is pretty much the same as making a color layer. Once you find a texture, make it black and white, and add as a layer on top of your baked image. Play around with the layer blending options and layer transparency -- I usually use either Multiply, or Overlay, but some of the others can be good, too.
|
|
|
|
Post by Fwecka (Lolabellesims) on Sept 18, 2021 22:15:20 GMT -5
Wow, thank you so much for such thorough instructions!! I might be able to do much better job on my next cc keeping in mind all of those:) But could you help me with one more thing? How do I change just the color of the baked map without ruining the texture using photoshop? I searched everywhere but couldn't seem to find it. Also, is there a way to change the texture like leather clothing? (but keeping the baked texture) Another thing you can do it go to Image > Adjustments > Curves and give the baked texture a color--any color--then Image > Adjustments > Hue/Saturation to adjust the colors and the saturation. If you want to brighten or darken the colors I usually use Image > Adjustments > Levels. It's seems to me that Levels does a better job of maintaining the shadow contrast. Lightening a color through Hue/Saturation or Brightness/Contrast makes everything look faded. If you want to use a specific pattern-type texture such as leather, you can add the leather texture as a new layer then change the blending mode, as gibi described. Here's a good tutorial for making your own leather texture in Photoshop. |
|
|
|
Post by mauvemorn on Sept 19, 2021 3:55:37 GMT -5
We need to know what image editing software you're using but there are a few approaches to this: 1). You can change the color of the material, bake the diffuse, then adjust the color in the image editing software with Hue/Saturation or Selective color. The lightness can be adjusted with Levels or Curves; 2). You can bake the diffuse as grey, then fill the same area with color and change its blending mode to Overlay/Soft Light/Hard light/ Multiply, whichever works best To make leather look like leather, you need reflections. Simply adding leather texture will do nothing, it will just look noisy. You need to bake the texture in cycles with a properly set up material. Setting up lights/using LittleDica's specular imitator, rendering in Cycles, setting up the materials are general blender topics with a lot of information, we cannot help with it here but you can find your answers on youtube. |
|
|
|
Post by yi4183 on Sept 20, 2021 13:52:46 GMT -5
Yes, exactly what I was looking for! Thank you.
Thank you all for the help.. it has saved me
|
|


