|
|
Post by alerii on Jun 28, 2023 12:30:58 GMT -5
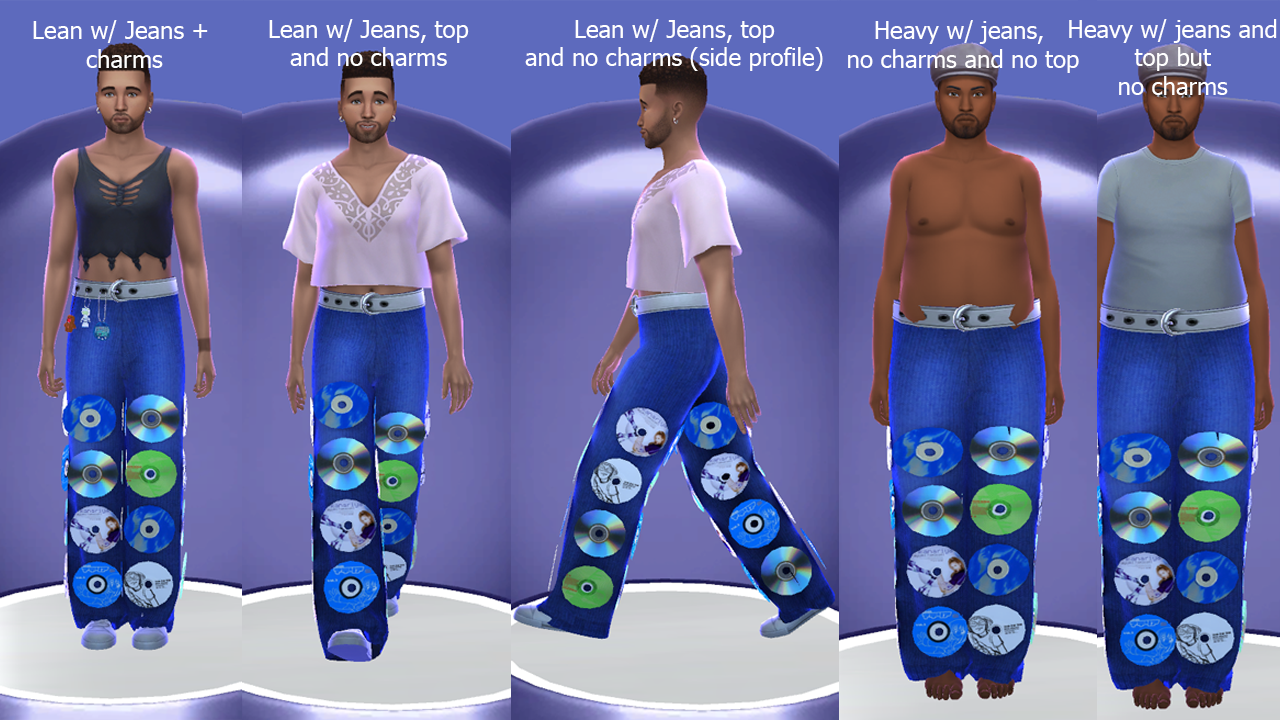
I'm trying to make cd jeans with a high waist for masc frame and it keeps clipping through when there's no top. As you can see below, the jeans are clipping through in CAS but when I add a shirt onto it, it's fine. There is also slight clipping with the cds on heavy sims so any help is appreciated with that too. The charms below are an accessory I made specifically for this mesh. Things I've tried: - Redoing Uv_1 + weights with a full body male mesh
- using CAS Tools to try and fix distortion
- Slightly widening the mesh as the hips so it's not too close
 |
|
|
|
Post by mauvemorn on Jun 29, 2023 12:09:16 GMT -5
Hi. Transferring weights and uv_1 from the full body made it morph and move as intended. However, the mesh is not structured as intended. Unless you have a default top replacement or using some custom body preset, the structure is the only reason As you see, it does not clip in my case  If you transferred weights and uv_1 from pants to disks, they also behave as intended, so you will need to just move them a bit away from the jeans. - clone ymBottom_PantsLoosePajamas, export the blend, open it. There will be 4 meshgroups. It was done for pants to not clip into tall boots. Your item must be split the same way into the same number of meshgroups. Hide all meshgroups; - append your pants. There is no reason for the buckle and the disks to be separated, so join them with your pants; - unhide one meshgroup of the reference, select the same area ( does not have to be identical) on your pants, separate, assign the same cut, delete the meshgroup of the reference. Repeat with others; - once you have 4 meshgroup, remove unused vertex group as youve already done; - save, import back into ymBottom_PantsLoosePajamas |
|
|
|
Post by alerii on Jun 30, 2023 8:59:29 GMT -5
Thank you so much for your help. I pinned the problem down with the jeans (corrupted body preset) I have another query. The mesh looks fine in S4S. there are cut lines from where I separated the mesh into different cut groups when I go in CAS and ingame. Do you know how to get rid of them? Thank you again :D .blend file: drive.google.com/file/d/1Q4-5I-gh7_iHkBV-QUTebm7WoZh2mw4i/view?usp=sharing |
|
|
|
Post by mauvemorn on Jun 30, 2023 9:50:20 GMT -5
because of ripped uvs here. Straighten and align them
|
|
|
|
Post by alerii on Jun 30, 2023 16:06:57 GMT -5
Thank you. The problem reduced very slightly but unfortunately it's still there. It's more noticeable when the sliders are in their extremes aka muscles and weight on lowest/highest. I tried to use CAS tools but that didn't work either. What's weird is that the bottom disks now have a weird shadow on them. Not sure if it was caused from CAS tools (sorry if so) but I've used edge split on them, appended older versions of the disk onto the newer ones but it didn't work. The shadow doesn't show in Blender but it shows in S4S + CAS. current .blend file: drive.google.com/file/d/104SDiI2BRBTmeXp8qQb46GBaD1bHDt8l/view?usp=sharing  |
|
|
|
Post by mauvemorn on Jun 30, 2023 16:55:05 GMT -5
I can’t check the file right now but that is not what I meant or what it should be. Always use a maxis mesh as an example of what something should be like, this will prevent 99% problems and answers all the questions
See how uvs are ripped in the pic I shared before? This happens because the reference was split there. As a result, each vertex in that area on your pants received two locations on the uv map. Then you split each of those vertices into two, so they morph differently.
What you should do is this:
- clone long pants, export the blend, open;
- join all meshgroups, select the area where the mesh is split (edge loop at a time), and remove doubles;
- then save, append into the scene with your pants, transfer uv_1
|
|
|
|
Post by alerii on Jul 3, 2023 16:22:09 GMT -5
hi, sorry for the late reply. I think I'm doing something wrong? What I interpreted from your message is join meshgroups + remove doubles of ymBottom_PantsLoosePajamas at the points where it was split and then append into blender w/ pants like you said + re-transfer uv_1. Idk what i'm doing wrong but the uvs have seemed to stretch on some of the parts/look worse. I'm actually confused as I followed what you said :-S In the blend I kept the long pants as "fullbodytransfer" so you can see what I did. Sorry again and thanks for your advice! .blend file: drive.google.com/file/d/11XQf1972S722rmpLw3fkC00VA0gyC3so/view?usp=sharing |
|
|
|
Post by mauvemorn on Jul 5, 2023 11:37:41 GMT -5
You did everything right, this is just not a fail proof way of doing it. Splitting both the reference and your garment into front and back(left) and back (right), then retransferring uv_1 individually is ( but this is headache-y and you'll have to remove doubles and split sharp edges after that) You can try fixing it, though - enable sync, choose face select, press B, select like in the pic; - Shift H; - switch to vertex select, select all those vertices in the wrong area, S X 0 to smack them;  - G X, move until they reach the rest of the back pattern ( like in the pic); - disable Limit selection to visible, deselect that area ( like in the pic), move the remaining one in place - uhide everything with Alt H, do the same on the other leg
 |
|
|
|
Post by alerii on Jul 6, 2023 11:02:16 GMT -5
|
|
|
|
Post by alerii on Jul 14, 2023 9:04:04 GMT -5
bumping this thread as it may have gotten pushed down a bit :]
|
|
|
|
Post by mauvemorn on Jul 14, 2023 10:42:28 GMT -5
Hi again, sorry for the wait. Need access to download the file, though
|
|
|
|
Post by alerii on Jul 14, 2023 12:28:38 GMT -5
Hi no problem. I've unrestricted it now!
|
|
|
|
Post by mauvemorn on Jul 14, 2023 13:03:17 GMT -5
You retransferred all the data from bottoms instead of the fullbody, as before. As for the disks, theres some stray geometry in that area. Select everything and Mesh - Clean up - Delete loose.  Also, the disks are ripped everywhere. If you will select one face on them and move it, it will disconnect from the rest. The front and the back of these disks have different topology. When you removed doubles, the sides joined, while the middle remained. Instead of becoming one plane, it became a flat torus. If deleting loose will fix the shadow, leave this problem as is |
|
|
|
Post by alerii on Jul 18, 2023 10:16:33 GMT -5
Thank you!! The problem with the clipping is now solved. Also i think this mesh lowkey hates me lol, the very subtle lines came back and the weird shadows on disks are gone in game but show up in CAS (should I just leave it?) I did uv_1 again to every part so that the mesh wouldn't separate and it still did. Again, tysm for your help. I'll link the blend file jic. .blend file: drive.google.com/file/d/1a1FEOdjRU79HANk3bn8h_n00zGsK2tTO/view?usp=sharing |
|
|
|
Post by Fwecka (Lolabellesims) on Jul 18, 2023 15:08:51 GMT -5
Fair warning: this is a long post but it'll fix your mesh problems. (Sorry. I can never keep things brief).
Your mesh has quite a bit of issues. It's split in odd places and you have faces on top of faces on top of faces in the CDs. Regarding the pants, if you put your mesh in object mode and solid shading you'll see sharp edges in places other than where the seams should be. Those sharp edges are there because there's a seam in those areas--the vertices are not merged where they should be.
So, do this. Join all your mesh groups then tab into edit mode. In the UV editor, enable sync and enter face select mode. Select the pants in the UV editor (you can just hover your mouse over the islands and press L) then put your mouse in the 3D window and press M > by distance. This will merge everything in the pants and wreck your seams but your seams weren't right to begin with and you'll need to fix that, regardless. Press H to hide what you just merged. Select the waist area and merge the vertices, then hide them. Do this with everything except the CDS. You can unhide with alt + H.
Okay, here's where it gets tricky for me as mesh clean up didn't help (Mauvemorn may have better advice). Your CDs have disconnected vertices all over the place in addition to the overlapping geometry. Select the outside faces of one of the CDs, merge the vertices, then hide those faces. Then do the same with the backside of the CD. Once you've hidden the the front and the backside, if there are any faces left that are in between delete them. You can't have faces directly on top of faces or you get mesh flickering (called Z-fighting). Do this with one or two of the CDs. This way, you don't have to fix every CD. Then separate the CDs that you fixed from the main mesh (P > selection), duplicate them (shift + D) and put them where you want them. Keep the old CDs so you know where to place the new ones, then delete the old CDs. Once you've placed the CDs merge the mesh groups again.
You will need to rearrange the UV layout to match your texture because, by copying the meshes, the UVs will all be in the same spot. Tab into edit mode, press A in the UV editor to select everything, then press image > open and import your texture.
One thing I should mention is that the front and back sides of your CDs are really close together and may cause problems so you should separate them a little bit.
Note that you may have issues with normals in the CDs. It's easier to see this if you have backface culling enabled. If your normals are facing the wrong way, select the geometry that needs to be fixed then mesh > normals > recalculate inside or outside depending on what you need.
Once everything has been cleaned up, you can mark the seams and split them where they need to be. In the UV editor, press A to select everything. Then UV > seams from islands. In the 3D window, you should have seams where the edges of your UV islands are located. Enter edge select mode and select one edge in the 3D window. Select > select similar > seams. All of your seams should be selected. At this point, you can mark them sharp so that you can use the edge split modifier later (Edge > mark sharp). Also, mark the areas where the mesh needs to be split into different mesh groups. Since your mesh is in tris it helps to turn them into quads. Fewer edges to deal with that way. Select your mesh then press alt + J. There will be a little window in the lower left corner. Open that and put a checkmark next to compare UVs. Sometimes turning tris to quads messes up your UV layout and compare UVs prevents that. Don't worry about turning the quads back to tris. Studio will do that for you but keep in mind that if your mesh is in quads the polycount will double when it's turned back into tris.
|
|


