|
|
Post by Sympxls on Oct 7, 2016 12:40:00 GMT -5
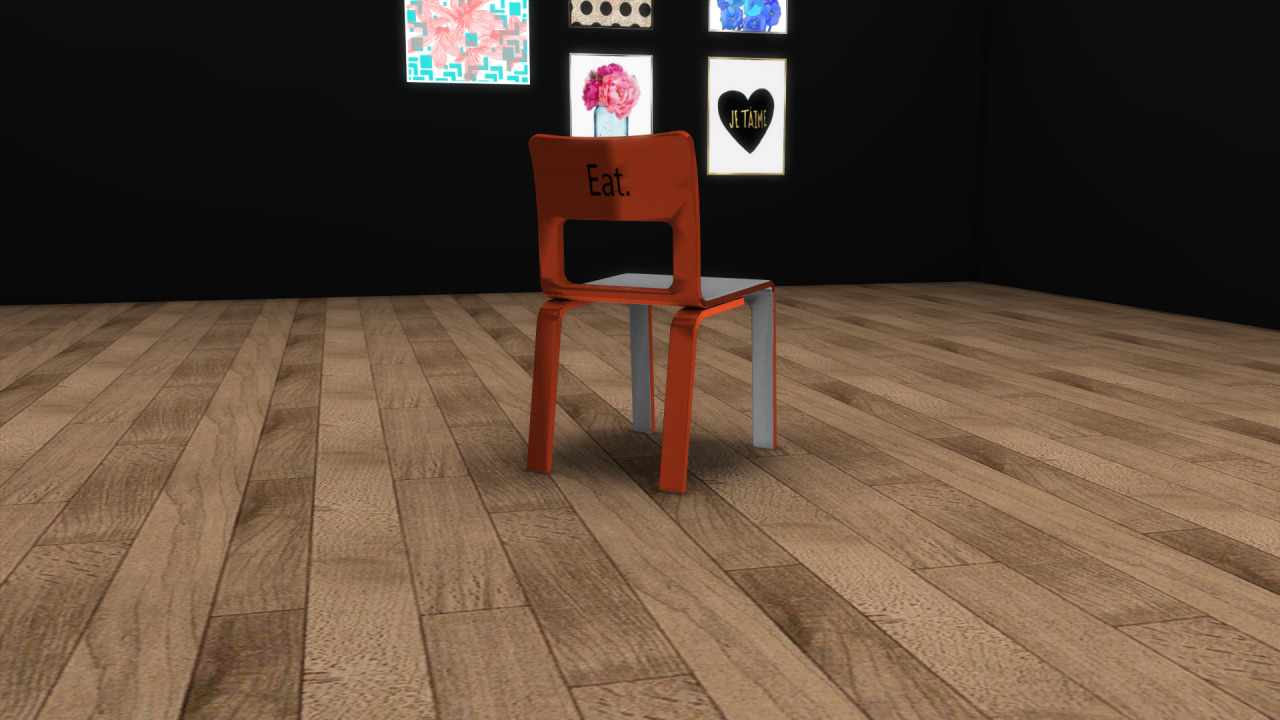
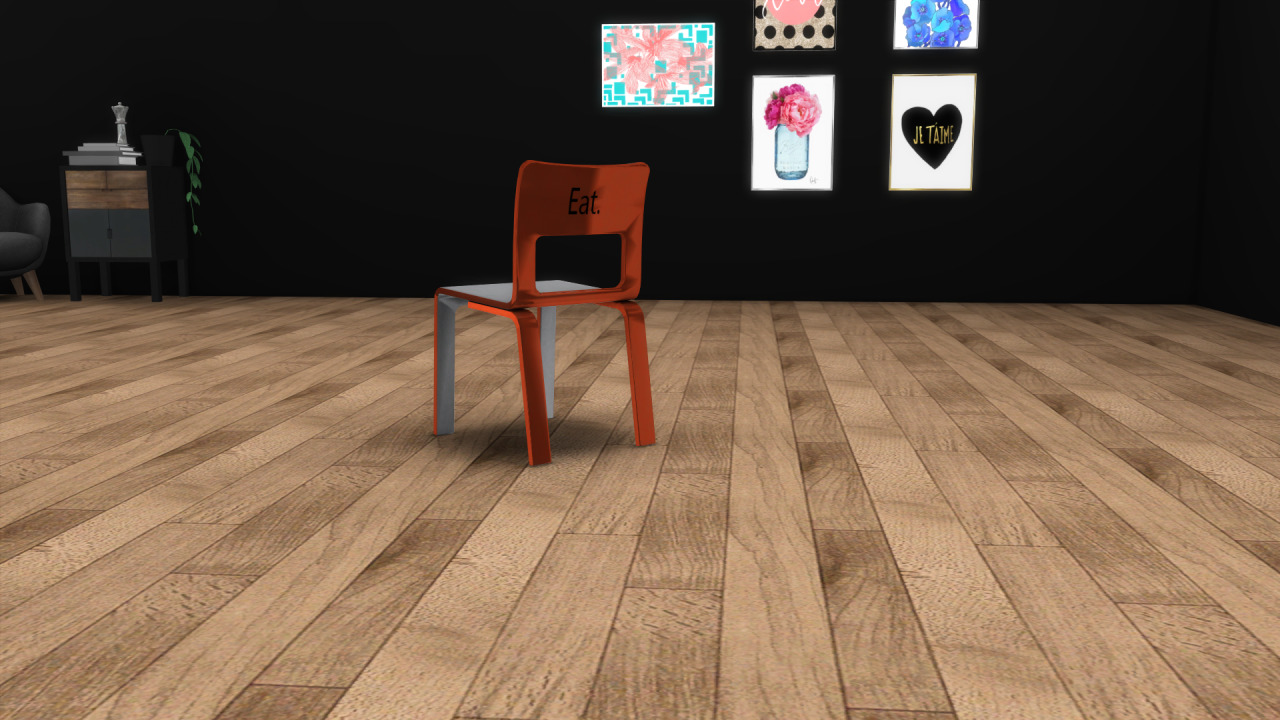
  Can anyone help me and explain where those shadows on the back of the chair came from, and how do I get rid of them? This is a conversion from TS3. Does this mean I have to do something with the texture in Blender? Im really lost so any direction is appreciated. Thanks!! |
|
|
|
Post by nikadema on Oct 7, 2016 13:38:37 GMT -5
Go to your blender menu and in edit mode, hit "edge split", on the modifiers menu. Hope that helps!
|
|
|
|
Post by Sympxls on Oct 7, 2016 15:00:24 GMT -5
Thanks for the help Nikadema, but that did not work :((
|
|
|
|
Post by adelin4504 on Oct 7, 2016 15:42:36 GMT -5
The chair is glowing too much. i think its the game :D
|
|
|
|
Post by Mathcope on Oct 7, 2016 15:52:11 GMT -5
I would bet is a normals issue too. Did you apply the edge split modifier as nikadema told you? Did you hit the apply button, save and re-impor to studio? If that didn't work it must be something else. It's hard to tell if you don't post the files though. If you can post the .package and blend file for someone to take a look.
|
|
|
|
Post by Sympxls on Oct 7, 2016 19:28:06 GMT -5
okay, I applied the split edge modifier again. going in game again to test. wish me luck. I'll be back soon with an update  |
|
|
|
Post by Feyona on Oct 7, 2016 19:34:20 GMT -5
Sympxls check this thread where Inabadromance explained how to check in blender what your mesh will look like when you import it in Studio (if that shadow related to the mesh). It helped me.
|
|
|
|
Post by Sympxls on Oct 7, 2016 21:36:28 GMT -5
I took it in game and it still looked the same. followed the above mentioned thread (thanks Feyona !) and split the edges following that tutorial and now my vertices count has more than tripled since the orig converted mesh from 5639 to 19197!!!! I am super scared to even take it in game now! Im scared to go any further and muck it up even more :(( where did I go wrong? :'( link thats everything in that folder. orig ts4 mesh, blender meshes, s4s package file, etc. the whole shabang. The high LOD is the only mesh I imported on that saved s4s package file because I was afraid to go any further...... |
|
|
|
Post by Feyona on Oct 7, 2016 21:52:36 GMT -5
Sympxls I found 2 meshes with 19987 vertices. Do you have the old one before splitting the edges? I don't really work with objects, more with CAS accessories. And I split edges manually by clicking on each and choosing mesh -> edges -> split edges while viewing the mesh with the settings from Inabadromance's post.
|
|
|
|
Post by Mathcope on Oct 7, 2016 22:05:58 GMT -5
That's not really what should happen at all. If you split the edges you would get a bit of increase in the poly count but that many is just not right. You must've done something wrong. As Feyona said, post the original files and so we can see it better.
And, as a sugestion, 5636 poly is actually still high for a normal chair...
|
|
|
|
Post by inabadromance on Oct 8, 2016 0:32:32 GMT -5
hi! i checked the download folder and.. i'm only seeing 3 .blends. One of a EA chair (i assume) and 2 identical blends of your chair.. i'm not really sure if i'm seeing it correctly. I tried this on both of your .blends.. and when i change to solid, smooth edge to check how it looks.. it doesn't change, meaning that those 2 settings are already on, and i don't see any shadow/light issue with it. If the mesh had that issue, you would have noticed it right away by now. Unless the original mesh you're showing on the first post isn't on the files? What i did noticed is that both bump and specular in your package are exactly the same. That shouldn't be that way. the bumpmap (BD3D97D4BC076C7F) is composed of a grey-ish layer and ligther grey alpha channel, and you're using the same texture from the specular. I would suggest you looking at the original item you cloned and exporting it's bump map to see how it should be. Also, i would highly suggest changing the names of the groups for the original ones such as s4studio_mesh_0, 1.. and so on. On the object data tab, remember to change uvmap for uv_0. That sometimes screws up the way the game reads the textures. |
|
|
|
Post by Sympxls on Oct 8, 2016 9:41:37 GMT -5
I labeled the blender meshes the way they were because that is what worked for me and I apologize for not explaining my reasons for naming them the way I did. 1.blend is the mesh I would import into S4S and s.blend is the shadow mesh. That is what works for me. Sorry if it confused anyone. The original mesh I showed on my first post was in the files. I know the shadows weren't showing in blender or S4S, but when you took the mesh in game, the shadows on the texture were there, as shown in the picutre. I started over from scratch. Used the multiplier from TS3 (which was the same as the bake.png I had created when I baked the mesh in blender even before posting on here) as the bumpmap. In my defense, I used the TS3 spec map for both the TS4 spec map and bumpmap because I'm a total noob and really had no idea of the difference until now. Used the orig spec map from TS3. Went in game. The shadows on the mesh were gone!!! Thanks inabadromance! But now the mesh was super shiny, so I replaced the TS3 spec map I had previously saved the package with, with the orig cloned mesh's spec map, and going back in game, it was less shiny, but still shiny nonetheless. How do I get rid of that shine all together? Cause I hate it. lol |
|
|
|
Post by adelin4504 on Oct 8, 2016 11:54:07 GMT -5
|
|
|
|
Post by Sympxls on Oct 8, 2016 12:24:07 GMT -5
yes I did, using both spec map from TS3 mesh and the orig cloned meshes spec map, and both options leave the new converted mesh shiny....
|
|
|
|
Post by Mathcope on Oct 8, 2016 12:38:12 GMT -5
You can't use the specular from Sims 3, you need to make your own for TS4, as it works different. Read the tutorial adelin linked to you.
|
|