|
|
Post by ciablue on Dec 25, 2016 19:03:56 GMT -5
 I done goofed again. For some reason the belt of my current project is superimposing itself into the tops that I put on with my new skirt.  honestly I wouldnt mind so much if not for the buckle. XD |
|
|
|
Post by Mathcope on Dec 26, 2016 1:33:17 GMT -5
This is most likely to be a UV mapping problem. The place in the UV where you mapped the belt is probably interfering with the uv of the top. If you don't know what I mean post the .package and someone can give you further help. |
|
|
|
Post by ciablue on Dec 27, 2016 8:52:03 GMT -5
Okay Im trying to make a sort of warp around skirt that I want to be able to use over other base clothing. Im hoping to end up with somthing like this.  I extruded the interior of the skirt in order to make it visible. But the skirt adopts the the color and texture of whatever is worn with it.   How do I make the skirt hold its own colors and textures? Or is this not possible? |
|
|
|
Post by Mathcope on Dec 27, 2016 13:02:19 GMT -5
You would have to edit the uv map of the skirt. If you take a look in the uv editor in blender, the uvs (pants and skirt) should be overlapping. You must get one of them and move it somewhere else. Then edit the textures also. If you need more info post the .package and .blend file, so I can get pictures from the project.
|
|
|
|
Post by ciablue on Dec 27, 2016 17:11:33 GMT -5
Hiya Math!Thank you for the quick reply. The wrap skirt inst part of the jumper at all. I just added the picture to show what I had expected it to look like when done, versus what I ended up with. Now Im thinking that if I append the skirt to a nude bottom that may solve my issue. lol Dunno, just taking stabs in the dark here I edited my UV, removing the top of the dress, the sleeves, the skirt cap and the belt. My hope was that I could solve belt placement problem by painting the belt on the skirt. But the outline of the original belt still shows up on the skirt, even though I removed it from the uv and edited out of the layers. Below is a picture of the edited texture.  Im including my blend with this post. Wrapskirt Blender File |
|
|
|
Post by Mathcope on Dec 27, 2016 18:19:35 GMT -5
Sorry, I think I just realice what you're trying to do. I though the skirt was part of the first post picture outfit. However, the solution I told you is still the same. The thing is, EA has a single "composition image" for ALL the CAS items that you could have. This means, ALL the textures of the items your sim is using are mapped into a single image. EA follows a pattern in their items and they texture them in different areas of a template. This single image has an area assigned for each type of item. For example, you have a place assigned to the body (Top or bottom parts), other for the shoes, other for the earrings, other for the hats, and so on. There's also a place called "Extras". This is used for tops, bottoms, and shoes extras that doesn't fit in the regular area. Currently, your skirt texture is mapped inside the bottom area. And as every bottom in the game is mapped in that area, you can't use both items at the same time without overlapping the textures. This also goes to the belt texture. It is mapped in the "extras" for the tops. So every top that uses extras will overlap textures as well. This method EA decided to use for TS4 has its limitations. Although It helps with game performance, give us creators a more limited place to work. There's a template to follow these areas when created. You can dowload them and use them in blender when looking at the uv map. HEREThe "solution" I can find for this is to scale down your skirt uv map and move it to the "extras". However, you will have conflicts with items that use that areas, so you would have to play around with it. Also, since youre scaling down the texture, the quality will drop too. I don't make to much of complex CAS items to know a lot about this topic, but you can also open other creators projects and look where they place the UV map. I know there're some clothes as "accessories" and works for most combinations. (I assume you try to make it as accessory, since the mesh has no body) This is how the uv looks like. (You can see the conflict in the areas) 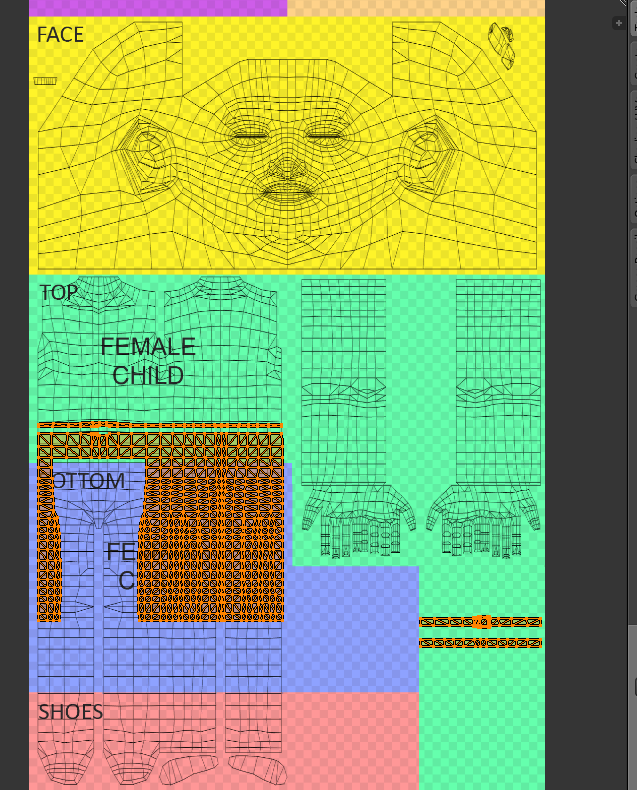 |
|
|
|
Post by inabadromance on Dec 27, 2016 18:21:02 GMT -5
hi! in the blend that you shared on your last reply has the belt UV mapped on the extra parts (which corresponds to the bottom right space on the sim texture. That space is usually used to map tops, such as the one you're using, shirts (collars) and hoodies. Also, the wrap is mapped on the bottoms part which will override any of the bottoms. If you're planing to use your item as an accessory (which the cut number should be 0000 not 0004) then you should move the uvmap from both skirt and belt to somewhere else. Or it will override other textures. there's no much space left.. but other accessories. EDIT: loooool you beat me for 1 second. literally XD cc Mathcope |
|
|
|
Post by ciablue on Dec 28, 2016 8:21:03 GMT -5
Thank you guys! Ina I thought that covering the belt on the texture was enough. I have since moved it on the UV and my edit is not showing perfectly! (Never occured to me to even check the UV I thought Id dont something wrong in a layer edit somewhere) TY TY I will try the shrinking method Mathcope suggested first. Though Ive NO idea where in the world Im going to try to put it. lol |
|
|
|
Post by ciablue on Dec 28, 2016 10:48:50 GMT -5
Guys how do I download the UVmaps so that they are the proper size? I just saved the image and opened it in blender. I think maybe thats not right though |
|
|
|
Post by inabadromance on Dec 28, 2016 11:39:03 GMT -5
hi! Yes, you open the image on the UV screen and then select the mesh by hovering the body and pressing A. The uv should appear on the image you imported. |
|
|
|
Post by ciablue on Dec 28, 2016 18:53:20 GMT -5
Thank you inabadromance I was able to import the uv chart. Once I had I decided to try and put the wrap in the Hat area. I changed the sort layer to reflect HAT.  Saved package And can't find it in game at all. I did change the skirt from geom.004 to geom.000 in blender. Im thinking maybe I shouldnt have done that XD |
|
|
|
Post by inabadromance on Dec 28, 2016 19:10:28 GMT -5
I wouldn't recommend changing your package but re cloning a new one. starting with a bracelet acc (then change to hat on the cas part in the warehouse). also you'll need to change the region map to "base".
remember that Sims can't use hats while wearing your clothing.
if you're not planning on doing patterns and only solids, you could maybe choose a smaller space.
|
|
|
|
Post by ciablue on Dec 29, 2016 8:51:11 GMT -5
inabadromance So I should import my skirt over a bracelet mesh? Or am I understanding you wrong? Also the upper arm areas from the dress refuse to go away even after I deleted the mesh groups associated with them. As a result I have these weird squares on my arms when wearing a sleeveless top with the wrap. The squares remained even when I saved my edit over a different basegame skirt.
|
|
|
|
Post by inabadromance on Dec 29, 2016 13:09:59 GMT -5
The problem you're facing is because you can't delete geometry via blender. If a package has 4 groups, then the mesh you should import have to have the same exact groups so each of them get replaced and imported correctly. By you importing a blend with only 1 group being 0004, then only that group will be imported leaving the rest untouched.
Export the blend of a bracelet and you'll see 1 group (0000). your blend has to match this exactly to be imported correctly.
|
|


 I done goofed again.


