|
|
Post by Saph on Oct 29, 2022 14:04:28 GMT -5
Good evening everyone,
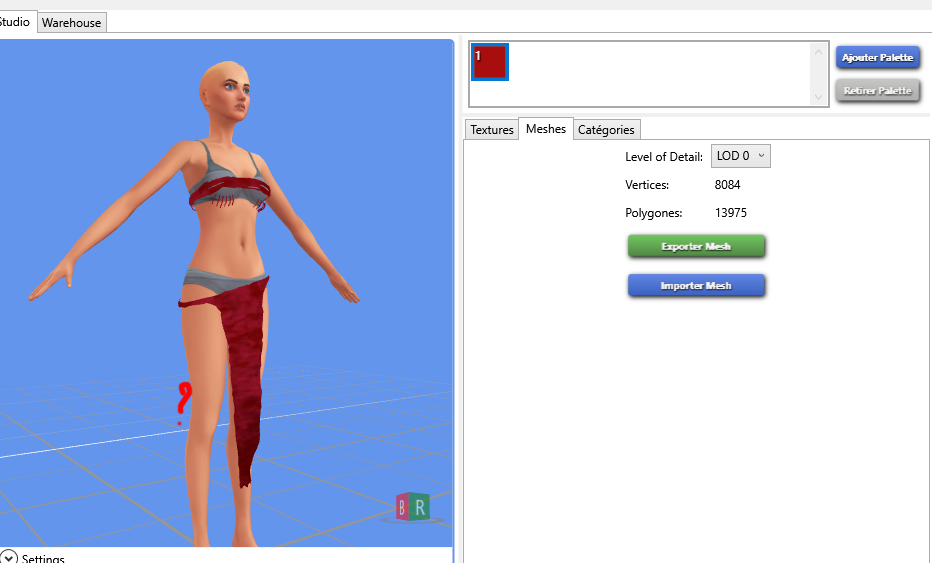
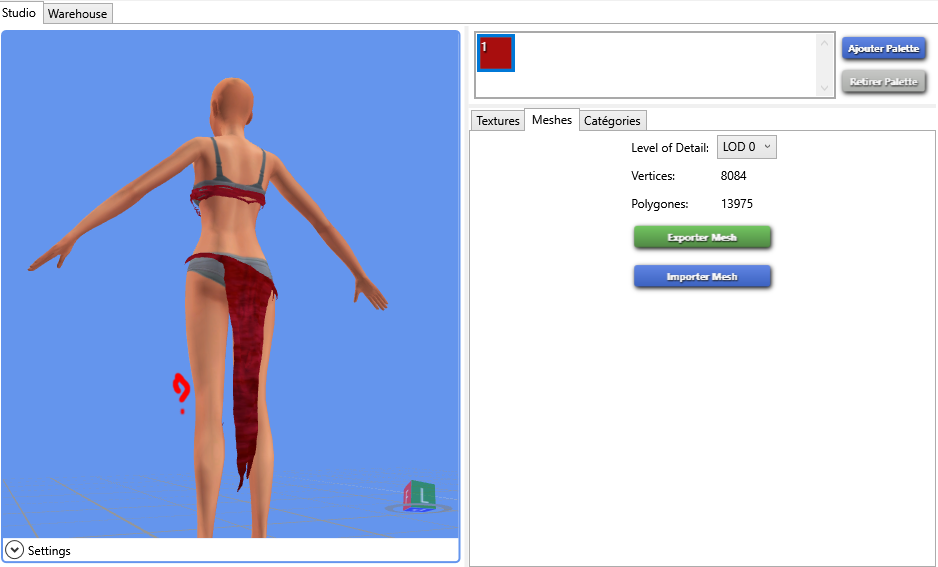
I'm having a transparent issue with all my loinclothes conversions. Let me explain : The front is showing while the back is invisible, and when I turn the sim so the point of view is from the back it is the opposite (back showing and not the front)
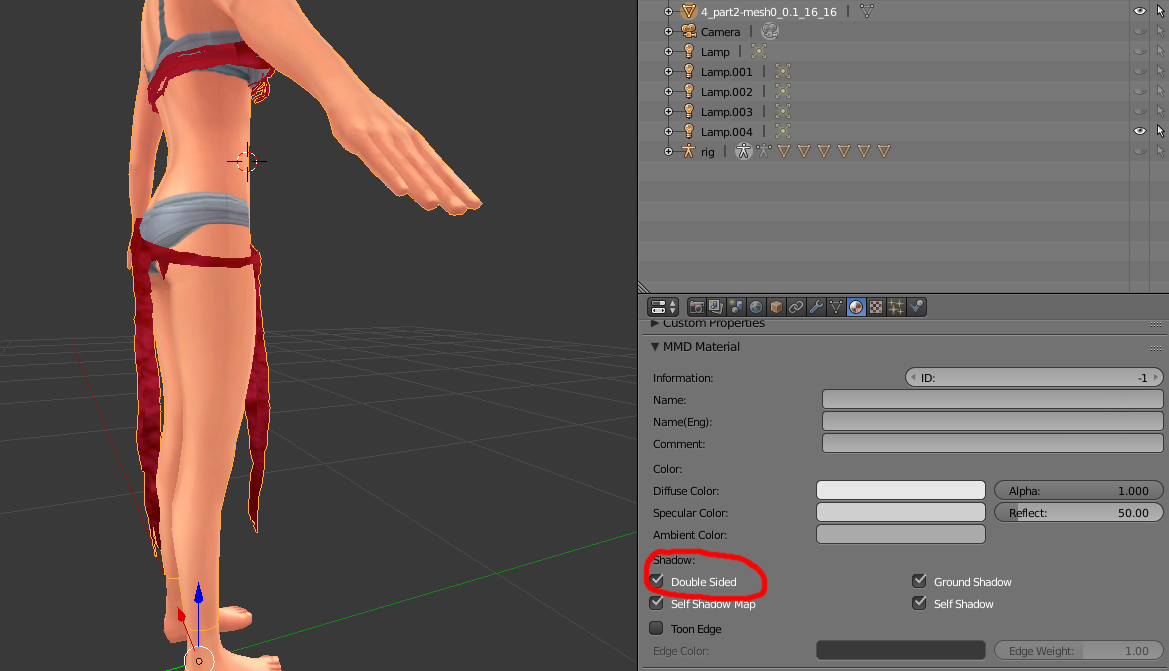
I've found how to fix it in blender by enabled "Double Sided" In Shadow Section but nothing changing in the game.
Screens :
|
|
|
|
Post by mauvemorn on Oct 29, 2022 15:02:17 GMT -5
Hi. You need to add the other side manually only in places where it is visible
- select those areas of the mesh that are visible from the other side;
- press Shift D to duplicate, then Esc to confirm. If my memory serves me well, to the right there will be a field called Offset. If yes, enter -0,0002 there;
- if no, press Alt S and type -0.0002 or something like this. The point is to move the duplicated geometry a bit away from the original;
- with duplicated areas still selected, Mesh - Normals - Flip normals
|
|
|
|
Post by Saph on Oct 29, 2022 16:06:06 GMT -5
Thank you for answering.
My bad I forget to say I'm an absolute noob, this conversion is only the third I made in my life.
So would you give a little more detail or step by step, I'm completely lost, only understand that I have something to duplicate =)
|
|
|
|
Post by mauvemorn on Oct 29, 2022 16:42:20 GMT -5
Without the blend file I cannot give a clearer response, upload it on the file sharing website like mediafire and share a link with us
|
|
|
|
Post by Saph on Oct 29, 2022 16:56:57 GMT -5
|
|
|
|
Post by mauvemorn on Oct 30, 2022 5:50:46 GMT -5
It is best to re-do everything  - if you were to zoom into the breast area, you'll notice that the maxis mesh you're using as a body has a sculpted edge of the swimsuit. It is best to replace the body. In uv editor enable sync, select the uvs of the garment, Select - Inverse. In 3d view press Delete, choose Faces. Rename the remaining mesh to Garment; - you need to transfer the data from a reference that is similar to yours in shape. There is obviously nothing like that in-game but the skirt must behave like a skirt, so you can clone a long dress and transfer all data from it. Clone yfBody_DressMaxi, for example, export the blend, append all parts of it into your scene. Join all parts of it into one, rename to Reference; - transfer weights, uv_1 and vertex paint with the following settings, then delete the reference    - the uvs in uv_1 are in the space meant for shoes, so you need to move them away and re-do the textures, otherwise they will conflict with shoes. When you will assign that texture to the background, you will notice that the uvs stretch vertically. These uvs were generated in the square uv space while ts4 cas textures are rectangular. So you need to shrink the garment's uvs to the original size with S Y 0.5. Bigger uvs = better texture quality, so you want to utilize the available texture space more efficiently. However, it is best to avoid the bottom right corner because people tend to put everything there and you end up with CAS full of items that cannot be used together; - expand the rig, make "top" and "bottom" visible and selectable. Select "top", in 3d view press Shift D, then Esc. Do the same with "bottom". Select top.001, shift-select bottom.001, join with Ctrl J. Switch to Edit mode, select everything with A, Remove doubles. This is the body now. Normally you'd need to delete the areas of it that are covered by the garment, but in this cases there's nothing to delete, so just leave it as is; - so now that the garment is fully adapted, you can add the inner side. If you were to look at your garment from all angles, you'd see that the inner side is only needed in the skirt area, anywhere else it will not be visible. So in Edit mode disable Limit selection to visible, press B, click and drag to select the skirt. Then press Shift D, then Esc. Press Alt S and type -0,0002, then Mesh - Normals - Flip normals; - now select the body you made earlier, shift select your garment, join them in this order. Assign cut 0000; - clone yfBody_DressPanels, import the blend there |
|
|
|
Post by Saph on Oct 30, 2022 8:10:35 GMT -5
|
|
|
|
Post by mauvemorn on Oct 30, 2022 12:46:29 GMT -5
The last big one, starting from « so now that the garment is fully adapted, you can add the inner side. » no point in doing it from the beginning if you’ll have to remake everything because it does not behave right in-game
|
|
|
|
Post by Saph on Oct 30, 2022 13:46:07 GMT -5
Sorry my mother tongue isn't english, I think I misunderstood something
"no point in doing it from the beginning if you’ll have to remake everything because it does not behave right in-game" are you saying that the behaviour problem is the whole process of how I do my conversion ?
|
|
|
|
Post by mauvemorn on Oct 30, 2022 14:57:27 GMT -5
What I mean is that in the file you shared originally there are problems that you will have to fix after you’ll see them in-game. The mesh will move and morph in a jagged way and conflict with shoes. So there is no point in starting by adding the other side when you will have to re-do everything anyway.
|
|
|
|
Post by Saph on Oct 30, 2022 15:18:14 GMT -5
Ok, and what is making the mesh move in a jagged way is because I choose a swimsuit and not a dress and the shoes conflict is caused by the bad placement in the uv map, is that correct ?
|
|
|
|
Post by mauvemorn on Oct 30, 2022 15:52:57 GMT -5
Morphing in the crumpled paper kind of way: choosing the default setting instead of Nearest Face interpolated when transferring uv_1;
No smooth movement between the legs: the wrong reference;
Moving not as smooth as it could be + some distortions around breast when using breast sliders: using the default settings instead of Nearest face interpolated when transferring weights;
Being affected by calf sliders: skirts should be vertex painted with two colors;
the garment’s textures on shoes or vice versa: uvs in the wrong place in uv_0.
|
|
|
|
Post by Saph on Oct 31, 2022 2:34:27 GMT -5
I see,is there somewhere a tutorial that show the things you are talking about ? The one i'm following don't talk about all these details that make my conversion goes wrong, and i'm not experienced enough to achieve it without visually seeing how to do it
|
|
|
|
Post by Fwecka (Lolabellesims) on Oct 31, 2022 4:20:53 GMT -5
Saph, I have one in my signature that will help. It's what I learned from Mauvemorn and it's for Marvelous Designer meshes but you don't have to use a Marvelous Designer mesh, of course. I'll explain a few things. 1. Topology is important because it affects the weight paint. Clothing undergoes a lot of animations in the game and if the weight paint is sloppy the clothes will not animate well. Here's the difference between bad topology and good topology. Look at how nice the lines look in the image on the right.  The topology of your mesh is bad and the weight paint looks choppy. Compare an EA skirt's weight paint to yours and you'll see what I mean. 2. The uv_1 map and vertex paint are responsible for how the CAS sliders work in-game. If they aren't done correctly the mesh won't morph smoothly. 3. Flowing skirts must be vertex painted in a certain way--the bottom of the skirt will be a different shade of green than the top of the skirt. Any fabric that fits tight against the sim's body must morph with the body. The bottom of a long skirt will not morph as much because that part of the skirt isn't tight against the sim's body. To see this for yourself put a long skirt on a sim in CAS and play with the sliders. You'll see that the hips can morph a lot but the bottom of the skirt doesn't morph much at all. 4. Your mesh has too many polygons. Clone an EA dress and look at how many polygons it has. You'll see the polygons are about 5,000 faces while yours is around 10,000 faces. Normally, I prefer dissolving edges when (X > dissolve edges) when reducing the polycount but this is difficult to do when the topology is bad. The decimate modifier can be used but it'll ruin your topology. 5. To reduce the polycount (when the topology is good) press T to open the side panel, enter edit mode, press A to select everything, alt + J to turn the tris to quads. In the side panel, put a checkmark next to compare UVs. This way your UV layout won't be messed up. Switch to edge select then hold alt and select edge loops, X > dissolve edges. Hold shift + alt to select multiple edge loops. Dissolve as many as you edge loops as you can. 6. If you convert the second dress you'll want to bake the texture from its old UV layout to a new UV layout. Here is how it's done. |
|
|
|
Post by Saph on Oct 31, 2022 4:55:23 GMT -5
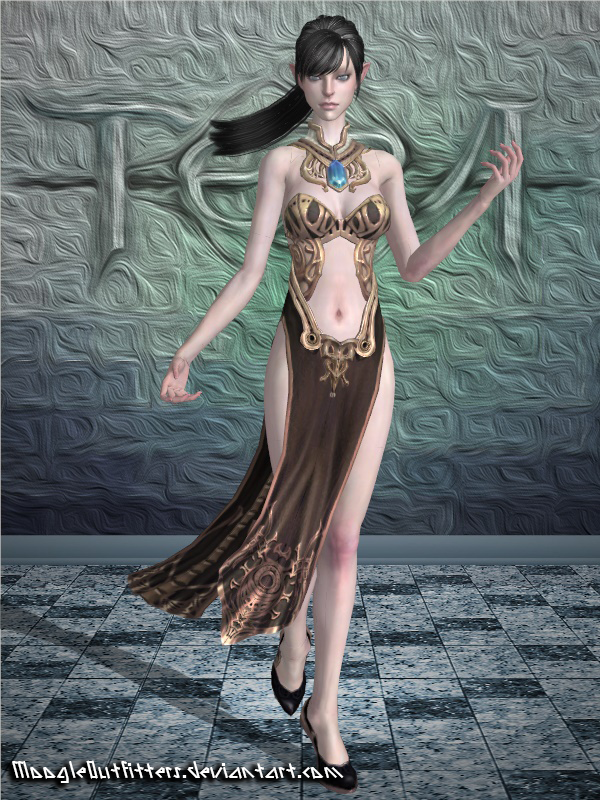
Yeah, the good one look very satisfying, so it was finally what mauvemorn talked about when she asked to re-do everything, I didn't create this clothe, I was trying to convert it from his xps form : www.deviantart.com/papkapapka/art/Red-Goddess-with-dress-Agony-747322202 so it was this way anyway. I confirm it really looks bad in-game except if the sim don't move at all lol. So does your tutorial will help me in this situation knowing I don't do my clothes myself but they are only conversions ? Thank you so much both of you for giving me your time teaching me, hope i'm not annoying  |
|