|
|
Post by Renorasims on May 23, 2017 13:13:31 GMT -5
Delete the bottom part and then extrude it inside to close it. I can explain more if you don't know how to do that. Hi haya194Thank you for your fast response!  If you could...  I would be very grateful! I tried with E first selecting faces but don't know how to get them towards the middle  |
|
|
|
Post by Renorasims on May 23, 2017 10:58:54 GMT -5
Hi Everyone, I'm having a 'poking vertices' problem and i'm not sure how to fix it. I think it's because of the weight paint not being in the middle of the circle. (if needed: here is the package file)   I appended the new mesh (part from a BG dress) to the nude-top but later added the bottom part of the dress to prevent the see through effect when looking at it in a certain angle. How can I weight paint this part of the mesh? I vertex painted the new mesh into the color green of the nude top so that should be OK right? |
|
|
|
Post by Renorasims on May 13, 2017 11:07:48 GMT -5
When Studio exports a CAS item to Blender, it instructs Blender to add certain rig parts to the scene. The parts Blender will add are those parts that the item you're exporting does not have. So for a full body outfit, Blender is going to display the feet, head, and teeth. To get a top in there, you can append the nude top. Hi Orangemittens! Thank you for your reply! I'm finding it a bit difficult to explain what's going on (english is not my native language). I thought that it would be a problem if the arms and torso can get selected like that, when i start UV unwrapping the new mesh. But I see that all tops work like that... after importing a few others  . So if I understand what your saying; blender does not import the 'top' part of the rig (in the case) because technically there's nothing missing? I appended a nude top in a previous state but that did not add a top part to the rig. which I can only explain because my mesh already has a torso and arms, so no top part of the rig is needed? I wanted to know because I need to unwrap the new mesh and I wanted t make sure I did it right before I start with the whole UV unwrapping part of creating |
|
|
|
Post by Renorasims on May 9, 2017 12:48:19 GMT -5
Currently I have time to learn meshing so I might post more often . I'm separating the vest of a BG full body outfit and want to make it function as a accessory. Just as I was ready to start UV mapping the new mesh I noticed that my rig misses the 'top' category. I didn't noticed until now because when working on it, I do see the top of the mesh (because I chose the Nude top). So for this whole day I thought nothing was missing. Until I figured that her chest and arms shouldn't get selected when selecting the mesh...  I looked trough the steps of this tut and saw that inabadromance did not miss the 'top' part of the rig. I figured it had something to do with me choosing the nude top (I thought this suited better, bc it's going to be an accessory ).  I made a new package file (create 3D mesh) and headed over to step 18 (where you can see her complete rig, see above) with another BG full body outfit. I exported mesh , opened it in Blender to check and again, no 'top' category in the rig...   Just to make sure it's not that particular BG full-body outfit I took the outfit inabadromance used from Get to Work... Still no top part. Did the same thing with another top that has a mesh rather then painted on t see if this maybe made a difference but yet again not 'top' category in the rig .  Soo... I'm a bit lost right now  When exporting the mesh from S4S to Blender the 'top' category from the rig does not seem to be in the Blender file. I haven't changed anything in my Blender settings, not sure if this can cause that though. I use Blender 2.78 and S4S Harmony 3.0.1.3. Hopefully you guys know what's happening. I haven't figured it out yet so if anyone knows something all help is very welcome! |
|
|
|
Post by Renorasims on May 7, 2017 15:20:31 GMT -5
Currently I have time to learn meshing so I might post more often . I'm separating the vest of a BG full body outfit and want to make it function as a accessory. Just as I was ready to start UV mapping the new mesh I noticed that my rig misses the 'top' category. I didn't noticed until now because when working on it, I do see the top of the mesh (because I chose the Nude top). So for this whole day I thought nothing was missing. Until I figured that her chest and arms shouldn't get selected when selecting the mesh... I looked trough the steps of this tut and saw that inabadromance did not miss the 'top' part of the rig. I figured it had something to do with me choosing the nude top (I thought this suited better, bc it's going to be an accessory ). I made a new package file (create 3D mesh) and headed over to step 18 (where you can see her complete rig, see above) with another BG full body outfit. I exported mesh , opened it in Blender to check and again, no 'top' category in the rig... Just to make sure it's not that particular BG full-body outfit I took the outfit inabadromance used from Get to Work... Still no top part. Did the same thing with another top that has a mesh rather then painted on t see if this maybe made a difference but yet again not 'top' category in the rig . Soo... I'm a bit lost right now When exporting the mesh from S4S to Blender the 'top' category from the rig does not seem to be in the Blender file. I haven't changed anything in my Blender settings, not sure if this can cause that though. I use Blender 2.78 and S4S Harmony 3.0.1.3. Hopefully you guys know what's happening. |
|
|
|
Post by Renorasims on May 7, 2017 11:43:42 GMT -5
I don't think there is a way to mirror part of the mesh with mirror modifier, I don't see an option to mirror by vertex groups. But you can mirror selection by duplicating it (Shift+D or Mesh -> Add duplicate). After this you will need to mirror duplicated part by x axis by pressing Ctrl+M and X. Before mirroring duplicated part you need to make sure that pivot point set to the center of the mesh, and not somewhere on the sleeve. For this you need to press Ctrl+C (this will set cursor to the center of the mesh). After setting cursor you need to set pivot point to cursor (see the picture). 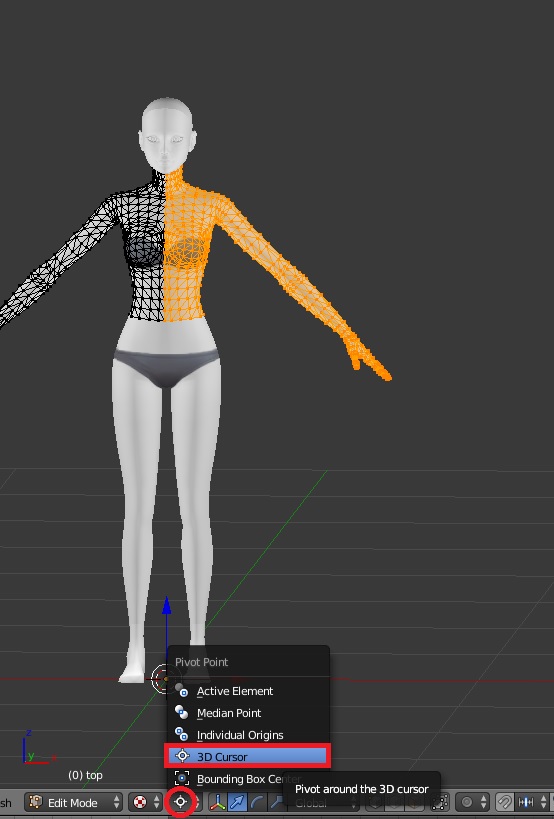 When I mirrored selection, I noticed that normals got flipped. I have no idea why it happens to be honestly. If it happened to your mesh, you need to recalculate normals. 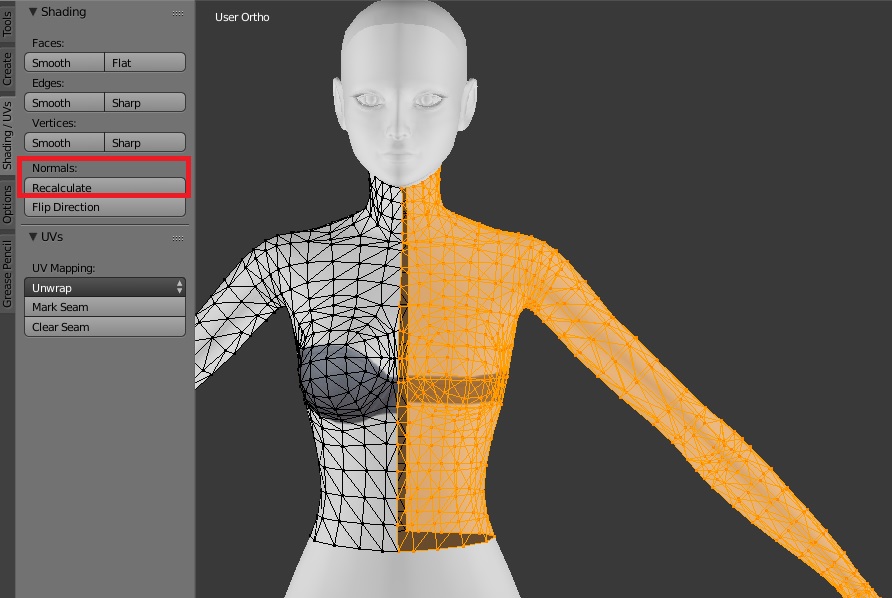 Hi Feyona! Thank you for your pointers!  I removed half of the mesh and set the pivot point to center and then applied the mirror modifier. It's worked! Only got a message in the command line of the blender screen that said; Applied modifier was not first, result may not be as expected which I didn't fully understood Since the mesh looks fine and also in S4S nothing seems off. But anyway it works :D! Thank you!!! EDIT: I think the command line message appears because the geom skin modifier was first, not sure though. |
|
|
|
Post by Renorasims on May 6, 2017 11:32:32 GMT -5
Hi There! I looked through some tuts and searched the forum on this but only came to some seam topics which is a whole other subject. Hopefully you guys can help . I'm creating a new toddler top from a existing mesh (toddler dress with puffy sleeves) and thought that it might be a good idea to use the Mirror Modifier tool in blender to be sure of symmetrical sleeves.  I thought that if I box-select the area that i want to mirror it might work but unfortunately it also creates a mirror of the other parts of the mesh. That's what I think... because the circled areas flicker on the screen.  Is there a way to only mirror the selected part of the mesh? Or do I always have to chop the mesh in the middle and mirror it then? Good to know for the future!  I was actually almost done but then realized the flickering images might indicate a whole mirror instead of partial. Rookie mistake |
|
|
|
Post by Renorasims on May 4, 2017 16:19:00 GMT -5
EDIT: Figured it out I think, I used append mesh instead of object. Now I have the dress in the top file so I'll work further from there and hope I don't stumble into more hiccups. If I do I'll repost here so that someone else might have some help with that too I've sorted through the comments of this tut here for an answer my question but only came to the conclusion that I am not the only one with this question So that gives me some sort of relief haha. Anyway; I am trying to make the toddler dress into a top. unfortunately I got a bit stuck. It does not have a 'bottom' part of the rig, so if I start shortening the mesh she won't have legs.  How can I get this part of the rig into to my dress file? Or do I need to append the mesh of the dress into the top blend-file? Which I've tried but did not work... which is more of a indication that I'm doing something wrong I guess XD. 
|
|
|
|
Post by Renorasims on May 3, 2017 9:38:38 GMT -5
There is a tutorial HERE showing how to do this and the item should be made as a selective clone Hi orangemittensThank you so much  , I was searching for the wrong thing overthinking it and making wayy more complicated that it really is... Thanks again and sorry for this! |
|
|
|
Post by Renorasims on May 2, 2017 12:14:02 GMT -5
Hi Everyone I just made a recolor of the fireplace that came with the vampires GP but unfortunately it does not work with the wonderful slots override that orangemittens made. Is there a way to make my recolor 'use' the override file from OM rather than the EA original? I looked at it myself (opened the override from OM in studio to see if there is anything I need to copy to my package file, looked over the forum, etc) but I'm not at a place yet where I know a bit about modding. I'm still in the whole meshing/recolor fase so...  Hopefully someone here knows! Thank you in advance! |
|
|
|
Post by Renorasims on Mar 28, 2017 4:31:21 GMT -5
This is great info! I was stuck on the importing other LOD's part (no mesh appeared in S4S) this helped me a lot!!! Thank you |
|
|
|
Post by Renorasims on Mar 26, 2017 14:29:09 GMT -5
Well i don't really know. Have you done it before or it's the first time? here's a video.. maybe you're missing some step. Hi Dear! ☺️ I just really needed to let you know that I just had a really dumb blond moment over here😳☺️🙈... When I just started with Blender I really hated the way the left and right mouse button are 'reversed'... so... I changed that in the settings (the interface settings that blender kind heartly saves for you after un-installing and re-installing☺️ how thoughtful...) This is the only thing I can think of that could have been the cause cuz I changed it back to default settings and tried again and VOILA! I feel like a complete idiot 😂🙈 Luckily my post over at Blender was still in draft mode 😂🙈... Gonna watch that anyway all help is ALWAYS welcome! |
|
|
|
Post by Renorasims on Mar 26, 2017 6:57:01 GMT -5
hi! I downloaded the .blend file and right click in object mode to the right side, left side and booties. Then press ctrl+J and joined just like it should. The join tool only works while in object mode. If it doesn't work for you, then you might have a problem with blender. Have you try re-installing it? Hi Thank you so much for responding! Okay... then it's going to be much more complicated than I thought... I just tried to do the exact same thing as you did (after re-installing Blender). I use windows for S4S and Blender. So I also installed Blender in OS to see if the joining meshes works there but unfortunately it doesn't  . Thank you for taking a look at this! I know now that its not the files or anything like that. Hopefully someone at the Blender forums knows the issue otherwise it would be really hard to start meshing... |
|
|
|
Post by Renorasims on Mar 25, 2017 15:07:26 GMT -5
Since I think it's a more sims related blender question I'd like to try one last time here before I head back to the blender forums. To avoid a lot of explaining background info at Blender forums. I'm running into the same issue with creating a necklace now... the whole ctrl + J function isn't working in edit/object mode and I still have no idea why...
See message above for package files.
|
|
|
|
Post by Renorasims on Mar 14, 2017 9:19:13 GMT -5
Hi Everyone , I'm needing some help with my first frankenmesh. I know this probably isn't the easiest one to start with but I really would like to finish it (we just need more wedges!) with some pointers from anyone who is familiar with the process and blender. I'm trying to create more MM wedges so I took the upperpart of some BG booties (S4S name: AnkleBootsCuffed_Saddle) to put on top of some GTW wedges (S4S name: BootiesWedge). The base-mesh is the GTW Sandal which has the same vertex groups except the B_R_tightwist. The BG boots have that vertex group so I added that one to the base-mesh so that the joining of the now three separate meshes (upperpart left, right and the base-mesh) would run smoothly. I added the meshes upper part left and right through file -->append. I selected through LMB-Shift first 'right' then 'left' last the 'booties' layer in Object mode ctrl - J voor join.  Unfortunately this doesn't work. I've searched long and hard on many sites (from blender artist platform to other forums) but can't find the reason why these meshes won't join. So... I'm stuck Could anyone help me out with this? Reason why I'm making this new set of wedges this way is bc the mirror modifier function does not work well for making shoes. There will always be one of the shoes that does not fully connect to the leg. I've searched the forum here a bit and saw some posts a about this. I'm taking this one step at a time, after pasting the upper part UV mapping is next. I saw a lengthy tutorial about here but for now i'm not even going to get there due to this issue. Can somebody tell me what I doing wrong? Your help means a lot! I'm still learning and very grateful for any pointers! Here are the blender & Package file. Package is just the plain GTW boots, nothing has been done with it yet (just mesh extraction). |
|


 If you could...

 . So if I understand what your saying; blender does not import the 'top' part of the rig (in the case) because technically there's nothing missing? I appended a nude top in a previous state but that did not add a top part to the rig. which I can only explain because my mesh already has a torso and arms, so no top part of the rig is needed?
 When exporting the mesh from S4S to Blender the 'top' category from the rig does not seem to be in the Blender file. I haven't changed anything in my Blender settings, not sure if this can cause that though. I use Blender 2.78 and S4S Harmony 3.0.1.3. Hopefully you guys know what's happening.
 I removed half of the mesh and set the pivot point to center and then applied the mirror modifier. It's worked! Only got a message in the command line of the blender screen that said; Applied modifier was not first, result may not be as expected
 I was actually almost done but then realized the flickering images might indicate a whole mirror instead of partial. Rookie mistake
  , I was searching for the wrong thing
