|
|
Post by kitkat on Feb 6, 2018 21:17:26 GMT -5
Couple of things - first, I think the shadows on the top of your mesh were due to the bump & specular. I replaced the ones in there with blank ones. That took care of the darkness on the top but not on the sides. I looked at your shadow LOD mesh, and it wasn't mapped. Not sure if that matters, but I always use my UV mapped mesh for my shadow LOD. I deleted the ground shadow from your blender file, and then I replaced your shadow LOD mesh in S4S with the new one. At the same time, I also went through Peace's steps and changed the SSAO intensity level from 1 to 0. The 00000000 model entry is the one labeled "Model" not "Model LOD" like it said in the tutorial text. If you did the Model LOD one, that may be why it didn't work for you. Since I did the last two steps at the same time, I can't say for sure which one fixed the side shadows. But it did show up fixed in my game. Let me know if any of that doesn't make sense   |
|
|
|
Post by kitkat on Feb 5, 2018 21:42:38 GMT -5
No problem Not sure which of those would have been causing your specific graphics issue, but it's always best to make your objects confirm to EAs norms as much as possible. Here's a blank normal and a blank specular. To decimate in Blender, make sure your object is selected and you are in object mode. Click on the wrench icon (Modifiers) in the row of icons in the middle of the right side panel to open the modifiers panel. Click on the "Add Modifier" button then select "Decimate" from the menu that pops up.  In the decimate box that will now appear in the right side menu, change the ratio from 1.0000 to .1, hit enter, then "Apply." Do this 2X to get to get down to 318 polys.  |
|
|
|
Post by kitkat on Feb 5, 2018 20:22:30 GMT -5
Were you following the tutorial here? |
|
|
|
Post by kitkat on Feb 4, 2018 11:20:50 GMT -5
First of all, your mesh is insanely high in polys. Your computer may be struggling to render it correctly. I decimated it two times in Blender with a .1 ratio and got it down to 316 polys with no deformation in the mesh. Second, I've never seen a texture that was 800x800 pixels. 512 x 512 or 1024x1024 is the proper size. I used 1024x1024. Third, your normal map and specular in the warehouse were not created correctly. I replaced the first DST image with a blank normal and the second with a a blank low-gloss specular. Finally, your shadow mesh groups should be your actual mesh with a cut value of zero not the ground shadow mesh. This allows your objects to cast a proper sun shadow. Your mesh in game after the fixes -  |
|
|
|
Post by kitkat on Feb 4, 2018 0:37:02 GMT -5
Oh - gotcha! Thinking about it, I tend to have my lots kind of compartmentalized in my game. I have lots I play and lots I decorate. I use my OMSPs and MOO cheats heavily in my decorated lots and to a more minimal degree in the lots I play. So, TBH, I know my OMSPs work well for decorating and photographing but I'm less sure about how they work in heavily played lots. I'll have to test that out and post a disclaimer if I find an issue. Thanks for highlighting this potential issue |
|
|
|
Post by kitkat on Feb 3, 2018 23:40:00 GMT -5
Hi, sugarmagnolia. IIRC, there was a problem with MOO'd (bb.moveobjects on) objects losing their places back at the start of the game. Is MOO (MoveObjectsOn) what you mean instead of OMSP? I use actual OMSPs CC objects instead of the 9 and 0 keys for most surfaces (you can find the ones I've created HERE). And I haven't had any problems with MOO'd objects moving around. Although, I'll have to admit that I don't go back and change my walls often. |
|
|
|
Post by kitkat on Jan 25, 2018 21:24:49 GMT -5
Thank you Mathcope and mehrlicht I have some new retail shop shelves finished and ready for sharing: 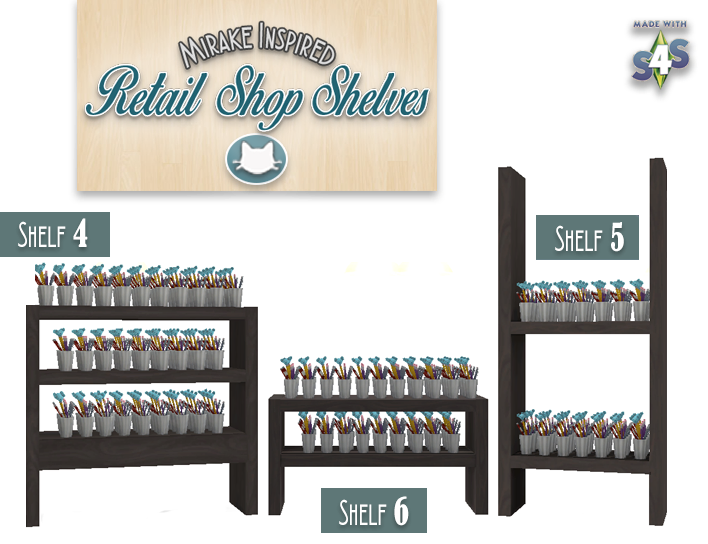 I made the first group of these shelves a while ago to go along with a group of Cassandre's Color Trends Boutique items I converted from Sims 2. They were inspired by Mirake's Mira's Shop for TS2 on TSR. The old shelves needed a little updating (new slots, shadows and textures), so I fixed the original three and created three new ones as well. All 6 shelves have 7 textures (6 wood textures and one solid white texture). You'll need to use the MoveObjects to place them as shown in the pictures. Enjoy and look for another group of Color Trends Boutique items coming soon! DOWNLOAD or VISIT MY SITE |
|
|
|
Post by kitkat on Jan 18, 2018 0:06:23 GMT -5
Thanks! I'll give that a try |
|
|
|
Post by kitkat on Jan 15, 2018 17:51:37 GMT -5
It's been a while... I was working on a new OMSP this week for my updated shop shelves (soon to be released), and I decided to update my old OMSPs and add a few new OMSP heights. If you have the old versions, you'll definitely want to grab the new ones and toss the old. The new ones have the occluder shadows removed so that they don't make shadows on the floor. They also have spiffy new Catalog previews that will help you find the one you want more easily. I hope some of you designers out there will find these helpful   DOWNLOAD or visit my SITE for more information. DOWNLOAD or visit my SITE for more information.
|
|
|
|
Post by kitkat on Jan 15, 2018 16:34:53 GMT -5
Someone on here had this exact problem a few days ago, so I learned how to fix it from Mathcope:
1. Select _mesh_7 in Object mode.
2. Click Ctrl+A and apply "rotation and scale" then Ctrl+A again and apply "location" (this will flip your normals, but it will get fixed in the next step)
3. Tab into edit mode.
4. Click "A" to select your mesh.
5. Click "W" to bring up the Specials menu and select "Flip Normals"
6. Return to Object mode and join the two groups.
|
|
|
|
Post by kitkat on Jan 15, 2018 14:23:05 GMT -5
Your normals may be getting flipped when you merge. If you share your .blender file, someone here can take a look.
|
|
|
|
Post by kitkat on Jan 15, 2018 10:33:43 GMT -5
Thanks for the reply vero That's what I tried this morning. After sleeping on it, I remembered that there were some unchecked boxes in the selective clone I made (I just followed the picture on the tutorial here without thinking - oops!). Making a new selective clone with the rig and slot boxes ticked let me have a fully functional work-around OMSP. I'd still like to figure out why objects with a completely transparent texture are no longer selectable/moveable and if there's a way to fix it in S4S. I'm putting a link to the OMSP .package with that issue here and in the first post. OMSP problem |
|
|
|
Post by kitkat on Jan 15, 2018 10:22:58 GMT -5
You can't change or add cut numbers - they have to match the object you clone exactly. You could make your uv map bigger (say 1024x1024 instead of 512x512) and separate them out on different parts of the map. Or look for a window that already the groups you're looking for (if there is one).
|
|
|
|
Post by kitkat on Jan 14, 2018 21:41:29 GMT -5
Thanks inabadromance - glad you've found them useful When I made them the first time, I used this tutorial plus a good bit of trial and error. Unfortunately, it was so long ago, I don't quite remember exactly how I figured it out. I don't think it involved linking prototypeIDs? But I'm not entirely sure what that is, lol. I'll play around with making one of the LODs different, but not sure that would work for what I want them for. If they pop back up when zoomed out, that would limit their functionality for taking full-room pictures. UPDATE - this is not solved, exactly, but I did find a work-around. I used the Selective Clone option instead of Create 3d Mesh. That carried over enough needed information from my original OMSP to keep the new one selectable/moveable when totally transparent. I'll have to use the old warehouse method for re-positioning slots (sad face), but the new selective clone is working as my old ones do. I WAS finally able to make an end table transparent again with a bit of fiddling, but it had the same problem as the plant - the invisible swatch can't be grabbed/moved. I guess something has changed with the game coding since I made the first one? But the old ones still work, so there's that If anyone has any insight on why invisible swatches can no longer be moved or how to fix them so that they can be moved, I'd still like to know. UPDATE #2 - While this was a workaround on the issue of selectable/moveable, now I'm struggling with moving the slots where they need to be. There are no "rig" and "slot" entries on the selective clone, so I can't change the slot positions in the warehouse using the old warehouse tutorial. Grr.... Maybe I can batch import the rig/slot values from my original mesh and edit those? Getting too late here - I'll have to try again tomorrow. Adding my current .package below just in case anyone can take a look. The Z value I need the slots to be at is 1.707, and the X and Y values are both zero. UPDATE #3 - The workaround is now fully functional. I had to make sure the "rig" and "slot" boxes where checked when making the selective clone. |
|
|
|
Post by kitkat on Jan 14, 2018 15:38:03 GMT -5
With the vast improvement and expansion of S4S since the last time I tried this (2015!), I decided to make another OMSP for some display shelving I've made. (Yes, I know I can add tons of slots, which I've already done, or use the up/down MOO game function - I also want an OMSP). I cloned a floor plant since it already has the capability for transparency, imported my mesh, added slots, and made a completely invisible swatch for it. It works great in game except for one thing. When I change to the completely invisible swatch, you are no longer able to grab the thing and move it around. Does anyone have an idea why this is happening and what I can do to fix it? The OMSPs I made in 2015 from an end table don't do this when turned invisible. I could go that route, I guess (if I can remember how), but it's so much easier cloning the plant; and it works great except for not being able to move it when it's invisible. I also tried cloning one of my old OMSPs, but something is lost in the cloning, and the transparent swatch shows up black in game.  OMSP problem OMSP problem |
|


