|
|
Post by looneybin17 on Mar 3, 2017 14:41:10 GMT -5
I think you can just press U and the menu will pop up.
Anyway,everything is wrapped up for now,thanks a lot for the help to everyone,you were...FANTASTIC!
(eeh?eeeeh????Nine refference,eeeeh!)
Yay! Another Doctor Who fan!  
Sorry,had to nerd out :D
|
|
|
|
Post by looneybin17 on Mar 3, 2017 8:44:08 GMT -5
Well, I figured out how to color the texture in blender, but it doesn't import into S4S. :( I know it is something I am not doing right, but I will have to study a few tutorials to figure it out. Here is what it looks like  and  and this is what the ORIGINAL  looks like. Maybe someone else can tell me what to do. In Blender, select the model, then go to Edit Mode. Press A to select all. Then go to (I think) Mesh and then find UVs - Unwrap UVs. The Smart Unwrap usually works the best. Then you need to make sure your UVs and your texture align. I think you can just press U and the menu will pop up.
Anyway,everything is wrapped up for now,thanks a lot for the help to everyone,you were...FANTASTIC!
(eeh?eeeeh????Nine refference,eeeeh!)
|
|
|
|
Post by looneybin17 on Mar 3, 2017 6:03:50 GMT -5
|
|
|
|
Post by looneybin17 on Mar 3, 2017 4:13:15 GMT -5
Just to add something, what looneybin17 says is correct. You can set the opacity level lower to make it transparent if you use .png or set the alpha a lighter gray if you're using .dds. But keep in mind that this only works if the object has already set up a transparency shader in it. The easiest and best way to make a transparent or translucent object is to clone one that already has a transparency shader set on. This shaders often come in different groups. So for example the object will have a group with the shader "Phong" (which is assigned to a given cut number) and then another group (with another cut number) that's named, let's say, "Phong Alpha" (which allows transparency). If you want your item to have transparency you will need to split the mesh in blender and assign that mesh group the correct cut number of the transparent group. I don't know if I sould clear right now (i'm a bit sleepy) but you can try cloning any transparent item and see what I mean. Or maybe you have experimented with these before. ---- And another thing to keep in mind. The bump map or the specular doesn't take any part on the transparency. So you mustn't mess with those to achieve that effect. The bump map works to define details in the mesh's texture and to give the ilussion of a 3d geometry on it. Sometimes you can't make a big poly count item to actually model those details, so the bump map gives the effect of that within a good decent poly count. Take this as an example, this person baked the normal map (basically the same as the bump, but not in grayscale), so it has a lot of details, that are not actually in the mesh, but it gives the ilusion as it they were in the geometry. The normal map just contain a bunch of "Normals" (that's why the name, I know shocking) information on where the surface would go. 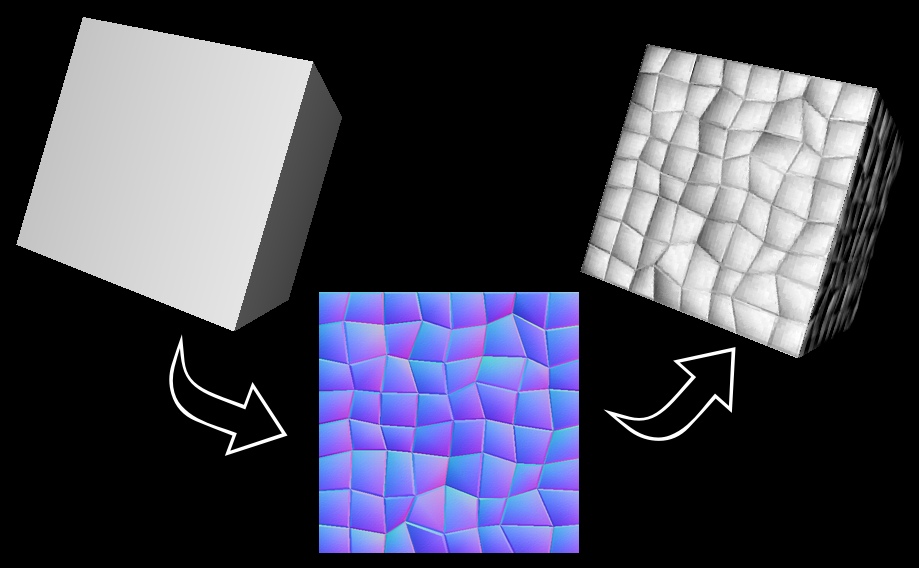 And the specular only controls the shine information. You can actually give shine to the glass/transparent parts, but it won't take part in the effect of making it transparent or displaying like that in game.
Correct me if I'm wrong,but didn't the transparency of an object depend on some value in the Warehouse?
|
|
|
|
Post by looneybin17 on Mar 3, 2017 0:41:00 GMT -5
Well, I figured out how to color the texture in blender, but it doesn't import into S4S. :( I know it is something I am not doing right, but I will have to study a few tutorials to figure it out. Here is what it looks like and and this is what the ORIGINAL looks like. Maybe someone else can tell me what to do.
#demonbird
Anyway,it looks amazing,thanks for helping me again.
|
|
|
|
Post by looneybin17 on Mar 3, 2017 0:28:27 GMT -5
Hi Leniad ! The mask looks amazing!, Creepy actually, but amazing! Are you having problems with the texture not importing or with the mesh itself? Studio only takes mesh data from the .blend file. It won't import the rig or textures in it. You must make a Uv map and bake your textures to it. Then when you have it, import it to Studio as a Diffuse. Also, Cas objects work a little different than objects since everything is mapped into a single composition image. This means your uv map must be in a specific assigned are into that template. It cannot override and intersect with any other areas that are assigned to other items. Like clothing, shoes, earrings, etc. HERE is the link to the template. You can use the first one, made by brujah or the second one Feyona found in the game files. If you have any other troubles please ask. I thought I added a UV before even sending it to Len. |
|
|
|
Post by looneybin17 on Mar 2, 2017 18:44:54 GMT -5
Stupid question,but is the mesh supposed to be in 4 parts?
|
|
|
|
Post by looneybin17 on Mar 2, 2017 18:36:50 GMT -5
Hello! I hope everyone is doing well. I was wondering if anyone had a suggestion on how to change a part of my object to look more like cloth. What I was thinking was to make it see-through on the part of the shade, but then wouldn't it look like just a glass shade? What would be the bast way to give it like a cotton or linen-y look? A bumped bump map?  Any thoughts are appreciated. Thanks! -------Edit. Anyone? I tried following a video tutorial but it dealt with CAS and was mostly for recoloring an item and not giving it an actual texture. I also downloaded the trial of CrazyBump because I'm thinking I need a textured bump maybe, but not sure how to use it. Hey,it might be noobish but usually when I want something textured,I find the texture online,create new layer in my drawing program,paste the image of the texture and drop its opacity to 50% or less.
Other ways are the spec and bump map,as far as I know.
|
|
|
|
Post by looneybin17 on Mar 2, 2017 18:15:58 GMT -5
WE NEED THIS!
|
|
|
|
Post by looneybin17 on Mar 2, 2017 18:13:14 GMT -5
It's called a trach tie,or trach tube holder.The actual tube is usually attached to a machine,not the collar.
|
|
|
|
Post by looneybin17 on Mar 2, 2017 17:32:38 GMT -5
Got it and working on it. I am trying to learn how to do this stuff and just got a breakthrough. It may be a day or so before I get it, but I am getting it.
Don't worry,I'm glad you're helping me.
I hope I explained myself well,I didn't know how to say it.
|
|
|
|
Post by looneybin17 on Mar 2, 2017 17:30:32 GMT -5
The mask?I have a medieval themed save,and two plague doctors.I want them to look spot on.
Plague doctors are sorta obsession of mine.I like drawing,rping,playing them...I tried to get them in my TS2 medieval save,but i couldn't download the mask.
Ah neat. Yup.It might sound a bit odd.Sorry.
|
|
|
|
Post by looneybin17 on Mar 2, 2017 16:58:07 GMT -5
No promises, but if you post mesh and picture of what you want, I can give it a go. Pst,bro,I sent you it |
|
|
|
Post by looneybin17 on Mar 2, 2017 16:57:20 GMT -5
If you don't mind me asking, what do you plan on using it for? I'm genuinely interested lol. The mask?I have a medieval themed save,and two plague doctors.I want them to look spot on.
Plague doctors are sorta obsession of mine.I like drawing,rping,playing them...I tried to get them in my TS2 medieval save,but i couldn't download the mask.
|
|
|
|
Post by looneybin17 on Mar 2, 2017 9:57:49 GMT -5
Like this: 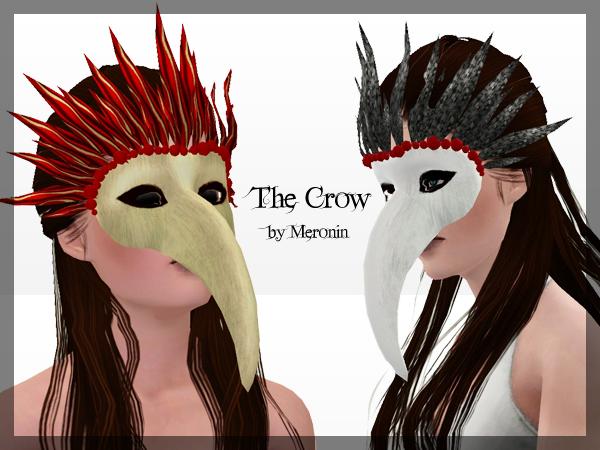 or this?  Like the second one.I know where this one is from,but the download isn't working.
Btw,does anyone know people here that are good with texturing?I have the mesh,but i dunno where to put the texture.
|
|