|
|
Post by augustes on Jun 11, 2023 3:34:21 GMT -5
Hi everyone ! I don't know if it's the right topic to post my question and I'm sure there were probably other posts like this because I'm facing this situation for a while now. So I have this glitch that happens when I'm using hairstyles that partially cover the face. I removed the broken files from the Mods folders, and then replaced them with Kijiko's 2022 fixed 3D eyelashes. The laptop mod is unactivated and the "uncompressed sim texture" option is ticked. Here is a CAS screenshot.  Eyelashes glitch Eyelashes glitch by AugusteS, sur Flickr Please help ! Regards, AugusteS |
|
|
|
Post by augustes on Jan 3, 2023 15:59:06 GMT -5
Hi everyone ! I made a conversion of the "More volume Pompadour" hairstyle from The Sims 3 for The Sims 4. The mesh was previously converted from TS3 to TS2 and I extracted the TS2 mesh to convert it for TS4 game with Blender. Now I'm facing some transparency issues as you can see in the following screencaps : The transparent parts betwen each hair lock was filled with skintone color and I'd like to fix it. Can someone please explain me how to make the mesh transparent again with Blender ?  Grace Kelly Pompadour Hair conversion Grace Kelly Pompadour Hair conversion by AugusteS, sur Flickr Here is the Blender file of the converted mesh : Pompadour HairstyleThanks, Regards, AugusteS |
|
|
|
Post by augustes on Dec 10, 2022 7:02:20 GMT -5
It's better to rather use your saved blend files than export mesh every time you want to look at it. What is more your blend meshgroups must be same as ea base you use to create package. If you clone something that have 3 cuts, you need to have 3 cuts too. If you have only one then it'll import only one and two will stay unchanged. You probably imported few times on different cut numbers and then you had 3 same meshes on 3 cuts - which lead to problem on picture Hi again ! I have used my dress mesh without the two others and the lingerie as a base and it works ! I still have to fix some attachments issues, but it works. Thank you so much !  Maleficent black velvet dress ~ WIP Maleficent black velvet dress ~ WIP by AugusteS, sur Flickr |
|
|
|
Post by augustes on Dec 10, 2022 5:14:05 GMT -5
I think it'll be better for you to work only with one meshgroup (this is definitely not how meshgroups should be divided, they are three for some reason. Study some ea dresses and see how they are divided and why). As a base use Lace lingerie underwear fullbody and delete s4studio_mesh_1 and s4studio_mesh_3. Then s4studio_mesh_2 should have cut number 0000. But before you import your mesh you need to delete body parts under your dress. cause they'll glith with dress while moving. This tutorial is not best, but as you read it you'll see how to delete body parts. After thay you need to redo weights, they are really messed up, I do not know why but you need to retransfer them. Choose reference mesh similar to your (long dress) and append it in blender. join all meshgroups of this dress and now to transfer weights you need to click on your reference mesh, then hold shift and select your mesh. Go to Weight Paint and use Transfer Weights option as in picture below. After transfering weights use Clean (Subset: All Groups) and Limit Total (Limit: 4) 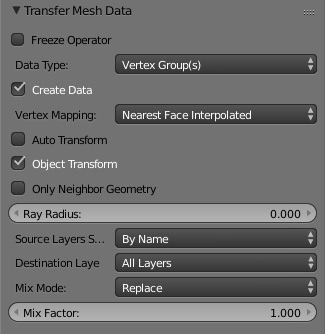 You should remove doubles of all your mesh and edge split shapr edges like dress bottom, sleeves at the end, this cut on body etc. It would be best if you'll just search for some tutorials, watch few of them and gather some informations how to do this things  Thank you so much for your wise advices. I already did what you said : transfer weights, use a full body lingerie as a base, delete meshes, remove doubles etc. But, everytime I export the mesh from S4S to see what’s going on with my mesh, the other meshes I deleted before reappear and I don’t why. I’ll carefully follow the tutorial and see what happens though. I’ll come to you later once it’s done. |
|
|
|
Post by augustes on Dec 9, 2022 18:24:50 GMT -5
Hey!  Always share file so we can take a look and answer more precisely Usually it's not enough to just delete verticles and add body parts. You need to check if your dress uv_0 is not overlaping with your body parts - and here it probably does. Sifix made this dress covering a lot of body, only shoulders are visible and top part of cleavage, so uv maps are probably where you now have body (on breast, belly, etc). You need to move your dress uv_0 to space not used by body parts in this mesh and move texture too Hello and thank you for your kind answer ! I've found another topic with another creator encountering the same issues with the texture. So I adjusted uv_0 to the dress and the body parts and it worked ! Buuut I am facing a new bunch of issues. First, I had a hole under the dress, the head was floating alone without body, so I added a nude top + a nude bottom mesh under the dress. Now I'm seing that...  Maleficent dress issues Maleficent dress issues by AugusteS, sur Flickr I assume there are several overlaid meshes and some weight issues, but after many attempts, I still don't know how to fix this.... Please help !!! Here is the file : Maleficent black velvet dress |
|
|
|
Post by augustes on Dec 8, 2022 17:19:12 GMT -5
Hello everyone ! I'm currently working on a new dress inspired by Maleficent's black velvet seen in the 2nd movie which looks like this...  Benjamin IP art Maleficent dress concept Benjamin IP art Maleficent dress concept by AugusteS, sur Flickr To make this dress for TS4 I've used Sifix' Aurora dress as a base and I deleted a lot of vertices on Blender to create a long neckline similar to the one seen on the original dress. But opening the mesh in Sims 4 Studio, I see that, even after it was adjusted to my new mesh with the texture editor, the texture is still overflowing on the sim's skin (take a look at the screencaps below).  Maleficent texture issues Maleficent texture issues by AugusteS, sur Flickr As you can see in the S4S screenshot, the skin on the neckline is covered by the dress texture instead of showing skintone. Could you please teach me how to fix that ? Thanks a lot and have a great day simmers AugusteS |
|
|
|
Post by augustes on Nov 26, 2022 3:00:24 GMT -5
Problem solved ! Thanks to your amazing advices ! I finally transfered the belt’s weight separated from the dress to the heart and it worked ! After 6 attemptsI succeeded at last! I’ll share a screenshot. Thank you so much !!
|
|
|
|
Post by augustes on Nov 25, 2022 16:13:28 GMT -5
-In uv editor enable sync, select the uvs of the heart and the knife, in 3d view separate them with P - Selection;  this button enables synchronization between uv editor and 3d view, so when you select the uvs of the heart in the uv editor, it highlights in 3d. It is faster ad easier to select the mesh this way instead of 3d view
"Applied modifier was not first, result may not be as expected" is not a problem
please share the updated blend, the result can help me guess what is could have been done wrong Thank you so much !! Here you go : Evil Queen dress updated |
|
|
|
Post by augustes on Nov 25, 2022 15:16:09 GMT -5
well, vertex paint and uv_1 did not transfer at all while weights seem to have been transferred from a completely different mesh. After separating the accessory from the dress, rename it to "heart"(or something) and the dress to "reference". This dress is what you should transfer everything from, not any other dress. Make sure both the heart and the reference are visible, then proceed to transfer everything. Make sure to enable UVs (blue on the screenshot) button for uv_1 transfer and Vcol for vertex color transfer
Also, in uv_0 the uvs of the heart are in the space meant for necklaces, so you won't be able to use it with them.
I tried to proceed as you said 2 or 3 times, and it doesn't work better, I really don't get what went wrong. It looks worse... Also, when I transfer uv_1 to uv_1 and VCol, I get a message from Blender saying "Applied modifier was not first, result may not be as expected". Is it normal ? How do you "enable sync in UV editor ? I'm not sure I got it right. For the rest, I think I followed your advices carefully and don't understand why it's still not working...  Evil Queen belt issue Evil Queen belt issue by AugusteS, sur Flickr |
|
|
|
Post by augustes on Nov 25, 2022 12:34:30 GMT -5
|
|
|
|
Post by augustes on Nov 25, 2022 11:16:30 GMT -5
Select the dress, shift-select the accessory, switch to Weight paint, choose Transfer weights, scroll down and choose the same options as in the pic. Choose Clean with All groups and Limit total with 4 I found it thank you... So I probably missed something but it's not showing as attached to the belt in game. There definitely is an improvement, but still the heart doesn't stay in place. If I share the package, could you check please ? Thanks again for your kind help.  Evil Queen belt issue Evil Queen belt issue by AugusteS, sur Flickr |
|
|
|
Post by augustes on Nov 25, 2022 9:43:02 GMT -5
Get Blender 2.76b. You need Data transfer and it was introduced later Ok done, I'm at the "transfer the weights" step, but I can't find the section your showing on you screenshots. |
|
|
|
Post by augustes on Nov 25, 2022 8:27:53 GMT -5
Hi. As I understand, those parts of the mesh were necklaces. They were in the neck area, adapted to move and morph like the areas of the body they covered. Now they are in a completely different place in 3d place but still adapted to move and morph like the neck -In uv editor enable sync, select the uvs of the heart and the knife, in 3d view separate them with P - Selection; - select the separated mesh, add data transfer modifier, transfer uv_1 from the dress as shown below, apply;  - transfer vertex paint the same way  - select the dress, shift-select the accessory, transfer the weights as shown below  - join the mesh with the dress Hello and thanks a lot for the help. I tried to follow your advices, but was unable to find the data transfer modifier... Is it an addon ? |
|
|
|
Post by augustes on Nov 25, 2022 4:54:28 GMT -5
Hi. If the features are preserved between mermaid forms, then there’s nothing you can do about it other than modify how the game is programmed. You may also be able to change one sim into another upon interaction with water, but that also would involve coding and seems very difficult. What you can do instead is to make this whole Ursula body as an outfit like those mascot animals In short: - rip the whole sim with simripper; - get it in blender, reshape to your liking (do not modify the height); - I do not know if the mesh that comes out of simripper is rigged. If it is not, you’ll have to retransfer weights from the reference (if it is not rigged, ask me for more details because you need to delete some bones); - disable morphing by vertex painting the mesh with black; - split it into the head and the body. For the head, clone a hat and import the blend there. For the body, clone a lingerie set. Edit their ExcludePartFlags to exclude the head in the first case and the feet in the second. I will try that, thanks a lot for the tips ! |
|
|
|
Post by augustes on Nov 25, 2022 3:32:00 GMT -5
Hi everyone ! So I'm creating my first dress with Blender which is the result of several combined meshes to make this Evil Queen dress. I wanted to add the heart pierced with by the sword we can see on the original Evil Queen's heartbox in the movie as a detail to the belt. To do that, I've combined 2 different necklace meshes. However, the dress is showing correctly in S4S while the heart + the sword seem to be somehow still attached to the sim body instead of staying in place on the belt in game. I'm sure this is a simple thing to fix, but after several attempts, it doesn't work better. Could you please explain me step by step how to fix that ? Thanks a lot and have a good day !  Evil Queen dress belt issues Evil Queen dress belt issues by AugusteS, sur Flickr |
|


 Always share file so we can take a look and answer more precisely
