|
|
Post by cupidjuice on Nov 7, 2016 19:52:25 GMT -5
I can't help too much with the actual issue and this may come off as a "caption obvious" statement but the only ways to get a ghost child is to create one in CAS through ghost parents or getting the "death" outcome when wishing for a child at the wishing well.
So perhaps babies screaming objects that look like babies can't use the shaders because the shaders are only available for every age except babies. Which would make sense why those little fingers are trying to turn into hands, it looks like they're adopting something made for a larger sims like a child.
|
|
|
|
Post by cupidjuice on Nov 7, 2016 19:38:58 GMT -5
the always wonderful OM helped me tune this (package file is there) furnace a very very very long time ago, to hide the flames and light. I know a lot more about blender now than I did back then so I've decided to re-work it, and a couple months ago someone on told me that it causes the Heak Seeker fireplace's flame to be nonexistent. It's the only fireplace Ive used in my game since I made it early last year so I never noticed, but the Heat Seeker is what I originally cloned. Just as before I know virtually nothing about tuning or where to look, I went back to my original post back when I first made the furnace but it's like reading hyrogliphics. So in short: is there a fix to this?  |
|
|
|
Post by cupidjuice on Nov 2, 2016 1:45:07 GMT -5
Update: Followed kiara's steps on this post and worked like a charm
|
|
|
|
Post by cupidjuice on Nov 2, 2016 1:31:08 GMT -5
Im aware this happens when you export a mesh once it's been imported but is there a fix for it, yet? I'm using the most recent version of S4S.  ![]() |
|
|
|
Post by cupidjuice on Oct 11, 2016 18:53:41 GMT -5
Yeah, it just doesn't let me go past them no matter what I do (and there's actually nothing to do apparently, I mean it lets me select expansions/packs but when doing 'save', a window appears saying: "No game path is confugured, would you like to try confuguring them now?" If I don't do it, the programme turns off) I've installed it after Sims 4 and even downloaded it again but it keeps giving me that message :/ I had this problem previously, but it was actually an installation error with Origin. Try these steps in this exact order: 1) uninstall Sims4Studio and delete all it's associated files in C:\Users\ Whateveryourcomputersnameis\Documents\Sims 4 Studio 2) Uninstall The Sims 4 via Origin 3) Once that's done, back up your TS4 cc / saves, what have you 4) Delete your Sims 4 files in Documents / The Sims 4 5) Delete everything in C:\Program Files (x86)\Origin Games\The Sims 4 6) reinstall The Sims 4 7) Launch The Sims 4 8) Create a save 9) "Repair" game in Origin 10) Reinstall Sims4Studio report back and let me know how this goes |
|
|
|
Post by cupidjuice on Oct 10, 2016 14:04:25 GMT -5
So I want to create a mod that is similar to enchanted dominions "arielnoshoes" (it's so she can wear the fin without the feet showing), but I wanted to hide from somewhere around the waist-down. I thought if I could hide the legs, I could make a cleaner mermaid fin mesh, a genie/spirit/ghost bottom, and anything else that generally would not look good just coating the legs. Does anyone know how to do that? There are several body replacements, like the servo bots body replacement for TS4 or LLS's human pectacular. You could definitley create your own mesh by hand and assign it to the legs although Im not sure how it would play with the walk cycle... and for feet, possibly "invisible" shoes. |
|
|
|
Post by cupidjuice on Oct 10, 2016 13:52:48 GMT -5
How do I see the "cut numbers"? and how do I know if it's correct? This is the second time i made a mesh edit and the first one I tried failed so I completely abandoned it... select the mesh layer, and select the scene icon (the sphere + cylinder icon) and you will see the cut number ![]()  When you clone a mesh, each mesh layer will have a different cut number. Your mesh will need to have the same cut numbers once completed / imported as it did when you originally cloned it. If you remove a mesh layer (therefor also removing it's cut number) it cannot be imported. |
|
|
|
Post by cupidjuice on Oct 10, 2016 13:45:05 GMT -5
I'm not sure i understand the problem, is S4S not letting you get past the game path? Did you install S4S before you installed The Sims 4 / Made your first save?
Your configured game path looks fine, to me. A proper reinstall could remedy this.
|
|
|
|
Post by cupidjuice on Oct 9, 2016 16:34:28 GMT -5
*continues to update this thread* All is dandy! I replaced the hand with a human hand, since I wasn't a fan of the previous and I've yet to make the metal texture for it 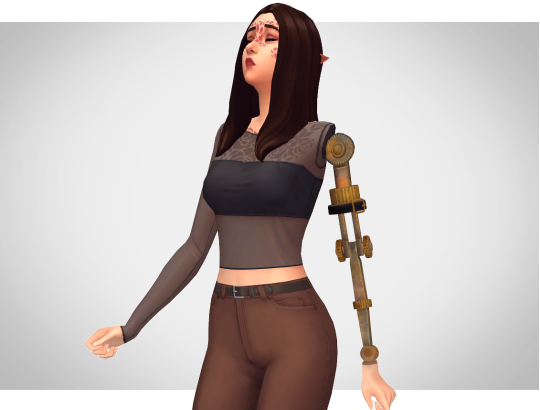 |
|
|
|
Post by cupidjuice on Oct 9, 2016 14:57:23 GMT -5
hi! I took a look at the blend, and i'm noticing a weird weight. Like the pelvis bone being attached on the middle of the arm. That would be a result of the item you used to transfer the weight from. What i suggest is preparing a special blend for the weight and then importing the fix object on this one. What i usually do is use the parts that come in the rig group to transfer the weights from. It's much faster in my opinion and never had any issues. In this case what i did was open the rig, enable the white arrow on the top group. Go into edit mode, select only the arm and delete the rest. And did the weight transfer from that arm to your arm (previously deleted all the bones for your arm) What i noticed then, was that the fingers didn't match, so you should modify the mesh and move it so it matches the base game arm, hand and fingers. I think we replied at the same time, because i didn't see your reply when i posted mine haha, but I got it figured out ♥ |
|
|
|
Post by cupidjuice on Oct 9, 2016 14:36:41 GMT -5
Update: Im a silly billy, and i guess was rusty. I adjusted the mesh my mirroring it so it matched up with the normal arm more, then just removed all the vertex groups, then transferred the weights from the original cloned base and THEN joined the arm to the body. I could probably move down the elbow a little bit because Im not fond of how flat it becomes when the sims bends their arm but regardless, im very pleased with it so far  |
|
|
|
Post by cupidjuice on Oct 9, 2016 14:08:53 GMT -5
Hi y'all, I'm giving this robot arm from TS2 a go, and I need some help with the weights (or bones, maybe?)
Since this isn't a ordinary sleeve / accessory I'm a little bewildered as to what the solution is
( I'll probably be editing and updating this post with the results / attempts / failures )Here is the package file
Edit: Solved, just removed the vertex groups, transferred weights from the base to the arm, then attached the arm and all is well 👍
|
|
|
|
Post by cupidjuice on Sept 30, 2016 0:21:10 GMT -5
Gracias! that's very indepth and that's what I ended up doing out ♥ |
|
|
|
Post by cupidjuice on Sept 30, 2016 0:20:08 GMT -5
hi! i'm not really sure if i'm understanding the question.. I'm seeing on the gif you shared on the first post.. and i see everything that is on the specular in the gif... the aureola on the lids and the dots on the sides.. Care to explain me is it you want to change? I'm going to try and assume that the dots and the solid aureola is what you don't want. If that is it, might want to edit the black part of the specular so it doesn't show that. You might not see it directly on the texture, but those parts are not black if they are still showing up on the preview. Same with the sides of the aureola of the shadow. Hope i'm explaining it right, if not just let me know what you meant!  *thumps heads* it was the lightest shade of black, a custom black i had in my palette that wasn't a perfect 000000 which is why I couldn't see it, haha. |
|
|
|
Post by cupidjuice on Sept 28, 2016 20:50:57 GMT -5
It seems the blank emission map link is broken
|
|


