|
|
Post by AdonisPluto on Apr 23, 2018 23:06:56 GMT -5
yeah I used to be able to get to my mods by doing that but now my 'The Sims 4' folder is completely different to that it looks like this _Installer Date Delta EP01 EP02 EP03 EP04 FP01 Game GP01 GP02 GP03 GP05 SP01 SP02 SP03 SP04 SP05 SP06 SP07 SP08 SP09 SP13 SP14 Support I have never seen this before and I have looked in each folder and there are still mods That is your installation folder located in the programs folder on your C drive that you have shown. That's the wrong location of the mods folder. What you are looking at is the installation folder of the game. And since you said your game is is an external hard drive, that's the content of the folder that you are showing. To get the mods folder, do not look at that folder that you showed the content. The mods folder is located in user/documents/electronics Arts/The Sims 4/Mods. Navigate there and you will find the Mods folder. To make sure you are looking at the right folder you can get a clue from your Sims4Studio. See image below  |
|
|
|
Post by AdonisPluto on Apr 22, 2018 16:53:28 GMT -5
Hi there, As some of you might picked up on, i am busy of making a TV Cabinet (Instead of a stand), with glass doors. Now there are two things i need to fix. One: The space it takes when placing the cabinet. It's like 2x1, but for the cabinet to work i need to increase it to a 3x1/4x1 (it might even be a 5x1). Does anyone know how to change that (if i am not clear enough with what i mean, i mean when you place something like a sofa, it lights up green if you can place it, or red if not. that is what i mean, i need to get that green to be 4x1 and not 2x1. Second: rigging the cabinet is a pain in the buttski, as i cannot see where i place the lrg,sml or med deco parts. is there a way to be able to see it, because for some reason, the glass is seethrough but i can't see the rigs inside. If anyone can help me out with one or both of these issues, you have my eternal gratitude. Greets, EsEmNL - Steven I have faced these same situations before and I got to get through it. For the first question, what I do is find an object in game that have exactly the footprint that I want. Then I Clone the object in S4S and export the footprint of the object from the warehouse. After that, I open my custom object and import the foot print that I had exported into my object. Also if you manually want to adjust the footprints, you can read this Thread
Also as a side information, The klassic Juiceback has a 4x1 footprint. The sofa seats have 3x1 footprint. For the second problem, I normally do it in a two way process because of the no see through the glass. So what I do is firstly, I clone an object without glass, and import my mesh into Sims4Studio. I then use the rig/slot editor to place my slots at the position where I want them. When I am satisfied with it, I save the package and reopen it again so that the slots/rigs that were added will take effect. I then open the warehouse tab and export the right file as well as the slot file. After that I go ahead and clone an object with glass and import my mesh into studio. When am through, I open the warehouse tab, and import the right and slot file that I had exported before into my current file. When this is done and you apply the textures, save the package and test in game. I know this process is a bit time consuming, but that's the way I have gone about most of my work and it has worked for me. I hope this helps you too. |
|
|
|
Post by AdonisPluto on Apr 14, 2018 17:35:40 GMT -5
To all new comers after my last picture at, you are all highly welcome to Sims4studions. It's wonderful having you all join. Once again you are all welcome.
|
|
|
|
Post by AdonisPluto on Apr 14, 2018 4:37:31 GMT -5
looks great
|
|
|
|
Post by AdonisPluto on Apr 14, 2018 2:08:57 GMT -5
Way to go. I have to soon start leaving how to mod my game too. Hoping I have the head to do this. Thanks for the tutorial
|
|
|
|
Post by AdonisPluto on Apr 14, 2018 2:05:22 GMT -5
after i added these tags it worked in my game. 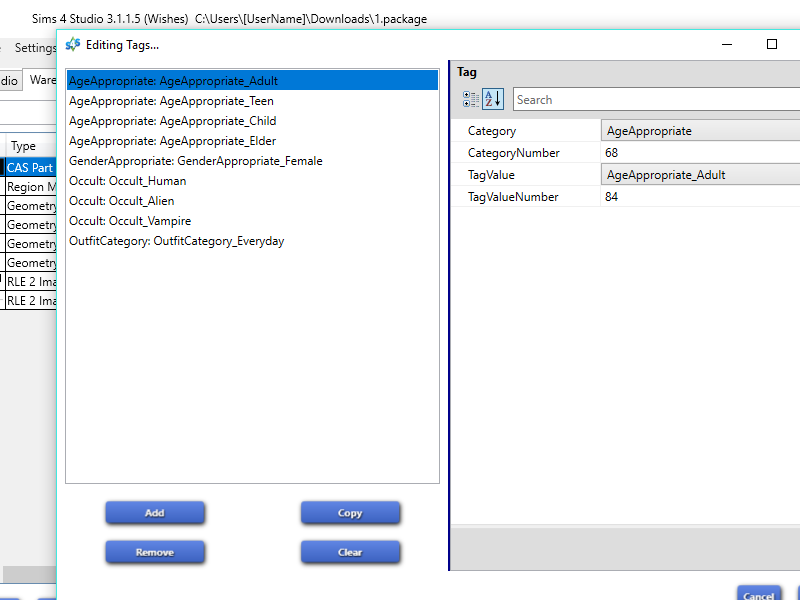 Im sorry if im being annoying but i added the tags and still isnt showing on my game 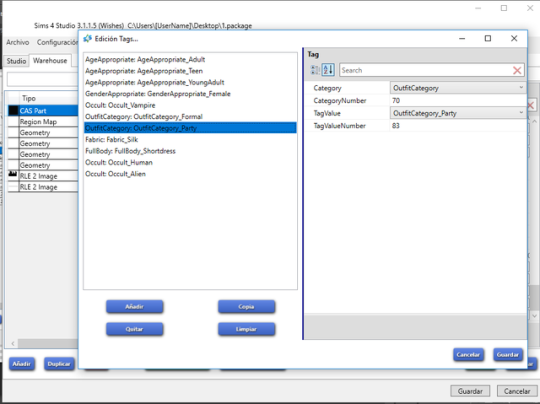 Your tag says outfit party but not tagged to a specific gender. If you want it for female adult alone, you have to be specific by tagging it to a gender appropriate. |
|
|
|
Post by AdonisPluto on Apr 14, 2018 1:54:01 GMT -5
The best bet, is to find a functional bunk bed, and Cline it as a base.
|
|
|
|
Post by AdonisPluto on Apr 11, 2018 8:26:02 GMT -5
Thank you so much guys!! As I need it for CAS I found the other tutorial HEREWhat I don't understand is this part: The easy way to use the Search bar is to know what to type in to find a specific item. To find that you can open the item you want to recolor using the My Projects button. Be sure to return to the main screen and select recolor or create 3D mesh before continuing to make your recolor/mesh from the custom content. Do not do so from the My Projects button or you will overwrite the original. Once the .package is open click the Warehouse tab. For CAS items click on the CAS Parts line and for objects click on the Object Definition line. The creator name will appear on the right hand side as shown in the picture Can I just leave that or it is necessary for recolor to work properly? That part is meant as a guide to help you locate the package file you want to work with. I have come to know through practice that I can search for a file when using a CC by another person as a base by two means. The first is by using the example pointed out in the tutorial and the second is by knowing the name used in saving the file. But as long as you can find the package file you want to recolor through the standalone recolor tab, you don't need to worry about that part of the tutorial. That's my personal opinion since I hardly use it. |
|
|
|
Post by AdonisPluto on Apr 11, 2018 6:34:24 GMT -5
I made the multiplier for you. You can download it from Here . Let me know if it's ok |
|
|
|
Post by AdonisPluto on Apr 10, 2018 16:25:11 GMT -5
missdelarocha You can start your own creator studio by going to the Creator studio. At the right part is create a studio tag. Click on it and it will take you to where you can create your own studio and you can post the link to your creations there
|
|
|
|
Post by AdonisPluto on Apr 10, 2018 16:03:45 GMT -5
You are welcome. Happy to be of help. |
|
|
|
Post by AdonisPluto on Apr 10, 2018 14:00:20 GMT -5
Ok I just looked at the wall. Is that the Vaiyon wall that you are using. If so I think it's possible to do what you want since there is no specular and normal map for that wall. Give it a try and test it in game and see how it turns out.
|
|
|
|
Post by AdonisPluto on Apr 10, 2018 13:49:19 GMT -5
It can be possible from my own point of view, but where I see a problem is with the normal map and specular map. Since the textures are different. Now I don't know if it's possible, you can fill the normal and specular maps with plain colour and try it out. I think it's all about experimenting to know if it works.
|
|
|
|
Post by AdonisPluto on Apr 10, 2018 7:32:46 GMT -5
Simmerkate I had to remap the uv layout of the box. And it looks fine now ingame. Just did not find out what was wrong with the mesh.This is how it looks ingame  this is the mesh in 3d view of S4S showing the image file too  I am attaching a zip file that contains the the blend, package, and the psd image i made that can be used for the recolouring. Download it here
|
|
|
|
Post by AdonisPluto on Apr 10, 2018 4:50:14 GMT -5
When you want to recolor an object, you should not just open it in Studio and add your image to it. You have to place the object in your documents/sims4studios/mods folder. Make sure S4Studio is not open. When you have placed the object mesh in the above folder, start S4Studio and and under objects, choose standalone recolor. When the object mesh page opens, search for the mesh you want to recover,click next, then give it a name and save. After some seconds, the object will open in the 3d mesh screen. Do your recolors and save. Now if you want to share this recipe without the original mesh, post your replies for download, but you must include the link to the original mesh so that those downloading your recolor can also download the mesh for the recolor to work. You can also read This tutorial for more information |
|


