|
|
Post by Clown Confetti on Nov 24, 2016 23:14:31 GMT -5
Thanks so much Confetti Clown! That's wonderful.  You're welcome, here it is! Download: simfileshare.net/download/140891/Please test this file in your game and tell me if it works and everything. :-) (I will upload it in my Studio thread as well, once I've taken better pics later... I'm on my "bad" computer right now.) Pic: 1st = original, the rest = the decluttered version, with slots examples. You'll have to use the moveobjects cheat to place lots of items in the slots like in the pic (you can place an okay amount of items without using moveobjects). The different LoD meshes have all been edited. I included all the original textures. You can find them in the same catalogue section as the original or search "decluttered". 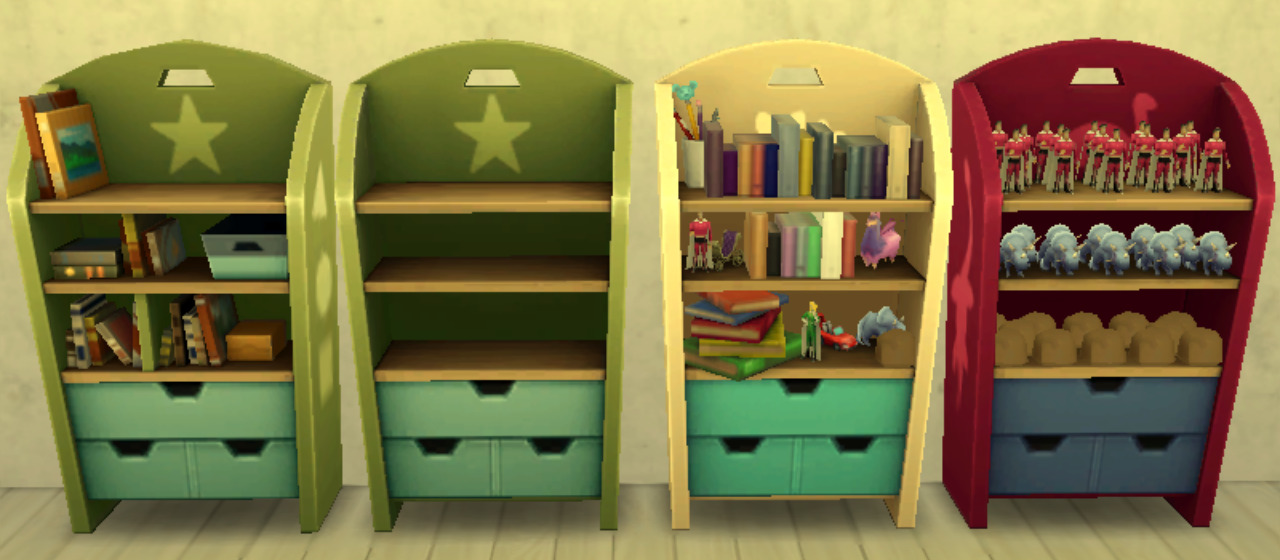 There were shadows drawn onto the textures, but I've cleaned them off. It might not matter to you since you're recolouring them, I just figured I might as well make them good to use :-P 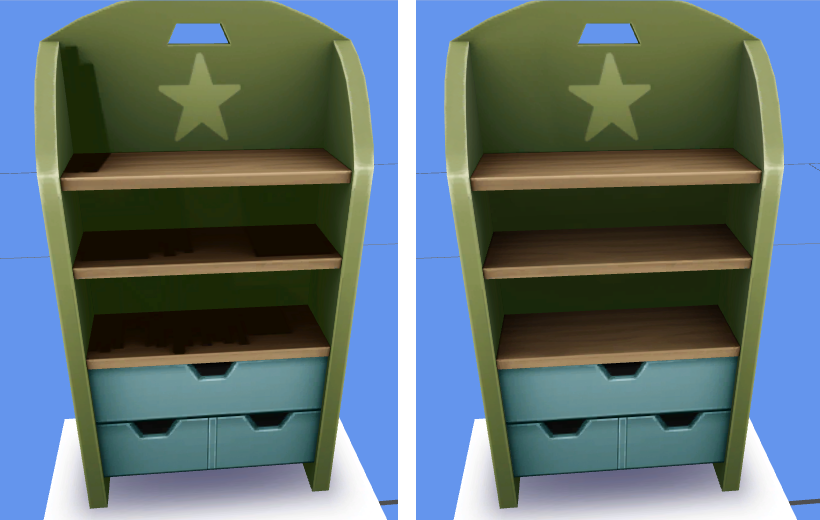 |
|
|
|
Post by Clown Confetti on Nov 24, 2016 12:23:28 GMT -5
I don't think it has been done yet, but I am looking for a decluttered version of the basegame kid's bookcase (the one that coordinates with the anti-goblin bed). Would any kind person be willing to do this project? I want it for a large set of children's furniture in Maxis match natural wood that I've been working on (almost done). I can try doing it :-) Edit: Done with the mesh editing (except for a S4S error importing the shadow LoD2 mesh, but it won't be a big deal to ignore that one...), will add slots to the shelves tomorrow and upload it, unless I get too busy. |
|
|
|
Post by Clown Confetti on Nov 23, 2016 20:02:35 GMT -5
For the ones where the texture is facing the wrong side (meaning the normals are on the other side), select the ones you need to fix -- easiest using the Face selection rather than vertices/edges -- and then hit CTRL+N. If that doesn't fix it right away, look in the toolbar, where the "Make Normals consistent" tooltip should have popped up. Try ticking the "inside" box for any faces that didn't get fixed. Hope that helps :-)
|
|
|
|
Post by Clown Confetti on Nov 21, 2016 16:42:03 GMT -5
Maybe it would be easier for people to help if you can post some of your attempted textures (if you feel comfortable doing that) so people can give some constructive criticism on them? I wish I could say something helpful but it's a bit hard to talk about something visual without using visuals :-P
|
|
|
|
Post by Clown Confetti on Nov 21, 2016 16:13:39 GMT -5
Do you have a bit more specific things you're wondering about? :-) Have you tried making a M.M. clothing texture and not succeeded? Is there a particular part of it that you're confused about?
Generally speaking, people who don't do M.M. textures (for any type of CC) either use photos for their textures, which often are too detailed (too "real") and potentially also have things like shadows and light effects that shouldn't be on the texture but rather generated in the game.
And generally, M.M. textures are more stylised and less "realistically" detailed (they may still have a lot of detail though), and may have a soft shading or light around edges to emphasise the shape of the mesh.
Edit: A way to start is also to export a couple different Maxis textures you like and try to edit/use them on other clothing, for example, grab a texture from a skirt and try to adapt it onto the texture of a tanktop instead. That lets you work with M.M. style textures without the pressure of creating them from scratch from the very beginning, and you can gradually study what they look like until you feel more confident in creating your own.
|
|
|
|
Post by Clown Confetti on Nov 21, 2016 15:52:10 GMT -5
|
|
|
|
Post by Clown Confetti on Nov 21, 2016 15:41:12 GMT -5
I decided to take some screenshots of how I sometimes work to create curved objects, I absolutely don't mean that you should do it this way, but it's just to give you some example of a manual method that I use. Hope it might help give you some ideas for your workflow :-) 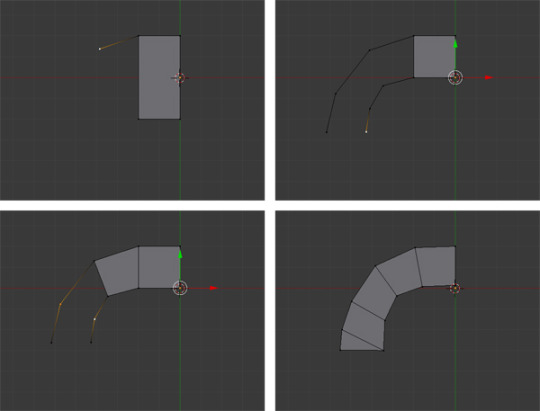 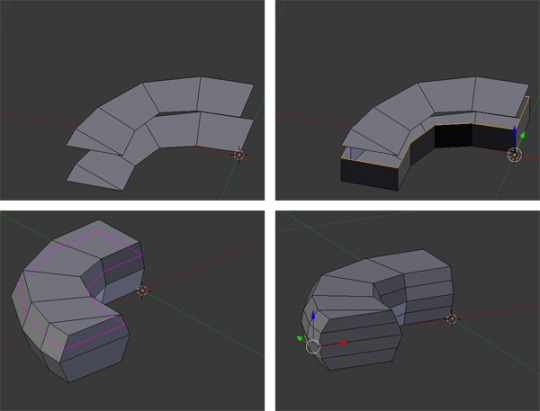 Edit: Sorry I just saw your other reply *was a bit slow haha*. Sadly I don't know much about edge split, I wonder what the problem is. |
|
|
|
Post by Clown Confetti on Nov 21, 2016 15:11:26 GMT -5
'Good idea, never thought about just moving the vertices.. I will try to do that I do mesh from scratch and i learned a lot since a few months of meshing now. But I usually split edges in the end of the mesh and today i realised that doubles the vertices.. Using decimate to get it down messes up the shape.' I see, I got the wrong impression since I was imagining the way I mesh from scratch but people definitely have their different methods :-) Yes, I think manually moving the vertices will help you. You probably already know this but sometimes the mirror modifier (or just duplicating the part after you're done moving stuff around) can help make that easier too, so you don't have to worry about marking and moving the correct parallel vertices on every side of your mesh when you're moving them around. Good luck! :-D |
|
|
|
Post by Clown Confetti on Nov 21, 2016 12:00:07 GMT -5
It helps the more you try meshing from scratch (various methods). If you have full control over the amount of vertices and faces, you can imagine different ways to cut down on them. As for curved parts, it's just a matter of using as few vertices/edges/faces as possible and still manage to produce something that looks curved -- I normally spend some time moving around the vertices of the curve to see where the best place is to put them. I never use tools to decrease the amount of vertices -- I go the other way around, I start meshing as low-poly as possible by hand, and then I use subsurf modifier to smooth the curves out (mostly if I want to render them for other purposes than Sims). :-P
|
|
|
|
Post by Clown Confetti on Nov 19, 2016 13:31:19 GMT -5
Hello guys, my name's Daniel and I'm from Buenos Aires (Argentina). I'm new at this whole thing of creating with Sims 4 Studio and since I can't open my own threads yet, I was wondering if you could give me some guidance. I need to create a necklace but I have no idea on how to do that, as I said I never used this software before. I found this: "Create a new object.package from an existing mesh" but that's not what I want. I don't want to replace an existing element but to create a new one from scratch. Is that possible? Just send me in the right direction and I can go further by my own. Thanks in advance for any tip or suggestion!! Hello! The "Start to finish new mesh accessory for beginners" may help you, find it here in the CAS tutorials section: sims4studio.com/thread/661/index-custom-content-tutorials-poses To make your own things from scratch, you'll need to learn/know how to edit/make meshes in Blender (or other 3D software if preferred), how to create textures in one way or another (there's free image editors if you don't have one), and, with the help of tutorials, find out how to import them into your cloned .packages in S4S. I really recommend reading some tutorials and then playing around with S4S and your 3D editor to learn as you go. :-) |
|
|
|
Post by Clown Confetti on Nov 16, 2016 9:52:31 GMT -5
These are AWESOME! Thank you very much. My husband is a big Boba Fett fan and these are his favorite images. He's super thrilled to have them in my game. Sorry I didn't think to include the size but they are perfect. You're welcome, I'm glad you both enjoy them :-) |
|
|
|
Post by Clown Confetti on Nov 16, 2016 8:07:12 GMT -5
Have you had a look at the CAS CC tutorials here? sims4studio.com/thread/661/index-custom-content-tutorials-poses Making recolours is easier than making new 3D meshes, so there's no reason not to start with recolours unless you specifically want to learn making new meshes first. (Which is fine, I just thought to clarify that since it's not quite clear to me from your post how you see it.) Whether it'll be Maxis Match or not is only up to your personal design sense when you create textures and meshes. If you add alpha to things then they tend to look less M.M., but it's not a certain thing, the most important part is your own understanding of design features in Maxis textures and meshes. :-) For example, they tend to have simplistic and stylised textures rather than using photos as a base. |
|
|
|
Post by Clown Confetti on Nov 15, 2016 17:37:44 GMT -5
I'd recommend starting by editing an EA mesh a little bit (and editing its texture), there are tutorials for this that you can find in the CAS/etc tutorial section. Basically think you'll have to learn to "walk before you run". Use Blender to work on this 3D stuff, because you'll master the program faster and soon be able to do great things if you just focus on that, instead of bringing other programs into the mix. If you make some minor edits to the shape of a mesh (and possibly completely retexture it, or make more major edits to the texture at least) you'll start understanding how everything works. Eventually you'll be awesome because of all your practice and understand how to create your own stuff in any way you like.
That's just my recommendations anyway :-)
|
|
|
|
Post by Clown Confetti on Nov 14, 2016 20:29:53 GMT -5
Hello, I am looking to have some pics turned into painting to hang in game. Is there anyone willing and able? please let me know if the photos don't show up I'm kinda a novice at this. Thank you! Here you go, let me know if it works and if there's any problems. (I'm pretty sleepy so it's possible I made some dumb mistake!) Download: www.simfileshare.net/download/138171/ Since you didn't specify what size painting you wanted I went for a "framed poster" sort of look. It's a new low-poly mesh (only because I wanted to try it, since I haven't made a wall-hanging mesh before). It's one painting with 3 swatches and it should be in the normal painting category. 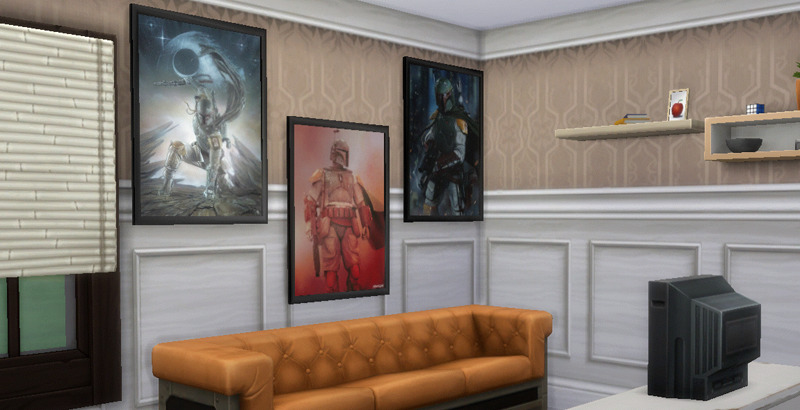  |
|
|
|
Post by Clown Confetti on Nov 14, 2016 17:56:31 GMT -5
I'll do it, will be done before I go to bed.
|
|


